


Please Note: This article is part of our historical archive. Because it was published a while ago, some of the information, links, or context may now be outdated.
A quick look at Google Trends will show you that WordPress hosting is hot, and is getting hotter by the day. Almost all major web hosting providers now offer specialized WordPress hosting plans, and there are web hosts who focus exclusively on WordPress hosting.
In our role as Outsourced hosting support specialists for web hosts, our key priority is to help our customers provide the best managed WordPress hosting for websites, which enables them to be the industry-best WordPress hosting providers.
See how we help WordPress hosting companies

Google Trends – The graph keeps going up and up!
Unmanaged Vs managed WordPress hosting
The rise of WordPress hosting is fueled by webmasters looking for a hassle-free way to setup and maintain a blog under their own domain name. Users don’t want to think about database settings, optimization, upgrades or other complexities that can affect their site popularity.
To tap into this market, the easiest way for an established web host is to re-package their one-click installers (eg., Softaculous, Installatron, etc.) as WordPress hosting solutions.
It allows webmasters to keep their WordPress updated, backed up, and even clone into new sites if needed. This way, the web host doesn’t have to invest in a new technology or method, which allows them to offer the best managed WordPress hosting at a low price tag.
However, this approach allows the user to install any untested plugin or theme on their sites, which can in turn lead to security or performance issues.
The host is responsible only to provide the features and auto-update options. It is up to the webmaster to use those features wisely. The issue with that is, a significant percentage of web owners wouldn’t know what plugins or themes or settings can cause their site to perform poorly.
Managed WordPress hosting goes one step further to take the responsibility of maintaining security, performance and features of WordPress sites hosted on their servers.
The server environment, WordPress software packages, and server settings are optimized for WordPress performance, security and search engine ranking. The most effective way to do this is through WordPress multi-tenant hosting using WordPress multisite network.
[ Use your time to build your business. We’ll take care of your infrastructure. Hire our hosting support experts to maintain your servers secure and stable 24/7 . ]
How to offer the best managed WordPress hosting services
Since WordPress 3.0, multisites or WordPress MU (WPMU) is a part of the default WordPress package. It allows you to run multiple websites on a single WordPress installation.
You can control which themes and plugins each user can access, and what features to give out to each customer. Here’s a quick look at how to enable multi-tenant hosting with WordPress multisite network.
Enable WordPress multisite network
Before we begin, you need to choose a domain name that will serve as the root domain name for all your customers. For example, let’s assume you choose the domain name wpbase.com.
The sites of your clients will then be at domain1.wpbase.com, domain2.wpbase.com, etc., and their real domain names will be transparently mapped to your sub-domains. More on that later. Now, let’s get to the WordPress installation part:
1. Install WordPress on wpbase.com
Install the latest version of WordPress on the document root of wpbase.com (not in a sub-directory). Make sure that mod_rewrite is working on this domain.
2. Enable multi site network
Add the below configuration entry to wp-config.php BEFORE the line that says /* That’s all, stop editing! Happy blogging. */.
define( 'WP_ALLOW_MULTISITE', true );Go to “Tools” –> “Network Setup” in the WordPress admin area. Choose “Sub-domains” option, fill in your site details, and click on “Install”. A list of settings to be put in wp-config.php and .htaccess will be shown in the next screen.
a. Put the displayed wp-config.php settings above the line /* That’s all, stop editing! Happy blogging. */.
b. Put the .htaccess settings displayed on the screen in place of any old WordPress related entries in your .htaccess file.
Now re-login to the WordPress admin area, and you can choose the “Network Admin” mode by going to “My Sites” in the top-left corner.
[ You don’t have to lose your sleep over server errors. Our expert hosting support specialists are online 24/7/365 to help you fix all server errors. ]
3. Install WordPress MU Domain Mapping plugin
As Network Admin, install the plugin WordPress MU Domain Mapping. Once it’s installed, copy the file “sunrise.php” from the new plugin folder and put it under “wp-content”. Now, put the below entry in wp-config.php above the line /* That’s all, stop editing! Happy blogging. */.
define( 'SUNRISE', 'on' );Go to Settings –> Domain Mapping, and enable the settings below:
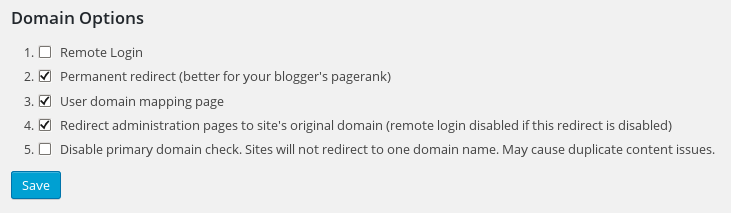
Domain Mapping Configuration screen in WordPress MU Domain Mapping plugin
4. Enable wildcard subdomains for wpbase.com
Wildcard subdomains are needed for you to point your customer’s domains to your multisite WordPress. In my Ubuntu 14.04 server, the following were done to enable wildcard subdomains in Apache web server and BIND DNS server. The process should be similar in your server.
4.a. The Apache configuration for wpbase.com is located at /etc/apache2/conf-enabled/wpbase.conf. In this file, under the “ServerName” line I added a “ServerAlias” entry as shown below:
<VirtualHost 203.0.113.32:80> ServerName wpbase.com. . . </VirtualHost>ServerAlias *.wpbase.com
4.b. The zone file for wpbase.com is located in /var/bind/zones/wpbase.com. A “*.wpbase.com.” entry was added to the zone file as shown below:
wpbase.com. 86400 IN NS ns1.example.com. wpbase.com. 86400 IN NS ns2.example.com. wpbase.com. 14400 IN A 203.0.113.32*.wpbase.com. 14400 IN A 203.0.113.32
Once the configuration is updated, restart both services. Your WordPress is now ready to host new domain names in the same installation.
Add domains to your WordPress multisite network
Let’s say you want to add mycoolsite.com to your multisite network. For this, just three things need to be done. I’ll illustrate by example so that you can do a similar configuration in your server.
1. Point mycoolsite.com to the server IP
My server IP is 203.0.113.32, and I put the below DNS entries in the zone file /var/bind/zones/mycoolsite.com.
mycoolsite.com. 86400 IN NS ns1.example.com. mycoolsite.com. 86400 IN NS ns2.example.com.mycoolsite.com. 14400 IN A 203.0.113.32
2. Add mycoolsite.com to the base domain as a parked domain
In my server the base domain is wpbase.com. So, I append mycoolsite.com to wpbase.com’s Apache configuration:
<VirtualHost 203.0.113.32:80> ServerName wpbase.com. . . </VirtualHost>ServerAlias *.wpbase.com mycoolsite.com
3. Enable domain mapping in WordPress MU
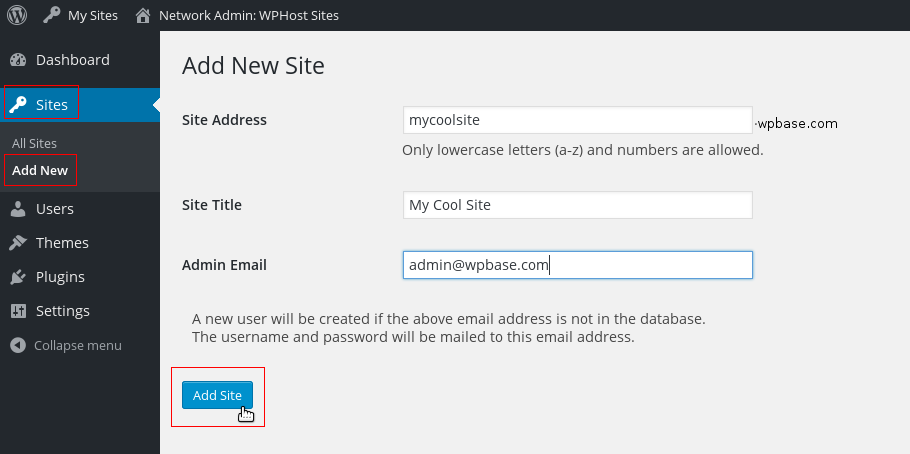
Go to “Sites” –> “Add New” in WordPress admin area as shown below. Fill in the “Site Address” as “mycoolsite”, “Site Title” as “My Cool Site” and admin email as your email. Click “Add Site”.
Now head to “Sites” –> “All Sites” and hover your mouse pointer over “mycoolsite.com”. You’ll see a URL like the one below:
http://wpbase.com/wp-admin/network/site-info.php?id=43Note the number assigned to “id” (here it’s 43).
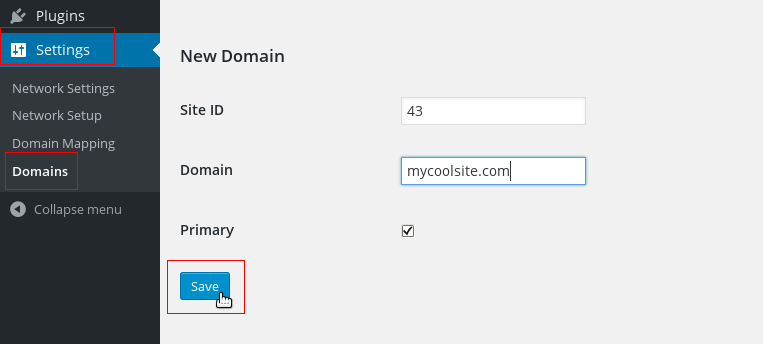
Then go to “Settings” –> “Domains”. Enter the number above in the field “Site ID”, and the customer’s domain (here mycoolsite.com) in the “Domain” field. Click “Save”.
Once you have completed the equivalent configuration in your server, try taking the customer’s site. If everything is working, the core of your WordPress hosting is now live. 🙂
