


Learn how to configure a Static IP Address in Ubuntu 24.04. Our Server Management Support team is here to assist you with any questions or concerns you may have.
How to Configure a Static IP Address in Ubuntu 24.04
Ubuntu 24.04 LTS is a feature-rich release from Ubuntu.
Once we install it, we have to set up the network interface.
By default, Ubuntu typically uses DHCP to obtain an IP address automatically. However, there are situations where setting up a static IP address is preferable, especially for network management and server operations.
A static IP address remains constant across system reboots, ensuring reliable remote access and supporting services that depend on fixed IP addresses. This is important in larger or more complex networks. However, we must be cautious when managing static IPs to prevent IP collisions.
An Overview:
Why Use a Static IP Address?
Here are some of the benefits of using a static IP address:
- Static IPs offer a fixed address for servers and devices, making network management and monitoring easier.
- Devices with static IPs can be accessed remotely without worrying about address changes, ensuring consistent access to network resources.
- Services that require specific IPs can be configured once, reducing the complexity of setup and maintenance.
- Web and Mail Servers require consistent IP addresses for DNS resolution and reliable communication, ensuring website availability and email delivery.
- Static IPs enable secure and reliable connections for users accessing VPNs or remote services.
- Devices like printers and IoT systems benefit from static IPs to maintain consistent service without disruptions.
- It allows administrators to restrict access to known IPs, reducing unauthorized access risks.
- Static IPs make it easier to track network traffic and detect suspicious activities.
- It also enables precise control over traffic, protecting systems from potential threats.
How to Configure a Static IP Address on Ubuntu 24.04
Method 1: GUI Method
Ubuntu 24.04 uses GNOME as its default desktop environment. This offers an interface for managing network settings. Here’s how to configure a static IP address on our Ubuntu desktop:
- To begin, click the network icon in the top-right corner of the screen.
- Then, click the `>` icon next to the Wired or Wireless connection.
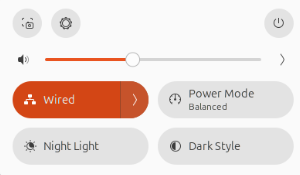
- Now, select the `(Wired) Settings` option to view current network details.
- Next, head to the settings menu and go to the IPv4 tab.
- Then, toggle the IPv4 Method to Manual.
- Now, enter the desired IP address, netmask (usually `255.255.255.0`), and gateway.
- At this point, we can add DNS servers if necessary.
- Then, click the Apply button to save the settings.
- Now, wait for the system to apply the changes. We can verify the updated IP address in the details tab.
Method 2: CLI Method
We can also configure a static IP address through the command-line interface (CLI) with ease. Before we begin, we need a machine running Ubuntu 24.04. and administrative (sudo) privileges.
- First, run this command to list available network interfaces:
nmcli dRemember to note the interface name we plan to configure.
- Then, it is time to edit the Netplan configuration file. Locate the Netplan files in `/etc/netplan/`. It is usually named like `01-netcfg.yaml` or `50-cloud-init.yaml`. Open the file for editing:
sudo nano /etc/netplan/01-netcfg.yamlHere is a sample static IP Configuration:
network:

version: 2

renderer: networkd

ethernets:

bobs4:

dhcp4: no

addresses:

- 192.168.1.10/24

routes:

- to: default

via: 192.168.1.1

nameservers:

addresses: [8.8.8.8, 8.8.4.4]
Remember to replace `bobs4`, IP address, gateway, and DNS entries with the actual network settings.
- After editing, secure the file:
sudo chmod 600 /etc/netplan/01-netcfg.yaml - Now, apply the changes:
sudo netplan apply - Then, confirm that the new IP address has been applied with this command:
ip a
Bonus Content: Here’s a deeper explanation of the Netplan YAML file elements:
- network: Root of the configuration file.
- version: 2: Refers to the YAML format version being used.
- renderer: networkd: Specifies that the `systemd-networkd` service will manage the network settings (ideal for servers). Alternatively, `NetworkManager` is used for desktops.
- ethernets: This section defines Ethernet interface configurations.
- bobs4: Represents the specific network interface name.
- dhcp4: no: Disables automatic IP address assignment.
- addresses: Sets the desired static IP and subnet (CIDR format).
- routes: Specifies the default route or gateway.
- nameservers: Lists DNS servers for domain name resolution.
By correctly configuring these fields, we will see consistent and reliable network behavior on your server.
Method 3: Using `nmcli`
Ubuntu 24.04 also supports setting a static IP via `nmcli`, a command-line tool for managing NetworkManager settings.
- First, list the available network connections with this command:
sudo nmcli con show - Then, it is time to modify the connection settings:
- So, set the static IP with this command:
sudo nmcli con mod connection_name ipv4.addresses desired_ip_address/subnet_prefix - To set the gateway:
sudo nmcli con mod connection_name ipv4.gateway gateway_IP - To set DNS servers:
sudo nmcli con mod connection_name ipv4.dns dns_server_address - Also, set the IPv4 method to manual:
sudo nmcli con mod connection_name ipv4.method manual
- So, set the static IP with this command:
- Then, activate the New Connection:
sudo nmcli con up connection_name - Finally, verify the New IP Address:
ip addr show
Method 4: Using `nmtui`
`nmtui` short for Network Manager Text User Interface Utility, provides a simple, text-based interface for network configuration. It is suitable for quick setups without requiring memorization of long commands.
- First, launch `nmtui;:
nmtui - Then, select “Edit a Connection” and choose the desired network interface, and select “Edit”.
- Now, switch to “Manual” under “IPv4 Configuration”.
- Next, enter the static IP address, gateway, and DNS servers.
- Then, return to the main menu and select “Activate a Connection”. Now, select the modified connection and activate it.
- Now, we can verify the configuration:
ip a
FAQs
Q. Why would I need a static IP address on Ubuntu 24.04?
A static IP address ensures that your system keeps the same IP address even after reboots. This is crucial for servers, remote connections, VPNs, web hosting, and other network-dependent services that require stable communication.
Q. What is the difference between DHCP and Static IP in Ubuntu?
DHCP automatically assigns an IP address each time the system boots, while a Static IP is manually set and remains the same. Static IPs offer greater reliability for servers and remote access, whereas DHCP is better for general, everyday devices.
Q. How do I find my current IP address on Ubuntu 24.04?
You can find your current IP address by running this command in the terminal: “ip a”. Look under your active network interface for the `inet` entry.
Q. What happens if two devices are assigned the same static IP address?
This causes an IP address conflict, which can lead to network connectivity issues for both devices. Always make sure to assign unique static IP addresses within your network range to avoid such conflicts.
[Need assistance with a different issue? Our team is available 24/7.]
Conclusion
Setting a static IP address on Ubuntu 24.04 involves identifying the correct network interface, editing the Netplan configuration file, securing file permissions, and applying the changes. This process ensures that our server maintains consistent and secure network communication.
In brief, our Support Experts demonstrated how to configure a Static IP Address in Ubuntu 24.04.
