


Please Note: This article is part of our historical archive. Because it was published a while ago, some of the information, links, or context may now be outdated.
LXC aka “Linux containers” make virtual server creation easy.
However, often LXC containers quickly fill the root file system to 100% and get into app errors. And, adding additional disk space using LXC LVM method come to rescue here. But, any bad step while adding disk can corrupt the live data.
That’s why, we frequently receive requests to add storage via LXC LVM method as part of our Server Management Services.
Today, we’ll see how our Dedicated Engineers make use of LVM method to add disk space in LXC.
Why LXC LVM method ?
Logical Volume Management or LVM allows much flexibility in LXC disk space management. It allows to simply expand the host’s root file system.
Typically, we suggest customers to maintain one logical volume per container and mount each of those as sub directories of /var/lib/lxc. Moreover, we then rename each of these volume with unique details. Again, this helps to separate the disk of the LXC container from the main server.
Let’s now check on how our Support Engineers added storage to LXC container for one of our customers.
The customer was running LXC containers inside Amazon EC2 instances.
Preparing LXC for disk addition
Usually, we make sure to backup the LXC instance prior to disk addition. This would work as a fall back option in case of any failures in the process.
The options included AMI backup or Volume snapshot of LXC instance. In general, Volume Snapshot will not work for this instance as the customer was using LVM in all his EC2 instances.
The only option was to create an AMI image of EC2 instance for backup of EC2 instance. Therefore, we went ahead with the AMI backup before proceeding the disk extension.
Again, the AMI backup task involves shutting down the instance first. This would avoid any possible anomalies during the backup process.
How we add disk space using LXC LVM method
After backup from the admin panel, we connect to the hardware node server as root user. Here the customer wanted to add 100GB to the LXC instance.
We begin by issuing the command lsblk that lists information about all available block devices on the server. Here, the output show up as :
[root@xxxx centos]# lsblk
NAME MAJ:MIN RM SIZE RO TYPE MOUNTPOINT
xvdc 202:32 0 80G 0 disk
└─xvdc1 202:33 0 80G 0 part
└─VG_LXC-LV_LXC 253:0 0 170G 0 lvm /lxc
xvda 202:0 0 10G 0 disk
└─xvda1 202:1 0 10G 0 part /
xvdf 202:80 0 100G 0 disk
└─xvdf1 202:81 0 100G 0 part
xvdb 202:16 0 100G 0 disk
└─xvdb1 202:17 0 100G 0 part
└─VG_LXC-LV_LXC 253:0 0 170G 0 lvm /lxc
Adding additional 100GB volume to the existing LXC involves the following steps.
1. Create a new physical volume
At first, we create a new physical volume by executing the command:
pvcreate /dev/xvdf1
Physical volume "/dev/xvdf1" successfully created
Further, we use the pvdisplay command to see that the new physical volume shows up correctly.
2. Add a volume group
Now, we need to add the newly created physical volume to the Volume Group. For example, to add /dev/xvdf1 to volume group VG_LXC, we use :
vgextend VG_LXC /dev/xvdf1
Then to confirm the status of the volume group, we execute:
vgdisplay
3. Extend the disk
It’s time now to extend the disk. For this, our Dedicated Engineers execute the command as :
lvextend -L +100G /dev/VG_LXC/LV_LXC
This extends the disk by 100 GB.
Here also, we use lvdisplay command to see the attributes of a logical volume including size, read/write status, etc.
4. Mount
We, then mount the extended volume group and expand the size of the mounted filesystem by using the following steps.
mount
resize2fs /dev/VG_LXC/LV_LXC
Here, for the resize2fs program to work on a mounted file system, the kernel should support on-line resizing.
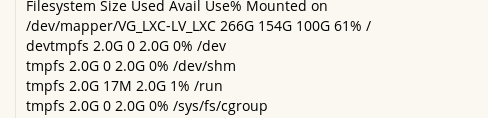
Finally, we confirm that the newly added disk shows up fine using the command:
df -h
The output clearly shows free 100G on the /dev/mapper/VG_LXC-LV_LXC partition.
[Trouble adding disk to LXC using LVM ? We can fix it for you.]
Conclusion
In short, the need for extending disk space often arises in LXC instances. Today, we saw how our Support Engineers use the LXC LVM method to add disk space and fix related errors.
