


Please Note: This article is part of our historical archive. Because it was published a while ago, some of the information, links, or context may now be outdated.
Wondering how to send NXLogs with SSL/TLS to Nagios Log Server? We can help you.
As part of our Server Management Services, we assist our customers with several Nagios queries.
Today, let us see how to set up encryption between Nagios Log Server and NXLog on Windows using self-signed certificates.
Send NXLogs with SSL/TLS
Encryption ensures that the traffic between the Windows machine and Nagios Log Server is not sent in plain text.
- Prerequisites
We already have NXLog on our Windows machine. In other cases, the installation steps and client are available in Nagios Log Server + Add Log Source on the navigation bar.
- SSL = Secure Sockets Layer
- TLS = Transport Layer Security
TLS replaces SSL, however, the tools to implement both use SSL in their name/directives.
The steps here will create a CA and that CA will sign two certificates. This allows Nagios Log Server to use the CA to trust that the certificates the source and destination use are valid.
- Global Config vs Per Instance
Our Support Engineers focus to help create certificate files to use in the Logstash Input we create.
If we define this Input in the Global Config, we will require to place the certificate files on ALL of our Nagios Log Server instances. If we do not, the configuration will NOT be applied to the instances that do not have the certificate files.
This means that the input configuration will never update on these instances.
If we do not wish to implement the certificates on each Nagios Log Server instance, we will need to create the Input as a Per Instance config for the instance that has the certificate files.
Send NXLogs with SSL/TLS to Nagios Log Server
Now, let us see how our Support Engineers create certificates on the NLS. Initially, we establish a terminal session to the Nagios Log Server as root.
Then, we execute the following command:
RHEL|CentOS|Oracle Linux
yum install -y mod_ssl openssl
Debian|Ubuntu
apt-get install -y openssl
The rest will perform from within the root user’s home directory. This is to ensure the files we create are not accessible to anyone except the root user.
Generally, we change into the home directory with:
cd ~
-
Create Certificate Authority
Out first step is to generate the private key file. For that, we execute:
openssl genrsa -out ca.key 2048
It will generate a random text. Then, we will generate a request and sign the key:
openssl req -x509 -new -nodes -key ca.key -sha256 -days 1024 -out ca.pem
We will need to supply some values, some can be left blank.
For instance,
Country Name (2 letter code) [XX]:AU
State or Province Name (full name) []:NSW
Locality Name (eg, city) [Default City]:Sydney
Organization Name (eg, company) [Default Company Ltd]:My Company Pty Ltd
Organizational Unit Name (eg, section) []:
Common Name (eg, our name or our server’s hostname) []:ca
Email Address []:
As we can see, we did not supply an Organizational Unit Name or email address.
-
Create Nagios Log Server Certificate
Now we need to create a certificate for our Nagios Log Server instance(s). Execute the following command:
openssl genrsa -out device-nls.key 2048
It will generate some random text. Then, we will generate a request:
openssl req -new -key device-nls.key -out device-nls.csr
We will need to supply some values, some can be left blank.
For example,
Country Name (2 letter code) [XX]:AU
State or Province Name (full name) []:NSW
Locality Name (eg, city) [Default City]:Sydney
Organization Name (eg, company) [Default Company Ltd]:My Company Pty Ltd
Organizational Unit Name (eg, section) []:
Common Name (eg, our name or our server’s hostname) []:nls
Email Address []:
We make sure to enter the following ‘extra’ attributes:
A challenge password []:
An optional company name []:
As we see above, we did not supply an Organizational Unit Name, email address, password, or optional company name. Specifically, providing a password is not necessary.
Finally, to sign the key, we need to execute:
openssl x509 -req -in device-nls.csr -CA ca.pem -CAkey ca.key -CAcreateserial -out device-nls.crt -days 500 -sha256
Which should produce output saying the Signature was OK and it was Getting Private Key.
-
Create Windows NXLog Certificate
Now we need to create a certificate for the Windows NXLog client. To do it, we execute:
openssl genrsa -out device-nxlog.key 2048
This will generate some random text. Next, we will generate a request:
openssl req -new -key device-nxlog.key -out device-nxlog.csr
We will need to supply some values, some can be left blank.
For example,
Country Name (2 letter code) [XX]:AU
State or Province Name (full name) []:NSW
Locality Name (eg, city) [Default City]:Sydney
Organization Name (eg, company) [Default Company Ltd]:My Company Pty Ltd
Organizational Unit Name (eg, section) []:
Common Name (eg, our name or our server’s hostname) []:nxlog
Email Address []:
We make sure to enter the following ‘extra’ attributes:
A challenge password []:
An optional company name []:
As we can see above, we did not supply an Organizational Unit Name, email address, password, or optional company name. Specifically, providing a password is not necessary.
in the end, to sign the key, execute the following command:
openssl x509 -req -in device-nxlog.csr -CA ca.pem -CAkey ca.key
-CAcreateserial -out device-nxlog.crt -days 500 -sha256
Which should produce output saying the Signature was OK and it was Getting Private Key.
-
Copy New Certificates
We use the following commands to copy the new certificates to the correct locations:
cp ca.key /etc/pki/tls/private/
cp device-nls.key /etc/pki/tls/private/
cp ca.pem /etc/pki/tls/certs/
cp device-nls.crt /etc/pki/tls/certs/
If we plan to create the Input as part of the Global Config, we need to copy these certificate files to all the instances in our Nagios Log Server cluster.
[Need help with certification? Contact us now]
-
Create Firewall Rule
We need to create a firewall rule to allow the incoming TCP traffic. In the terminal session execute the following commands (depending on operating system version):
RHEL 6|CentOS 6|Oracle Linux 6
iptables -I INPUT -p tcp –dport 7777 -j ACCEPT
service iptables save
RHEL 7|CentOS 7|Oracle Linux 7
firewall-cmd –zone=public –add-port=7777/tcp
firewall-cmd –zone=public –add-port=7777/tcp –permanent
Debian:
They don’t enable the local firewall on Debian by default. Otherwise, the commands are:
iptables -I INPUT -p tcp –destination-port 7777 -j ACCEPT
Ubuntu:
They don’t enable the local firewall on Ubuntu by default. Otherwise, the commands are:
sudo ufw allow 7777/tcp
sudo ufw reload
If we plan to create the Input as part of the Global Config, we need to create this firewall rule on all the instances in the Nagios Log Server cluster.
-
Create Input
It creates an Input that uses the certificates and will listen on TCP port 7777.
Log in to one of the Nagios Log Server instances as an Admin user. Then click Configure on the navigation bar.
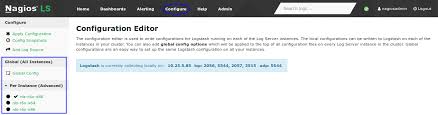
Select one of these options:
- For a Global Config
– In the left pane under Global (All Instances) click Global Config - For a Per Instance Config
– In the left pane under Per Instance (Advanced) click the Log Server Instance which has the certificate files.
The rest of the steps are common to either option.
Subsequently, on the right side of the screen, click the + Add Input button and select Custom.
A new block appears at the bottom of the Inputs table.
Here, type a unique name for the input which will be Windows Event Log (SSL/TLS).
In the text area field we enter the following code:
~~
~tcp {
port => 7777
type => ‘eventlog’
ssl_extra_chain_certs => [‘/etc/pki/tls/certs/ca.pem’]
ssl_cert => ‘/etc/pki/tls/certs/device-nls.crt’
ssl_key => ‘/etc/pki/tls/private/device-nls.key’
ssl_enable => true
ssl_verify => false
codec => json {
charset => ‘CP1252’
}
}
If we have a version of Nagios Log Server before 1.5.0 then the
ssl_extra_chain_certsssl_cacertssl_cacert => ‘/etc/pki/tls/certs/ca.pem’
The
ssl_extra_chain_certsFinally, Save & Apply to create this filter and apply the configuration.
-
Configure NXLog On Windows
We need to copy the CA certificate and the NXLog certificate to the Windows machine:
/root/ca.pem
copied to
C:\Program Files (x86)\nxlog\cert\ca.pem
/root/device-nxlog.crt
copied to
C:\Program Files (x86)\nxlog\cert\device-nxlog.crt
We can do this with a program like WinSCP or we can simply copy the contents of the files and paste them into Notepad on Windows and save the files with the correct filenames.
We can view the contents of a certificate by using the cat command, for example:
cat /root/ca.pem
Once done, open up the C:\Program Files (x86)\nxlog\conf\nxlog.conf file in Notepad. Then, find the section that looks like this and comment it out by adding a # at the beginning of each line:
#<Output out>
# Module om_tcp
# Host 10.25.5.99
# Port 3515
#
# Exec $tmpmessage = $Message; delete($Message); rename_field(“tmpmessage”,”message”);
# Exec $raw_event = to_json();
#
# # Uncomment for debug output
# # Exec file_write(‘%ROOT%\data\nxlog_output.log’, $raw_event + “\n”);
#</Output>
In the example above, the Host 10.25.5.99 line contains the IP Address of the Nagios Log Server. We need this address to use in the new config section that we are going to add next.
The following is the new config section that needs to be put into the
nxlog.conf<Output out> Module om_ssl Host 10.25.5.99 Port 7777 CertFile C:\Program Files (x86)\nxlog\cert\device-nxlog.crt CAFile C:\Program Files (x86)\nxlog\cert\ca.pem AllowUntrusted TRUE Exec $tmpmessage = $Message; delete($Message); rename_field(“tmpmessage”,”message”); Exec $raw_event = to_json(); </Output>
Finally, save the file and close Notepad.
Now we need to restart the
nxlogsc stop nxlog sc start nxlog
-
Verify Incoming Logs
We need to confirm Nagios Log Server receives data from the Windows server navigate to the Dashboards page.
For this, we perform a Query on the host field using the IP Address of the Windows host:
host:<Windows Host Address>
Additional Information:
If we would like to verify that traffic is encrypted, we can verify this by using
tcpdumptcpdumpRHEL|CentOS|Oracle Linux
yum install -y tcpdump
Debian|Ubuntu
apt-get install -y tcpdump
Once done, execute the following command to observe the traffic:
tcpdump -i ens32 -nnvXSs 0 host 10.25.14.91
In here, ens32 is the network interface on the Nagios Log Server and 10.25.14.91 is the IP address of the Windows machine. Here is an example of output before implementing SSL/TLS.
11:40:48.857072 IP (tos 0x0, ttl 128, id 31372, offset 0, flags [DF], proto TCP
(6), length 204)
10.25.14.91.61978 > 10.25.5.99.3515: Flags [P.], cksum 0xc5dc (correct), seq
1015102624:1015102788, ack 1368467930, win 16425, length 164
0x0000: 4500 00cc 7a8c 4000 8006 57c8 0a19 0e51 E…z.@…W….Q
0x0010: 0a19 0555 f21a 0dbb 3c81 3ca0 5191 29da …U….<.<.Q.).
0x0020: 5018 4029 c5dc 0000 7b22 4576 656e 7452 P.@)….{“EventR
0x0030: 6563 6569 7665 6454 696d 6522 3a22 3230 eceivedTime”:”20
0x0040: 3137 2d30 342d 3138 2031 313a 3430 3a34 17-04-18.11:40:4
0x0050: 3422 2c22 536f 7572 6365 4d6f 6475 6c65 4″,”SourceModule
We can see on the right-hand side the plain text such as “EventReceivedTime”:”2020-12-25.11:40:44″.
Here is an example of output after implementing SSL/TLS.
11:47:07.228206 IP (tos 0x0, ttl 128, id 1497, offset 0, flags [DF], proto TCP
(6), length 274)
10.25.14.91.54713 > 10.25.5.99.7777: Flags [P.], cksum 0x3ac9 (correct), seq
4122608981:4122609215, ack 932892309, win 16074, length 234
0x0000: 4500 0112 05d9 4000 8006 cc35 0a19 0e51 E…..@….5…Q
0x0010: 0a19 0555 d5b9 1e61 f5ba 0555 379a ce95 …U…a…U7…
0x0020: 5018 3eca 3ac9 0000 1703 0100 204b f03e P.>.:……..K.>
0x0030: a312 5aa3 efc2 3cea 5830 4c8c 2983 f47a ..Z…<.X0L.)..z
0x0040: dc67 3524 7961 dfb4 73de c64e b517 0301 .g5$ya..s..N….
0x0050: 00c0 459c 61e3 b309 b963 b3ab 599c 0b55 ..E.a….c..Y..U
0x0060: 221b c8dd 41e7 ffac 1b7a 6ba9 b5df 0dc5 “…A….zk…..
0x0070: b902 827c 8076 5b83 7f6c 79f8 e57c ea6c …|.v[..ly..|.l
0x0080: b628 e274 aa64 1b58 3348 39c2 856d 79ab .(.t.d.X3H9..my.
0X0090: 1cc7 a825 016d 5b96 e155 4f6c 2b69 4fae …%.m[..UOl+iO.
0X00a0: 3704 d9f3 6302 39a9 fd4c 5020 839b 324f 7…c.9..LP…2O
We can see on the right-hand side the data is encrypted and cannot be understood.
[Stuck with the procedure? We’d be happy to assist]
Conclusion
To conclude, encryption ensures that the traffic between the Windows machine and Nagios Log Server is not sent in plain text. Today, we saw an effective way our Support Techs employ in order to send NXLogs with SSL/TLS to Nagios Log Server.
