


Please Note: This article is part of our historical archive. Because it was published a while ago, some of the information, links, or context may now be outdated.
OK. So, I started off writing this post explaining why SSL is important and how Google considers HTTPS as a ranking signal, but then I realized no one really needs a pitch on why secure website access is important. So, let’s get right to the meat of the matter.
WordPress multisite is used by managed WordPress hosts and developers to efficiently manage hundreds of websites with minimal maintenance overhead. Today we’ll see:
- How SSL can be enabled in a WordPress network, and
- How to force SSL on all pages.
Enabling SSL in a WordPress multisite domain
There are 3 major challenges involved in enabling SSL on a WPMU domain.
- The website should load under it’s own domain name, and not as a sub-domain of the primary domain.
- It should either have its own dedicated IP, or be hosted in a SNI (Server Name Indication) enabled web server.
- It should have a certificate issued to the domain name.
In previous posts we’ve already covered how to enable WPMU domain mapping and how to choose SNI enabled web servers. So, I’m going to assume you’ve already taken care of those.
Installing a dedicated certificate
That leaves us with the question of getting a certificate. The best solution is to get a dedicated certificate for the domain. You can get certificates for as low as $9/yr, or even get free ones from StartCom, CAcert and Let’s Encrypt.
To get a ceritificate, you’ll need to submit a Certificate Signing Request. Here’s how you can generate one in your Linux server.
Step 1 – Create a certificate key
root@wp:/etc/apache2/ssl/domain3.com# openssl genrsa -des3 -out domain3-com.key 2048
 Generating RSA private key, 2048 bit long modulus
 ..+++
 .....................+++
 e is 65537 (0x10001)
 Enter pass phrase for domain3-com.key:
 Verifying - Enter pass phrase for domain3-com.key:
Step 2 – Create a CSR
root@wp:/etc/apache2/ssl/domain3.com# openssl req -new -key domain3-com.key -out domain3-com.csr
 Enter pass phrase for domain3-com.key:
 You are about to be asked to enter information that will be incorporated into your certificate request.
 What you are about to enter is what is called a Distinguished Name or a DN.
 There are quite a few fields but you can leave some blank
 For some fields there will be a default value,
 If you enter '.', the field will be left blank.
 -----
 Country Name (2 letter code) [AU]:US
 State or Province Name (full name) [Some-State]:Arizona
 Locality Name (eg, city) []:Phoenix
 Organization Name (eg, company) [Internet Widgits Pty Ltd]:Bobcares
 Organizational Unit Name (eg, section) []:Server Management
 Common Name (e.g. server FQDN or YOUR name) []:domain3.com
 Email Address []:support@bobcares.com

 Please enter the following 'extra' attributes
 to be sent with your certificate request
 A challenge password []:
 An optional company name []:
Step 3 – Remote the pass phrase from the certificate key
root@wp:/etc/apache2/ssl/domain3.com# mv domain3-com.key domain3-com.key_bak
 root@wp:/etc/apache2/ssl/domain3.com# openssl rsa -in domain3-com.key_bak -out domain3-com.key
 Enter pass phrase for domain3-com.key_bak:
 writing RSA key
Here I’ve generated a CSR for a 2048 bit certificate for domain3.com, and then I removed the pass phrase from the key in step 3. Send the CSR to your chosen certificate authority and they will give you a matching certificate. Note that Google recommends a certificate strength of at least 2048 bits, but you can get an HTTPS connection even with a 256 bit certificate.
If you do not want to spend time or money on an external CA certificate, you can create a self-signed certificate. However, note that it will show a certificate warning in browsers.
root@wp:/etc/apache2/ssl/domain3.com# openssl x509 -req -days 365 -in domain3-com.csr -signkey domain3-com.key -out domain3-com.crt
Signature ok
subject=/C=US/ST=Arizona/L=Phoenix/O=Bobcares/OU=Server Management/CN=domain3.com/emailAddress=support@bobcares.com
Getting Private key
Assuming you have an Apache server, you can use the below configuration to configure the domain SSL using the new domain certificate.
<VirtualHost 203.0.113.32:443>
 ServerName domain3.com
 ServerAlias *.domain3.com
 DocumentRoot /var/www/wpbase
 SSLEngine on
 SSLCertificateFile /etc/apache2/ssl/domain3.com/domain3-com.crt
 SSLCertificateKeyFile /etc/apache2/ssl/domain3.com/domain3-com.key
  <Directory /var/www/wpbase>
 Options +Indexes +Multiviews
 AllowOverride All
  </Directory>
</VirtualHost>
Here Apache uses SNI (Server Name Indication) to share the server IP 203.0.113.32 with all the domains in WordPress multisite. Note that the DocumentRoot points to /var/www/wpbase which is the document root for the primary multisite domain wpbase.com. So all HTTPS access will be directed to the WordPress installed in wpbase.com, but the certificates will be taken from the unique certificate repository.
Enabling shared SSL
If you do not want to install a dedicated certificate for the domain, you can let it share the certificate of your primary domain (which will show a warning in browsers). For that, just declare the SSL VirtualHost configuration of your primary domain before any of the other domains. By default Apache chooses the first SSL VirtualHost configuration. So, if you do not have a certificate for domain3.com, Apache will just go and use the certificate for wpbase.com.
Forcing SSL on WordPress multisite domains
An older trend was to use HTTPS only for certain parts of the site like store, cart, admin page, etc., but with Google’s HTTPS Everywhere pitch, webmasters now favor SSL on all their pages. To enable SSL by default on all your multisite domains, you can use the Really Simple SSL WordPress plugin.
Install it from your network admin area, and activate it for your entire network.

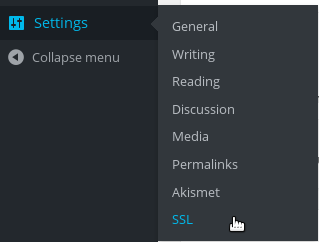
Once, it is activated, each site owner can go to Settings –> SSL to enable HTTPS on all their domain pages.
If you are looking for more fine grained control over which all pages to enable SSL, and which all domains to be given this feature, you can try using WordPress HTTPS (SSL), but the development of this plugin is currently stalled, and it may not work on your WordPress installation.
The Really Simple SSL plugin is due to release a new version soon where you can control which all domains can enable HTTPS. When it is available, you can upsell HTTPS as an additional service.
Conclusion
HTTPS is fast becoming industry standard for all websites, and as a WordPress service provider you should have a way to provide SSL for your WordPress multisite domains. With an SNI enabled web server and an multisite compatible WordPress plugin you can easily deliver this facility to your customers.
Bobcares helps WordPress developers and service providers configure their infrastructure and keep their servers secure and responsive.
SEE HOW WE HELP ONLINE SERVICE PROVIDERS
