


Get help from our Vultr Support team and learn to use the Vultr API to provision instances quickly for a smooth cloud setup.
How to Connect Vultr with vCanopy and Provision an Instance Easily
Cloud work feels easier when your platform is fast, simple, and dependable. Vultr offers that balance with quick deployment, steady performance, and room to grow. Teams use it to run apps, AI tasks, and development setups without interruptions. This guide highlights why Vultr is a smart choice and explains how to connect it with vCanopy for easy server management.
What Makes Vultr a Smart Cloud Choice
Vultr provides a fast and reliable way to deploy cloud servers, storage, and managed services across its extensive global network. Many teams that scale quickly use its flexible infrastructure to clone Vultr server setups across regions, which helps them maintain consistency and speed during expansion. Users run apps, AI models, and development environments without delay because it provides a wide range of compute and storage options.
The platform supports virtual CPUs, GPU instances, bare metal servers, and managed databases that fit both small projects and high-demand workloads. Its simple dashboard and API help teams manage resources with ease while keeping performance steady for users everywhere.
Step-by-Step: Linking your Vultr Account to vCanopy
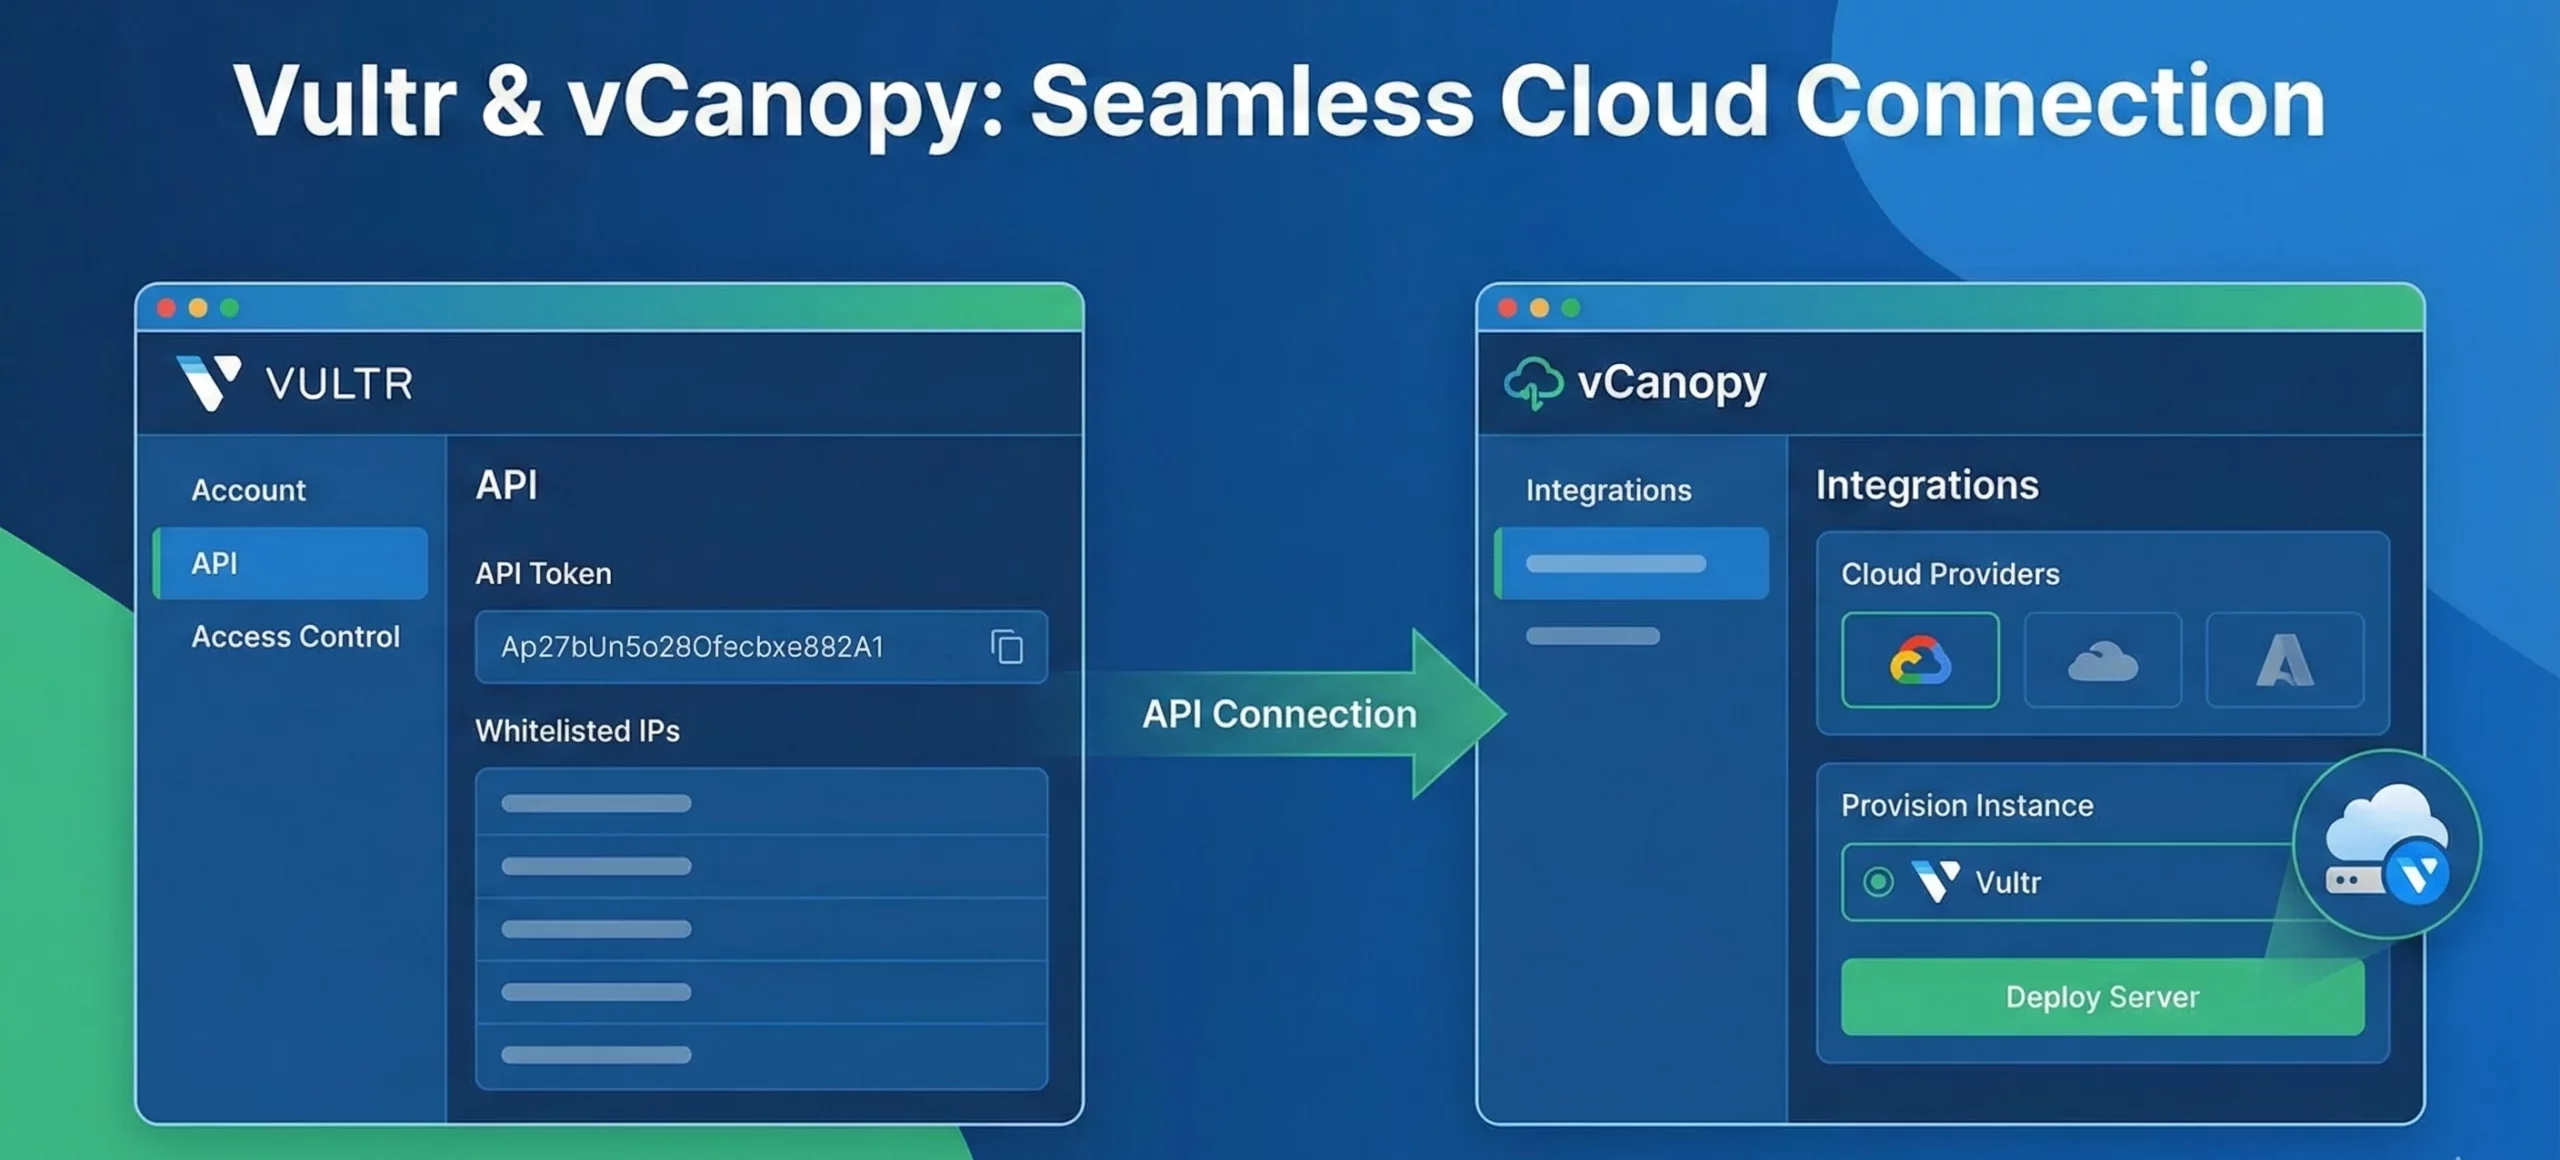
Step 1. Log in and enable the Vultr API
- Sign in to your Vultr account.
- From the dashboard, go to Account → API.
- Click the “Enable API” button under Personal Access Token.
- Copy the API token shown — you will need this later.
Step 2. Set API Access Control (whitelist IPs)
- On that same API page, locate the “Access Control” or “IP Whitelisting / IP Address Whitelisting” section.
- Add the IP addresses of vCanopy’s servers (or whichever third-party tool you use) to the whitelist. This ensures only those IPs can use your API token.
- If vCanopy provides specific IPs (for example, 35.199.11.215, 130.211.115.235, 35.245.53.150), add each as a separate entry. Many integrations use exactly these addresses.
Need quick help with Vultr setup

Step 3. Add the Vultr API token to vCanopy
- Log in to your vCanopy dashboard.
- Go to the settings or integration section where you manage cloud providers.
- Choose Vultr, then paste the API token you copied earlier. Name the key appropriately and save the configuration.
Step 4. Create a server (instance) via vCanopy using Vultr
- From vCanopy’s server-provisioning or cloud-provider section, select Vultr.
- Configure server details: name, region, plan, operating system, and any optional settings like backups or database preference (if vCanopy offers database provisioning).
- Start the provisioning; vCanopy will use the token and whitelisted IPs to call Vultr’s API and create the server.
Step 5. Monitor setup and deploy your site
- Watch the provisioning progress in vCanopy dashboard.
- Once server status is active, you can deploy your application (for example, a WordPress site) through vCanopy.
Step 6. Manage the server as needed
- You can use vCanopy to start, stop, restart, or delete your Vultr instance.
- If you need to change the API token or revoke access, you can safely update or delete the key inside Vultr and vCanopy.
Key Features of Vultr
- Offers flexible compute options, including cloud compute, high-frequency instances, bare metal servers, and GPU-powered machines for AI and other heavy tasks.
- Provides storage choices such as block storage, object storage, and a high-throughput file system, along with snapshots and automated backups.
- Delivers strong security through DDoS protection, private networking, firewalls, load balancers, and SSH key access.
- Supports managed services including a Kubernetes engine, managed databases, one-click apps, startup scripts, and custom operating system uploads.
- Includes a simple control panel, full API access, and team management tools that benefit from global routing improvements powered by Anycast Vultr for faster edge performance.
Conclusion
With the Vultr API, provisioning an instance becomes a straightforward part of your workflow. vCanopy adds comfort and clarity to the process, helping you launch and manage your servers with less effort. Together, they create a setup that supports your projects and keeps your cloud work moving smoothly.
