


Please Note: This article is part of our historical archive. Because it was published a while ago, some of the information, links, or context may now be outdated.
As per a recent Netcraft web server survey, Microsoft IIS web server powers about 30% of the internet. This shows that Microsoft technologies still enjoy a loyal following among business owners. So, it is no surprise that all cloud service providers offer Windows servers as an important part of their service offering.
In a previous post, we covered how we used oVirt to build a high ROI cloud hosting solution. Today, we’ll take a look at how Windows support was enabled in this cloud and how VM templates were used to provision Windows cloud instances in just 20 minutes.
See how our WHMCS oVirt plugin helps you!
Windows VMs in oVirt – Challenges and solutions
In the oVirt cloud system we setup, low provisioning time was an important service feature. Usually, Windows server provisioning takes anywhere from 1-2 hours depending on the server components requested, and the size of the order queue. We wanted to bring this down to less than 20 minutes.
We found that a lot of time was lost in installing custom server components and performing post-install setup, such as IP provisioning, license activation, network setup, backup configuration, etc. In our new oVirt cloud design, we decided to use Windows VM templates and automate initial server setup to reduce the time for deployment.
We created templates for different operating system and application combinations. For eg., there were templates created for Windows 2008 R2 + MSSQL, Windows 2012 R2 + Plesk, etc., that catered to the different categories of customers. These templates also had optimized firewall settings, optimized server settings, etc., so that time need not be spent in post-install setup. The templates were created using basic resource allocation, so that at the time of deployment, it was only a matter of entering the right resource numbers as per the customer’s order. Usage of templates in itself cut down the deployment time from 2 hours to less than 45 mins.
To reduce the provisioning time even further, we created scripts to automate IP configuration, DNS configuration, backup configuration, etc., so that manual effort was minimized to just launching the scripts. This additional step reduced the provisioning time to 20 minutes.
Here’s how we went about it.
[ Looking for custom plugins to manage your portals? Contact us to get tailor-made plugins to serve your business purposes. ]
Installing and configuring Windows 2008, 2012 and applications
To make different templates, first the Windows VMs needed to be created. For that, ISO images of all operating systems were loaded into an ISO storage using the engine-iso-uploader utility in oVirt engine server.
[root@ovirt-m1 home]# engine-iso-uploader -i ISO_DOMAIN upload /home/Windows_Server_2008_R2.iso
Please provide the REST API password for the admin@internal oVirt Engine user (CTRL+D to abort):
Uploading, please wait...
INFO: Start uploading /home/Windows_Server_2008_R2.iso
INFO: /home/Windows_Server_2008_R2.iso uploaded successfully
Once all the images were uploaded, new VMs were created by going to “System” –> “Data Centers” –> “Clusters” –> “VMs” –> “New VM”. This brought an interface like the one here, where the kind of operating system and resource limits were specified:
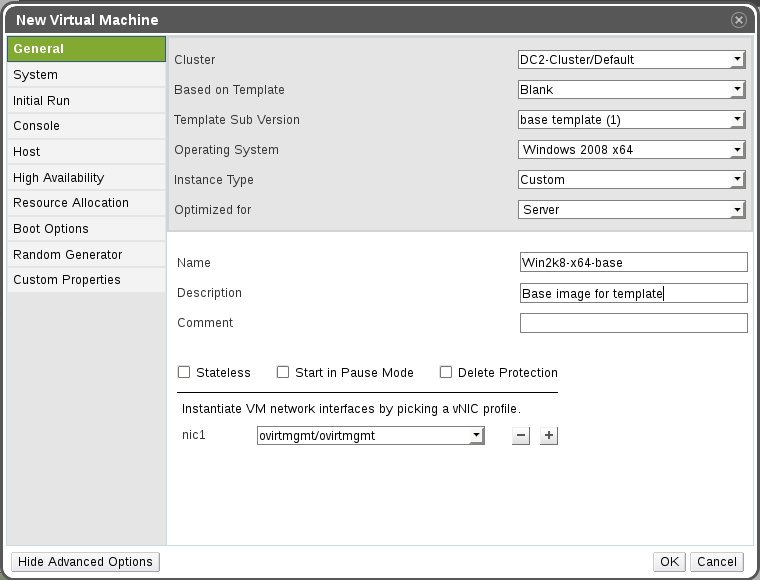
Windows 2008 installation in oVirt
The next step was to add a disk to the server, which was done using the “Configure Virtual Disk” utility (shown immediately after the new VM creation). An important setting in the disk configuration is the “Interface” setting. The default setting for this is “VirtIO“.
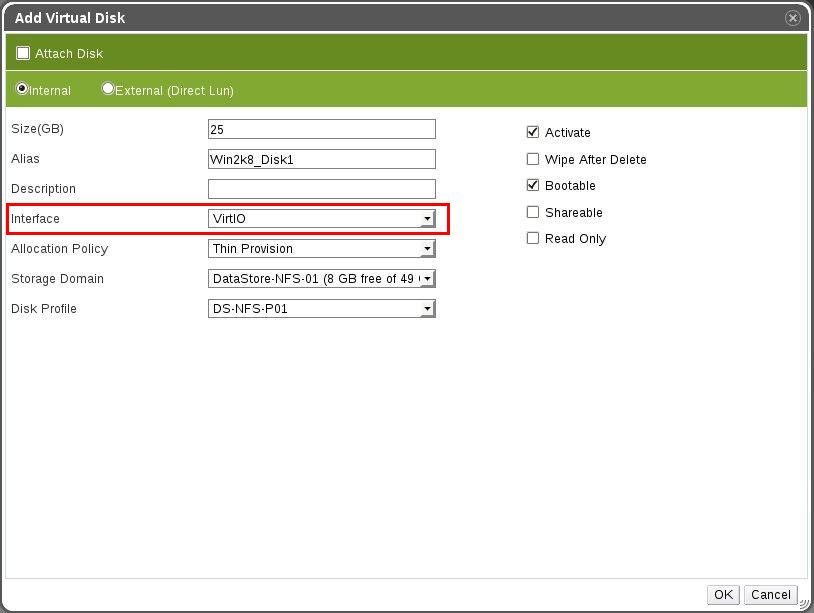
Choose VirtIO interface for Windows 2008 in oVirt
oVirt recommends the use of VirtIO for their disk and network interfaces. This is because, a VirtIO interface tells the Windows operating system that it is not a real disk or a real network card, but a virtual entity. This allows the Windows operating system to handle data much faster.
[ Looking for the WHMCS plugin to manage your oVirt interface? Get our WHMCS plugin for oVirt management here. ]
BUT, there’s a catch. Additional VirtIO device drivers need to be installed in the Windows operating system for this to work. Here’s how we did it:
Installing VirtIO drivers
Before we could go further, VirtIO drivers needed to be downloaded. We obtained them from fedorapeople.org. The VirtIO-Win ISO images were uploaded to the oVirt ISO domain, and the installation was resumed.
To start the actual installation process, we selected the new VM, and launched the “Run Once” utility. In that interface, the Windows ISO was chosen, and CD was marked as the first boot device. Then the OS installation was then started, and monitored using the “Console” utility in the VM menu.
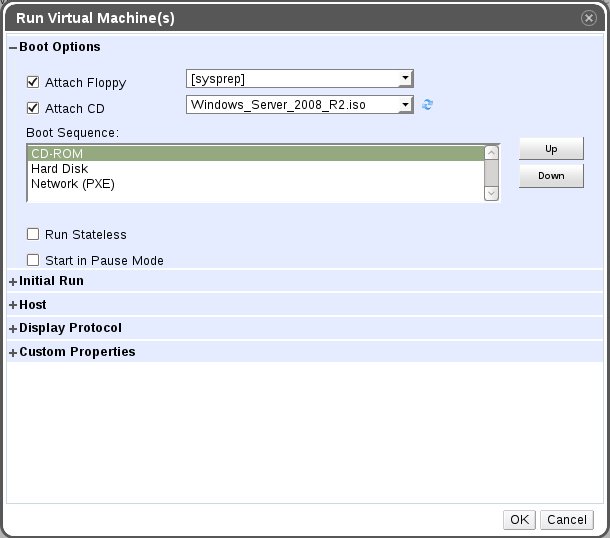
Windows installation using Run Once in oVirt
The installation progressed smoothly until Windows tried to locate the hard disk. It couldn’t find any, and showed this error:
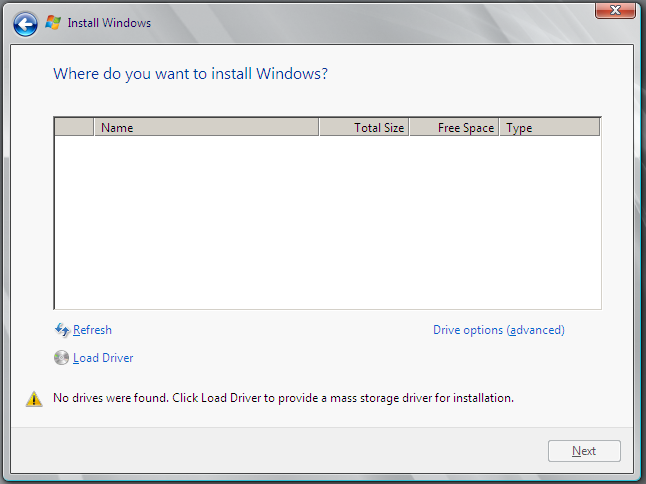
Windows cannot detect hard disk. Load driver action is shown.
At this point, the CD of the VM was changed by clicking on the “Change CD” utility, and the VirtIO-Win ISO image was loaded.

Load VirtIO-Win CD
Then the “Load Driver” action was used in the Windows installation interface, and the appropriate driver was loaded.

Install VirtIO-Win driver
The CD was then changed back to Windows ISO, and the rest of the installation then went along perfectly fine.
Creating Windows server templates
Once we had a working Windows VM, we configured firewall settings, optimized the settings for the data center environment and installed all the updates. Then the VM was sealed, shutdown, and a template was made based on it using the “Make Template” utility in “System” –> “Data Centers” –> “Clusters” –> “VMs”.
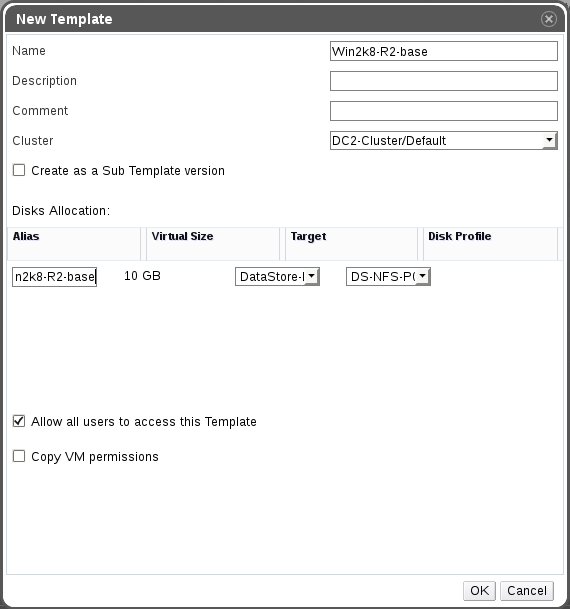
Create template using Windows VM
Copies of the base VM was then used as a base to install and configure several popular applications like MS SQL, Odin Plesk, IIS, FTP and Mail server. Several templates were then created using these application combinations. For eg., we created several variations of Windows 2008 R2 servers such as Windows 2008 + MS SQL, Windows 2008 + IIS + Mail, Windows 2008 + Plesk, etc. The same steps were repeated for Windows 2012.
All of these templates were created using the basic resource allocation, so that at the time of provisioning, we only needed to increase the resource settings as per the customer order. Windows post-installation setup scripts were included in the template, which allowed us to finish network configuration, backup configuration, etc. within a matter of 5 minutes.
As Windows and other applications released new versions, post-install updates could take longer to complete. So, we setup a template review mechanism by which templates were updated with latest patches at least once a month, so that post-install updates were minimal, and were completed in less than 10 minutes.
All these steps together gave us a Windows provisioning system in oVirt cloud, which allowed us to send cloud customers a setup-complete mail within 20 minutes or placing an order.
Fast provisioning is a core feature in any cloud hosting solution. Here we’ve covered how quick Windows VM provisioning was implemented for an oVirt cloud system. Bobcares helps cloud providers, data centers and web hosts deliver industry standard cloud services through custom configuration and preventive maintenance of cloud systems.
