


Please Note: This article is part of our historical archive. Because it was published a while ago, some of the information, links, or context may now be outdated.
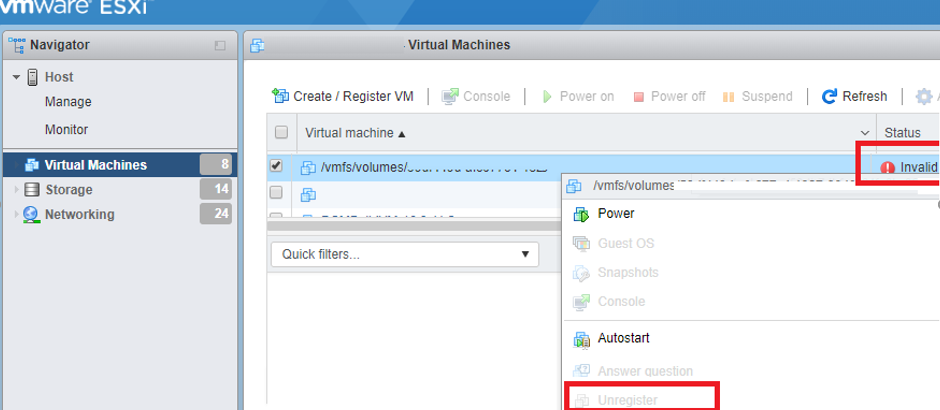
Invalid State of a Virtual Machine on VMWare ESXi generally triggers when we delete a virtual machine and the data remain in the VMWare vSphere/ESXi configuration for some reason.
As part of our Server Management Services we assist our clients with similar errors of the virtual machines.
Today, let’s find out the causes and effective solutions suggested by our Support Team.
Invalid State of a Virtual Machine on VMWare ESXi
As we mentioned earlier, this error might occur due to data that remain in the VMWare vSphere/ESXi configuration. In addition, this can happen after we manually remove VM files from the VMFS storage after running vMotion.
In these cases, we will not be able to delete a VM from vSphere Web Client using the built-in tools.
Symptoms:
We may see one or more of these errors when trying to start a virtual machine:
Could not power VM, no swap file, failed to power on VM.
A general system error occurred. The system returned on error. Communication with the virtual machine may have been interrupted.
In this article, let us see what invalid virtual machines are, how they occur, and some effective solutions our Support Techs suggests.
Causes of ‘Invalid State of a Virtual Machine on VMWare ESXi’
In vCenter Server, an “orphaned” virtual machine is one that exists in the vCenter Server database but no longer present in ESX host inventory.
An “invalid” virtual machine is a VM that is inaccessible because the ESXi host is offline or inaccessible, the VM configuration file is locked or corrupt or contains a bad option, etc.
In the case of an orphaned virtual machine, we need to either re-register or remove the VM from inventory.
To re-register a virtual machine, we navigate to the VM’s location in the Datastore Browser and re-add the VM to inventory. To remove an orphaned VM from inventory, we right-click the VM and choose “Remove from inventory.”
In the case of invalid virtual machines there are many potential causes and it requires additional troubleshooting.
Let us now focus on the most common causes our Support Techs have come across.
-
ESXi host not responding or disconnected
We ensure that the ESXi host is accessible and available in the vCenter Server inventory. If the host is “Disconnected” or “Not responding,” all VMs on that host will be unavailable to vCenter.
-
VM configuration file is locked
To verify this, we navigate to the VM’s directory in the Datastore Browser for the appropriate datastore. We should see the VM configuration file (.vmx file) listed. If the icon for this file is a blank page instead of the VM icon, it can be a cause.
To verify that this is the case, we run the
vmfsfilelockinfoAfter the remedy, we need to remove the VM from inventory and r-register or reload it.
-
VM configuration file is missing
If the VM configuration file is missing, the VM will be “invalid” in the vCenter inventory.
To verify that this has occurred, we navigate to the VM’s directory in the Datastore Browser for the appropriate datastore.
If there is no VM configuration file with the “.vmx” extension and other files are available (logs, disks, etc.), then the file may need to be recreated.
After recreating the VM configuration file, the VM will need to be removed from inventory and reregistered or reloaded.
-
VM configuration file contains invalid options or text errors
If the VM configuration file is present, and the ESXi host is available in vCenter Server’s inventory, the VMX may have become corrupt or contain invalid options or text errors.
Most frequently, this will be missing quotation marks, invalid end-of-line, or an option that is not valid.
To determine the exact cause of the invalid option or text error we follow the below steps:
- Reload the VM configuration.
- Check the host management agent log file by viewing /var/log/hostd.log
# tail -n50 /var/log/hostd.log - We should see messages that indicate the reload failure.
For example:info hostd[18267520] [Originator@6876 sub=vm opID=vim-cmd-61-609d user=root] File “/vmfs/volumes/5c182b95-ac4a587e-65f1-90b11c24698d/testVM/testVM.vmx” line 6: Syntax error. info hostd[18267520] [Originator@6876 sub=Vmsvc.vm:/vmfs/volumes/5c182b95-ac4a587e-65f1-90b11c24698d/testVM/testVM.vmx opID=vim-cmd-61-609d user=root] Failed to load virtual machine - If there is a “syntax error” listed, there is a fault in the VM configuration file.
Examine the file and ensure that there are no issues with quotation marks, corrupt entries, invalid options, etc. - After correcting the file, reload the VM again and determine if it returns to normal.
If it does not, we repeat this process to identify any additional faults.
-
VMware Tools Installation or Update
When we try to install or update VMware Tools, VM could also get into an invalid state.
The only way to remove such a VM is to use the SSH console of the ESXi host.
- Enable SSH on the ESXi host with the problem VM (Actions -> Settings -> Security Profile -> Services -> SSH -> Edit -> Start)
- Connect to the ESXi host using SSH client (Putty, mputty, etc.)
- To get the ID of the problem virtual machine, we run this command:
vim-cmd vmsvc/getallvms | grep invalid - A list of all VMs with the Invalid status registered on this host will be displayed. There should be a string like: Skipping invalid VM ’22’. In this case, 22 is the ID of the virtual machine
- To try and restore this VM in vSphere, we run the command:
vim-cmd vmsvc/reload 22 (in a minute refresh the client interface and check the VM status) - To unregister (delete) a problem virtual machine, we run the following command:
vim-cmd /vmsvc/unregister 22 - 7. Refresh the vSphere client interface. The virtual machine with the Invalid status should disappear.
Also, to delete the problem VM manually from the host configuration file /etc/vmware/hostd/vmInventory.xml, delete the section containing the data of the problem VM from the vmInventory.xml file (backup the file before doing anything) in a text editor and restart the host services:
services.sh restart
[Need a helping hand with the process? We are available 24*7!]
Resolve running virtual machine with invalid status
If a running virtual machine gets the Invalid status, it is likely that the VM configuration file is corrupted.
To resolve the issue we follow the below steps:
- Remove the VM from the inventory and restart the ESXi host
- Then, create a new VM and connect the virtual disks (vmdk) of the old VM to it (Use an existing disk)
- Perform Storage vMotion to collect all files of the new VM in a single folder
- Start new VM and make sure that it works
- Finally, delete the files of the old VM
If the problem of the Invalid VM appear after losing access to VMFS storages, we will have to manually remove them from the inventory and manually register them.
To do that we have to find the VMX file of a virtual machine in the VMFS storage, right-clicking it and selecting Register VM. Then, start the VM and make sure that it is available.
[Still stuck with the error? Contact us now!]
Conclusion
In short, Invalid State of a Virtual Machine on VMWare ESXi, is an error VMWare administrators face. This article outlines the most common errors that relate to orphaned virtual machines and how our Support Engineers tackle it.
