


Please Note: This article is part of our historical archive. Because it was published a while ago, some of the information, links, or context may now be outdated.
SSL certificates are costly. Or, used to be.
Now, website owners have a free, totally reliable option to setup HTTPS for their websites : Let’s Encrypt
Let’s Encrypt is a Certificate Authority that provides valid SSL certificates for free.
The downside is that, it can be a bit hard to setup – especially if you’re new to command lines.
However, here’s help.
Here at Bobcares, we manage thousands of Nginx servers as part of our job as a Server Management Company.
We’ve tried almost all methods to setup Let’s Encrypt in NginX, and today we’ll take a look at the most simple 4-step way to do it.
But before that, let’s take a quick look at how Let’s Encrypt issues an SSL certificate.
How Let’s Encrypt issues certificates
Unlike some other SSL companies who asks for business registration details, etc., Let’s Encrypt only requires you to prove that you are the legitimate owner of a domain.
It can be done in these two ways:
- You have access to the domain’s HTTP document root.
- You can edit the DNS of the domain.
In most cases, we choose the first method as all webmasters have access to their domain’s files. This method works in 4 steps:
- Your server tells Let’s Encrypt server that it needs a certificate for your-domain-name.com
- Let’s Encrypt then sends back a file and asks it to be put in the location http://your-domain-name.com/.well-known/FILE. This is to prove that you are an authorized owner of the domain.
- Once you’ve put the file, you’ll need to create a CSR (Certificate Signing Request) and send it to the Let’s Encrypt server.
- Let’s Encrypt verifies all of that, and sends back the new Certificate. It should then be included in the Nginx settings.

The Let’s Encrypt client process runs with “root” privileges, which is possible only for the domain owner.
Now, let’s take a look at how this can be done in Nginx.
Setting up Let’s Encrypt in NginX server
Let’s Encrypt accepts certificate requests and issues certificates in a language known as ACME (Automated Certificate Management Environment).
So, the first task is to get a software that can communicate in ACME protocol.
One script that we use frequently is Electronic Frontier Foundation’s Certbot.
So, the first step is to install Certbot.
1. Install Certbot
CertBot needs a lot of packages in it’s latest version for it’s proper functioning. So, first update all your packages with:
# yum -y update
Then, install the EPEL (Extra Packages for Enterprise Linux) repository, to provide the latest Python packages for CertBot.
# yum -y install epel-release
Note : If your server is custom configured, an upgrade might break your website. If you suspect something like that, click here to consult our NginX expert.
Then, we installed and configured Certbot. CertBot is available in CentOS 7 EPEL repositories. So, if you’re on CentOS 7, install CertBot with:
# yum -y install certbot
If you are on CentOS 6, you need to download and make the program executable by:
# wget https://dl.eff.org/certbot-auto
# chmod 755 certbot-auto
If you are using an Ubuntu / Debian server, install CertBot using:
# add-apt-repository ppa:certbot/certbot
# apt-get update
# apt-get install python-certbot-nginx
2. Create certificate using Certbot
At this point, let’s assume that you’ve already setup a working domain.
As an example, we’ll take the domain name “blog.bobcares.online”.
The configuration file for “blog.bobcares.online” is located at : /etc/nginx/conf.d/blog.bobcares.online.conf.
Now, generate the certificate using:
# certbot --nginx -d blog.bobcares.online
Replace “blog.bobcares.online” with your domain name.
A screen like this will be shown:
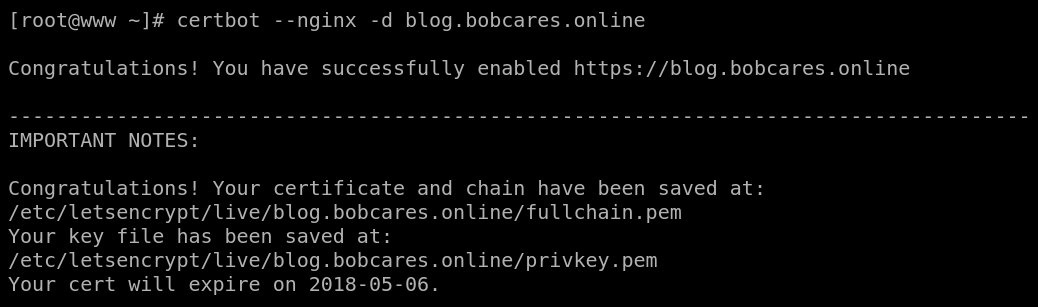
Your Nginx configuration file at /etc/nginx/conf.d/<domain-name>.conf will be automatically re-configured for SSL by CertBot by adding these lines:
listen 443 ssl; # managed by Certbot

# RSA certificate
 ssl_certificate /etc/letsencrypt/live/blog.bobcares.online/fullchain.pem; # managed by Certbot
 ssl_certificate_key /etc/letsencrypt/live/blog.bobcares.online/privkey.pem; # managed by Certbot

include /etc/letsencrypt/options-ssl-nginx.conf; # managed by Certbot

# Redirect non-https traffic to https
 if ($scheme != "https") {
 return 301 https://$host$request_uri;
 } # managed by Certbot
What if this doesn’t work?
In some servers, we’ve seen that the automatic Cert creation fails due to permission issues, network issues or other such errors.
In such cases, we take the cert generation step by step.
For example, we skip automatic Nginx reconfiguration, and just get the certificate using the command:
certbot certonly --webroot -w /var/www/blogbob -d blog.bobcares.online
Then we check the logs to see a successful ACME challenge like this:
[root@www ~]# awk '$7~/acme-challenge/ {print $1,$4,$7,$9,$11}' /var/log/nginx/access.log

66.133.109.36 06/Feb/2018:06:52:38 /.well-known/acme-challenge/XQE2Py_9isaJTQ_QU1poWu3UJYBJwYCkxS3DwlCxAeg 200
 (Let's Encrypt validation server; +https://www.letsencrypt.org)
A “200” status message means that our request was accepted, and the certificate files are created in “/etc/letsencrypt/live/blog.bobcares.online” folder.
The domain will then need to be manually re-configured for SSL like this:
server {
 listen 443 ssl;
 server_name blog.bobcares.online;
ssl_certificate /etc/letsencrypt/live/blog.bobcares.online/fullchain.pem;
ssl_certificate_key /etc/letsencrypt/live/blog.bobcares.online/privkey.pem;
}
At this point, the Let’s Encrypt configuration is complete, and if you’ve replaced “blog.bobcares.online” with your domain name, your site should show an HTTPS cert like this:
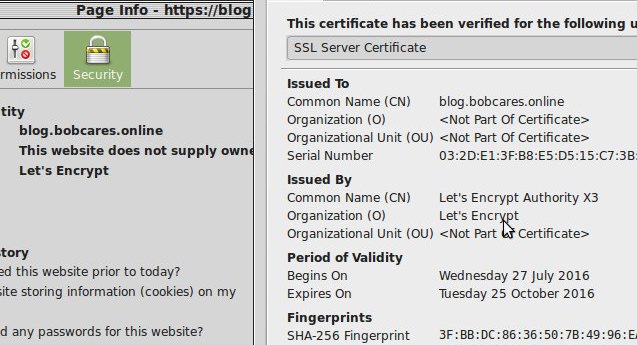
Secure connection with Let’s Encrypt
If it didn’t work as mentioned here, the certificate generation will need to be analyzed and troubleshooted.
Click here to open a support request to our Nginx experts. We are online 24/7.
3. Renew the SSL certificate
Let’s Encrypt certificates expires after 90 days. So its good to set an automatic renewal of the SSL by adding a cron job that runs :
certbot renew --quiet
This will ensure that the certificate is renewed before it expires, thereby ensuring continuing security for the website.
Possible issues with Let’s Encrypt setup
Here is a sneak peak into the issues that may arise, which can hinder the smooth SSL setup.
- Domain not resolving to the server – We need to make sure that the domain is resolving correctly to the server and the DNS records are set correctly.
- Package installation failure due to dependency errors – The conflicts during package installation have to be fixed by installing the relevant versions from the correct repositories.
- Domain not loading in the browser – The NginX configuration files should be updated correctly with the document root, SSL file locations and proper permissions set on them.
In short..
Let’s Encrypt is a free SSL provider, but setting up a cert for Nginx can be tricky. Today, we saw how we setup free TLS certificates provided by Let’s Encrypt Certification Authority in an automated way using Certbot in a server that runs NginX web server. Bobcares helps online businesses of all sizes achieve world-class security and uptime, using tried and tested solutions. If you’d like to know how to make your server more reliable, we’d be happy to talk to you.
