


Learn how to set up pfSense multi site-to-site VPN with OpenVPN. Our pfSense Support team is here to answer the queries and concerns.
How to Set Up pfSense Multi Site-to-Site VPN with OpenVPN
Our Experts recommend setting up a pfSense multi site-to-site VPN with OpenVPN to securely connect multiple remote offices or branch locations over the internet.
Instead of relying on expensive leased lines, this setup leverages pfSense firewalls and the OpenVPN protocol to create encrypted tunnels between sites, enabling seamless communication as if they were on the same local network.
Today, we will walk through the process of building a multi-site VPN using pfSense and OpenVPN, with examples and real-world performance insights.
An Overview:
What Is a Multi Site-to-Site VPN?
A multi site-to-site VPN connects more than two locations in a secure, point-to-point manner. In a pfSense setup, one site typically acts as the OpenVPN server, while the other locations connect as clients. This allows all offices to route traffic between each other securely and efficiently.
Need a basic walkthrough first? Here’s how we easily set up a pfSense site-to-site VPN.
Here are the key components:
- pfSense: An open-source firewall with advanced VPN capabilities.
- OpenVPN: A secure, flexible VPN protocol supported by pfSense.
- Site-to-Site VPN: A connection between network gateways that allows full network access between remote sites.
- Multi Site: Multiple VPN connections to various locations using one pfSense server.
Sample Network Setup
Let’s take a real-world example of three sites, Site X, Site Y, and Site Z, connected via a combination of OpenVPN and IPSec.
Here is the VPN Tunnel Configuration:
- Site X: OpenVPN Server (UDP 14447 and 14448)
- Site Y: OpenVPN Client (10.10.10.0/16)
- Site Z: OpenVPN Client (10.10.11.0/16), also uses IPSec to connect with Site Y
Here is the internet connection speed:
- Site X connection: 1Gbps UP/DOWN
- Site Y connection: 100Mbps UP/DOWN
- Site Z connection: ADSL 20Mbps DOWN / 5Mbps UP
Performance Test:
- SITE X – SITE Y OpenVPN download test: ~10MB/s
- SITE X – SITE Y IPSec download test: ~2MB/s
While IPSec worked without routing errors, it was significantly slower. To address this, the plan is to implement a complete OpenVPN setup across all sites by configuring a second WAN IP at Site Y.
Step-by-Step: Configuring Site-to-Site VPN with OpenVPN on pfSense
If you’re new to OpenVPN on pfSense, we recommend reviewing this guide to setting up OpenVPN on pfSense before diving into multi-site configurations.
Site X – OpenVPN Server Configuration
- First, go to VPN > OpenVPN > Servers and click +Add.
- Here are the basic settings:
- Server Mode: Peer to Peer (Shared Key)
- Device Mode: tun
- Interface: WAN
- Local Port: 1194 (or another unique port)
- Shared Key: Auto-generate
- Tunnel Network: `192.168.100.0/30`
- Remote Network: `192.168.2.0/24` (Site Y’s LAN)
- For encryption, enable NCP and choose algorithms: AES-128-CBC or AES-128-GCM.
- Now, save the configuration.
- Then, add a firewall rule on the WAN interface with the following settings:
- Protocol: UDP
- Source: Any
- Destination Port: 1194
- Next, add a firewall rule on the LAN interface with the following settings:
- Source: LAN net
- Destination: 192.168.2.0/24
- Destination port: any
This allows traffic from the LAN to the network of site Y.
- Finally, we have to add a firewall rule on the OpenVPN interface with these settings:
- Source: network – 192.168.2.0/24 (the local network of the site Y)
- Destination: LAN net
- Destination port: any
This allows traffic from the network of site Y to the LAN.
Site Y – OpenVPN Client Configuration
- First, go to `VPN > OpenVPN > Clients` and click +Add.
- Here are the basic settings:
- Server Mode: Peer to Peer (Shared Key)
- Protocol: UDP
- Device Mode: tun
- Server Host: Public IP of Site X
- Server Port: 1194
- Shared Key: Paste the key from Site X
- Tunnel Network: `192.168.100.0/30`
- Remote Network: `192.168.1.0/24` (Site X’s LAN)
- Save the configuration.
- Then, add a firewall rule on the LAN interface with these settings:
- Source: LAN net
- Destination: 192.168.1.0/24
- Destination port: any</li
- Next, add a firewall rule on the OpenVPN interface with these settings:
- Source: 192.168.1.0/24
- Destination: LAN net
- Destination port: any
Running into connection issues like TLS errors? This guide on troubleshooting TLS read errors in pfSense OpenVPN can help you further.
How to Verify the VPN Connection
- Go to Status > OpenVPN on both pfSense routers.
- The connection should display as UP, showing IP addresses and traffic statistics.
- Test connectivity using ping from one site to the other.
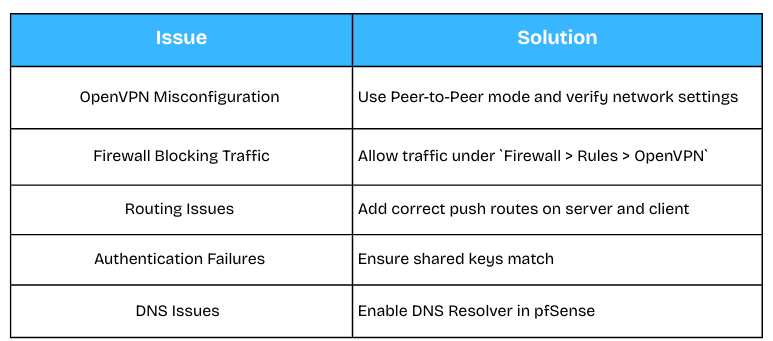
If the test was unsuccessful, check Firewall rules, OpenVPN logs, Shared key match, and correct routes.
If you’re stuck during hostname resolution, see this troubleshooting guide for when OpenVPN cannot resolve host address.
Troubleshooting Tips
[Need assistance with a different issue? Our team is available 24/7.]
Conclusion
Setting up a pfSense multi site-to-site VPN with OpenVPN is a cost-effective and scalable way to connect remote offices.
In brief, our Support Experts demonstrated how to set up pfSense multi site-to-site VPN with OpenVPN.
