


Please Note: This article is part of our historical archive. Because it was published a while ago, some of the information, links, or context may now be outdated.
KVM is a Linux virtualization technology that’s used in many virtualization solutions such as Proxmox, Virtualizor and SolusVM. All major Linux systems like RedHat, CentOS, Debian and Ubuntu have in-built support for KVM.
Bobcares helps VPS providers and server owners setup and maintain virtualization systems through our Server Management services. A common error found during the initial setup of KVM is “Could not access KVM kernel module“.
Today we’ll take a look at the different causes for this error, and how to fix it.
What is the error ‘Could not access KVM kernel module’?
If the KVM module is not enabled in the system due to some reason, it will show the error message ‘Could not access KVM kernel module: No such file or directory‘.
The error message happens during instances like starting a VM in Proxmox VE:

‘Could not access KVM kernel module error’ when starting a Proxmox VM
The same error can be shown while executing other KVM related tasks such as taking VM backups. For eg. here’s an error from Proxmox KVM virtual machines.

‘Could not access KVM kernel module’ error during backup in Proxmox
What causes the error ‘Could not access KVM kernel module’ in Proxmox, Virtualizor, Redhat, CentOS and Ubuntu.
The error ‘Could not access KVM kernel module‘ can occur due to 3 many reasons:
1. CPU does not have virtualization support
For KVM module to work, the CPU of the machine should have virtualization support enabled.
Using ‘lscpu’ command helps to verify whether the CPU supports hardware virtualization:

Confirm if processor support virtualization
The given result is for AMD processor. In machines with Intel processor, this virtualization extension name would be shown as Intel VT.
If there is no virtualization support for your processor, then KVM will not work at all in that machine.
GET YOUR SERVER INSTANCES MANAGED BY THE EXPERTS!
2. KVM modules not loaded into the kernel
If the CPU supports virtualization, then check whether the KVM modules are loaded into the kernel. Missing kernel modules can cause the error ‘Could not access KVM kernel module’.
To check if the KVM modules are being loaded, list them using the command:
lsmod | grep kvm
If the module is not listed, try loading the kernel modules for KVM – kvm and kvm_amd / kvm_intel – using ‘modprobe’ command:

Load the KVM modules
The module ‘kvm_amd’ is applicable for AMD processors whereas ‘kvm_intel’ is to be loaded for Intel processors.
If the modules are successfully loaded, it will display the modules in ‘lsmod’ output, as shown in the snippet.
3. Virtualization support is not enabled in the BIOS
By default, the virtualization support may not be enabled by all CPU vendors. In such cases, the ‘modprobe kvm’ command will work but ‘modprobe kvm_amd’ will give error.
To check if the virtualization support is disabled in the BIOS, check the ‘dmesg’ output after executing the modprobe command.
If virtualization is disabled in BIOS, it will display the message:

KVM module not enabled in BIOS
In such scenarios, we must edit the BIOS settings and enable virtualization support. We’ll see how to do that in both AMD and Intel processors.
How to enable virtualization in BIOS
1. How to fix error ‘Could not access KVM kernel module’ in AMD BIOS
To fix the error due to lack of virtualization support in BIOS for AMD processors, first restart the machine and access the system BIOS.
Then go to Advanced Settings -> CPU configuration.
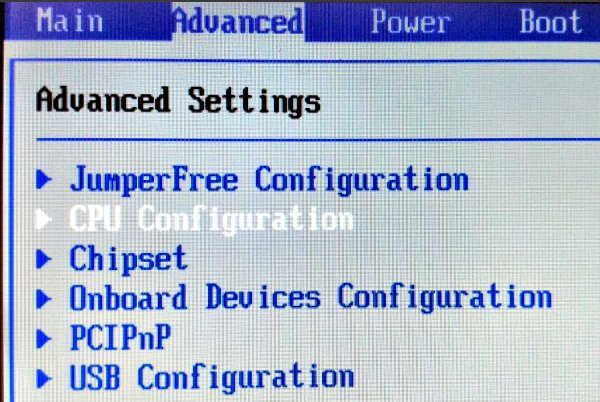
Enable the ‘Secure Virtual Machine Mode’ and save the settings.

Enable virtualization support in AMD BIOS
Restart the machine and now the Virtualization support is enabled in the system BIOS.
2. How to fix error ‘Could not access KVM kernel module’ in Intel BIOS
If you’re running Intel processors, the procedure to enable Virtualization in BIOS is similar, but options are slightly different.
In the section “Advanced” -> “Chipset Control” or “CPU Configuration”, choose the option named “Intel Virtualization Technology” or “Intel VT-x” or “Virtualization Extensions”:

Enable virtualization support in Intel BIOS
Enable the option. Save the settings and restart the machine. Now the system would have virtualization support enabled.
[ Are your spending too much time managing your server instances? Our expert engineers will take care of your server virtualization infrastructure and fix the errors instantly. ]
Fixed: Error ‘Could not access KVM kernel module’
You can see that the error ‘Could not access KVM kernel module’ is now fixed. The VM started fine in Proxmox VE without errors, as seen:
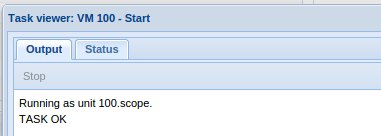
KVM successfully started after fixing the error
The VM backup also got completed without any errors:

Backup successful after fixing the error ‘Could not access KVM kernel module’
[ Managing your Proxmox server infrastructure doesn’t have to be hard, or costly. Get world class server virtualization management services at affordable pricing. ]
In short..
Today we’ve see the reasons why the error ‘Could not access KVM kernel module’ happens in Proxmox KVM instances and how to fix them.
Though the scenario we discussed here is based on Proxmox machine, the same fix is applicable in other KVM based machines such as Virtualizor, Redhat, CentOS and Ubuntu too.
We also give recommendations to server owners on how to manage their server resources effectively. If you’d like to know how to do it for your servers, we’d be happy to talk to you.

Really helpful! Thank you very much.
my libvertd servier is is running
but showing ibelow error
internal error: QEMU / QTP failed: could failed to initialize KVM module : No such file or directory
Hello Kamlesh,
It looks like a problem with the module loading. If you still have the error and need help, we’ll be happy to talk to you on chat (click on the icon at right-bottom).