


Deploy and optimize Juniper vMX on KVM with easy setup and high-performance tips. Our KVM Support team is ready to assist you.
Juniper vMX on KVM
Juniper vMX lets you run high-performance virtual routers on standard Linux hosts. Deploying vMX on KVM combines reliable virtualization with flexible network testing. This guide covers everything from preparing your host and converting vMX images to creating virtual machines and optimizing performance for lab or evaluation purposes.
Prerequisites for vMX on KVM
Before installing vMX, ensure your host meets hardware, OS, and software requirements. For hardware, you need a 64-bit Intel or AMD CPU with virtualization enabled in BIOS. Lite mode requires at least 5 GB RAM, while performance mode needs 16 GB. Storage should provide at least 40 GB for the Virtual Control Plane and 4 GB for the Virtual Forwarding Plane.
Supported operating systems include Ubuntu 18.04 or 16.04, RHEL 7.7 or 7.5, and CentOS 7.2. Install KVM, QEMU, and libvirt packages, along with networking tools like bridge-utils. For optimal performance, configure kernel parameters such as Huge Pages and enable SR-IOV if using high-speed NICs.
Preparing Your KVM Host
First, confirm that your CPU supports virtualization by running egrep -c ‘(vmx|svm)’ /proc/cpuinfo. Enable VT-x or AMD-V in BIOS if necessary, and ensure KVM modules load correctly.
Install essential packages using your package manager. For Ubuntu, run sudo apt install qemu-kvm libvirt-daemon-system libvirt-clients bridge-utils virtinst. For CentOS or RHEL, use sudo yum install qemu-kvm libvirt virt-install bridge-utils.
Enable the libvirtd service, add your user to the kvm and libvirt groups, and configure network bridges for your VMs. Temporarily disable SELinux or AppArmor enforcement to prevent permission issues that could cause a KVM error during setup.
Converting vMX OVA to QCOW2
vMX OVA files are TAR archives containing VMDK disk images and OVF configuration files. Extract the OVA using tar -xvf your_vmx_file.ova.
KVM uses QCOW2 images for better performance. Convert the VMDK files with:
qemu-img convert -O qcow2 <extracted_vmdk_file.vmdk> <your_new_image.qcow2>This conversion prepares your virtual disk for efficient use with virt-install or virt-manager.
Creating a vMX Virtual Machine
Deploy your vMX VM using virt-install. Start with the Virtual Control Plane (VCP):
virt-install --name vMX-VCP --memory 4096 --vcpus 2 --disk path=/var/lib/libvirt/images/vcp.qcow2,format=qcow2,bus=virtio --network bridge=br-mgmt,model=virtio --import --noautoconsoleNext, create the Virtual Forwarding Plane (VFP):
virt-install --name vMX-VFP --memory 8192 --vcpus 4 --disk path=/var/lib/libvirt/images/vfp.qcow2,format=qcow2,bus=virtio --network bridge=br-internal,model=virtio --network bridge=br-wan1,model=virtio --import --noautoconsoleAdjust memory, CPU, and network bridges according to your deployment needs. Start both VMs with virsh start <VM-name> and confirm their status with virsh list –all.
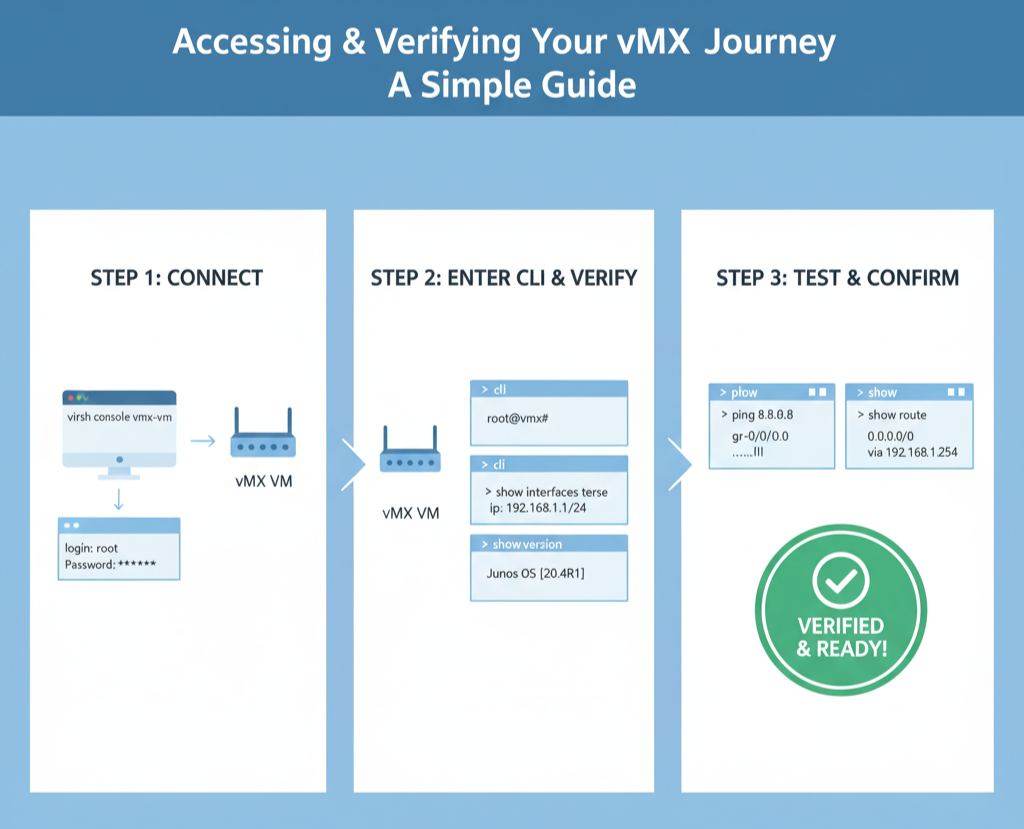
Accessing and Verifying Your vMX VM
Connect to the VM console using virsh console <VM-name>. Log in with the default root account or your configured credentials. Enter the Junos CLI by typing cli.
Verify interfaces and IP assignments with show interfaces terse. Confirm the Junos OS version using show version and test network connectivity by pinging configured IPs. Check routing with show route to ensure proper traffic flow.
Optimizing vMX Performance
For best throughput, apply your vMX license using the CLI. Enable performance mode to allocate more resources to the VFP:
set chassis fpc 0 performance-modeConfigure FPC ports to match your deployment, adjusting port numbers and speeds as required. Set loopback devices for control and management traffic to maintain stability. When using a KVM hypervisor, leverage SR-IOV and dedicate all VFP vCPUs to a single NUMA node for high-bandwidth scenarios.
[Need assistance with a different issue? Our team is available 24/7.]
Conclusion
Deploying Juniper vMX on KVM enables flexible and high-performance virtual networking. By following proper preparation, installation, and optimization steps, you can ensure reliable operation and maximize throughput for lab, testing, or evaluation environments.
In brief, our Support Experts demonstrated how to fix the “554 5.7.1 : Relay access denied” error.
