


Please Note: This article is part of our historical archive. Because it was published a while ago, some of the information, links, or context may now be outdated.
Magento store owners are always in search of speeding up their website stores.
Fortunately, LiteMage Magento cache module helps to give a real ‘edge’ in Magento website performance. It makes Magento faster by serving the pages quickly from the cache.
However, problems in LiteSpeed LiteMage license, improper layout setting, etc. may deter proper LiteMage module caching.
That’s why, at Bobcares, we often get requests from our customers to install Magento Litemage module as part of our Server Management Services.
Today, we’ll see how our Support Engineers properly set up Litemage and fix related errors.
Why Magento LiteMage cache?
It’s time now to check how LiteMage cache works in making store faster.
From our experience, we’ve seen that Magento works even faster with web servers like LiteSpeed.
The LiteMage is a specially designed cache module for LiteSpeed to improve website performance. Also, it is faster than any other module with a web server like Nginx with Varnish, and even Apache with Varnish.
Moreover, LiteMage cache both static content and Magento-specific dynamic content. Therefore, it dramatically enhances the site speed.
Also, integrating LiteSpeed with LiteMage into a Magento server is an easy method.
On the whole, the major benefits of Magento LiteMage cache includes:
- Faster page loading
- Static and dynamic caching.
- Provides SSL support
- Offer Anti-DDoS protection
- Need minimal resources
- Supports multi-store, multi-currency, and multi-user groups
- Easy to configure
How we Install and Configure Magento LiteMage Cache
We just learned the benefits of LiteMage cache.
Let’s see the 2 distinct methods that our Support Engineers use to install Magento LiteMage cache.
We begin by checking the LiteMage cache support in LiteSpeed license of hosting server. For a server having LiteSpeed license with LiteMage extension, the Configurable Options of License show up as:

1. Install and Configure Magento LiteMage via command line
For Magento 2 LiteMage installation, our Support Engineers follow the steps below.
1. Initially, we log into the server as a root user.
2. Then, we switch the directory where Magento is installed.
cd /home/username/public_html/magento
3. We set Magento developer mode by using the following command.
php bin/magento deploy:mode:set developer
4. After that, we download LiteMage plugin files and extract it
wget https://github.com/litespeedtech/magento2-LiteSpeed_LiteMage/archive/master.zip

unzip master.zip
5. Next, we create a directory for the LiteMage plugin and move the LiteMage plugin files to the new directory by using the following commands.
mkdir -p app/code/Litespeed/Litemage

mv magento2-LiteSpeed_LiteMage-master/* app/code/Litespeed/Litemage/
6. To enable the LiteMage plugin, we use the below command.
php bin/magento module:enable Litespeed_Litemage
7. After that, we run the below command to make the plugin settings available to the Magento Admin panel.
php bin/magento setup:upgrade
8. Once we recompile Magento, we switch the developer mode to production mode.
php bin/magento deploy:mode:set production
9. At last, we enable the LiteMage module. For that, we open .htaccess file under the domain document root to add the following lines.
<IfModule Litespeed>
LiteMage on
</IfModule>
Activate LiteMage in Magento admin panel.
Further, we need to activate LiteMage from Magento panel too. For this,
1. We login to Magento admin panel.
2. Then, we click on stores > Configuration.
3. Next, we go to Advanced > System > Click Full page cache.
4. From the page Caching Application, we select LiteMage Cache within LiteSpeed Server.
5. Again, we click save config.
6. Then, we select System > Cache management to check the box near to Configuration and Page Cache
7. Finally, we select Refresh and click Submit button.
2. How we Install LiteMage via Magento Connect Manager
1. Firstly, we download the latest version of the LiteMage extension package and then log into the Magento Admin Panel. This requires disabling compilation in Magento admin panel.
2. Next, we go to System > Configuration > Web then set Use SID on front-end to No.
3. After that, we need to login into Magento Connect Manager with Magento admin panel password. To log in, we go to System > Magento Connect > Magento Connect Manager.
4. We go to Direct package file upload and select the downloaded LiteMage package and upload it. Again, click Return to Admin.
5. Now, we log back into the Magento Admin Panel and select System > Configuration > LiteMage Configuration.
6. We select General Settings and set up Enable LiteMage Cache to Yes.
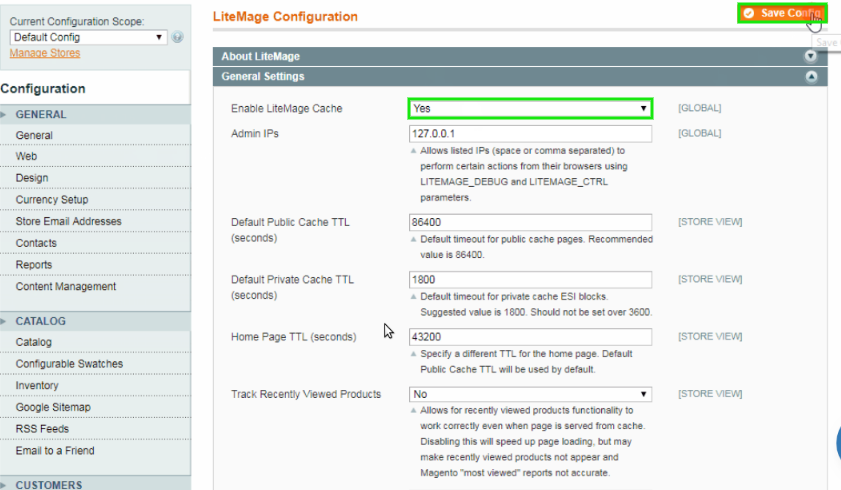
7. Next, we click the Save button.
8. At last, we select System > Cache management and check the box next to Configuration and click the Submit button to refresh the configuration cache.
Here, we toggle the compilation setting once again.
How we fixed common errors related to LiteMage Magento
Sometimes, customers may experience errors related to LiteMage Magento due to different reasons. The top reasons include:
- When LiteSpeed license does not have the support for LiteMage module
- Magento installation’s .htaccess file does not contain the “LiteMage on” line
- If the web hosting company have disabled LiteMage feature the account.
Now, let’s see the real-time errors and how our Support Engineers fixed it.
1. Improper layout setting
Recently, one of our customers had an issue with LiteSpeed LiteMage cache. The LiteMage cache did not work after he installed it on the Magento website.
On checking, our Support Engineers found the header of the website page did not contain
X-LiteSpeed-Cache: hit,litemageIn addition, we found
cacheable="false"code/Mageplaza/SocialLogin/view/frontend/layout/customer_account_create.xml: <block class="Mageplaza\SocialLogin\Block\Popup\Authentication\Social" before="-" name="social-login-popup-authentication-social-create" ifconfig="sociallogin/general/is_enabled" template="Mageplaza_SocialLogin::form/social.phtml" cacheable="false"/>
So, we solved this issue by removing
cacheable=“false”As a result, LiteSpeed LiteMage cache started working properly. We confirmed this by verifying the field
X-LiteSpeed-Cache: hit,litemage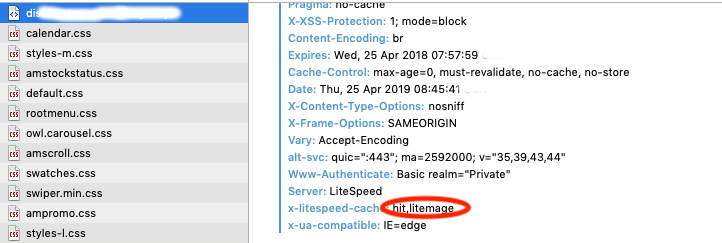
2. Web server switch
Similarly, often web server switches cause problems with LiteMage cache. By default, LiteMage cache do not work with any web server other than LiteSpeed.
For instance, one of our clients reported intermittent problems with LiteMage on his Magento website. Additionally, LiteMage was shutting down often.
On a detailed check, our Support Engineers found that the web server was automatically switching from LiteSpeed to Apache. This caused the LiteMage to shut down because of the incompatibility with Apache.
Hence, we set up a LiteSpeed web server monitoring system to verify that LiteSpeed is up and running on the hosting server.
[Having trouble while installing LiteMage in Magento? We’ll fix it for you.]
Conclusion
In short, LiteMage Magento is a specially designed cache module for LiteSpeed to improve website performance. However, LiteMage cache can fail due to reasons like improper layout setting, automatic web server switching, etc. Today, we saw how our Support Engineers fixed these LiteMage Magento errors.
