


Windows 11 VMware Workstation Player 17 setup guide for easy VM installation and use. Our VMware Support team is ready to assist you.
Windows 11 VMware Workstation Player 17 Setup
You can run Windows 11 and other operating systems on a single computer using the Windows 11 VMware Workstation Player 17 configuration. It provides easier file transfers, increased security, and improved performance. Detailed instructions for installing VMware and configuring a Windows 11 virtual machine are provided in this guide. To find out how to do it, continue reading.
Key Features of Windows 11 VMware Workstation Player 17
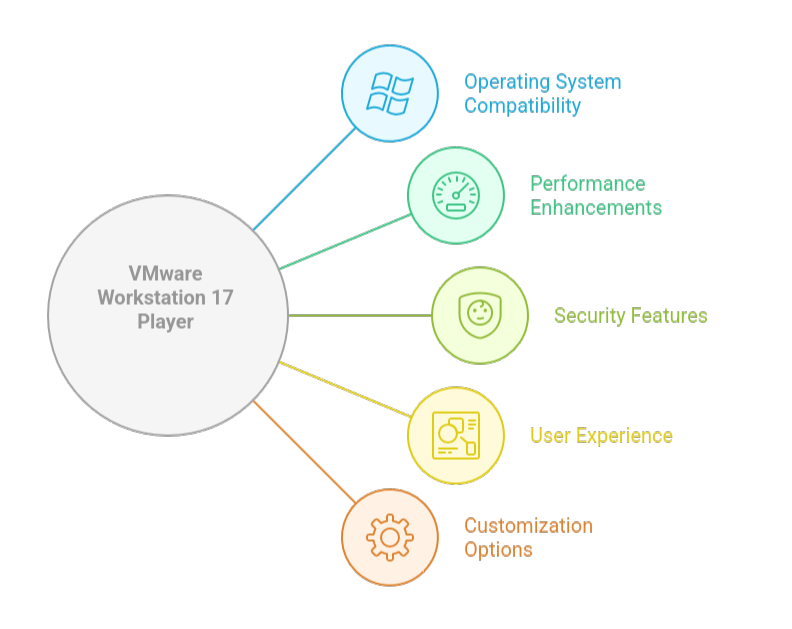
VMware Workstation 17 Player allows you to run multiple operating systems, including Windows 11, on a single computer using virtual machines. It supports up to sixteen virtual processors and offers more rapid operations and better graphics performance. Virtual TPM 2.0 improves security and allows virtual machines to boot up automatically alongside the host computer. Users may easily move files or information between the host and guest operating systems, change hardware and firmware settings, and encrypt virtual machines.
For more efficient operations, the program now supports autologon, background execution, full-screen mode, and multiple displays. You can alter keyboard shortcuts for frequently used operations, adjust displays, and copy or stream virtual machines. VMware Workstation 17 Player, which is available for free personal use, provides a high-performance, safe, and adaptable environment that is perfect for testing, learning, and running Windows 11 alongside other operating systems.
Prerequisites
Hardware Requirements:
- Processor: 64-bit with virtualization support (Intel VT-x or AMD-V)
- RAM: Minimum 4 GB, 8 GB or more recommended
- Storage: 1 GB for VMware plus extra for each virtual machine
- Graphics: DirectX 11 compatible card
Software Requirements:
- Host OS: Windows 10, Windows 11, or supported Linux
- VMware Workstation Player: Version 17 or later
- Windows 11 ISO: Needed to install as a guest OS
How to Set Up a Windows 11 VM
- Step 1: Select virtualization software such as Hyper-V (Windows Pro/Enterprise), VirtualBox, or VMware Workstation.
- Step 2: Visit Microsoft’s website to download the official Windows 11 ISO file.
- Step 3: Start your hypervisor, choose the Windows 11 ISO, build a new virtual machine, and set up hardware parameters like CPU, RAM, and storage.
- Step 4: To improve performance and integration, launch the virtual machine (VM), adhere to the installation instructions, and then install the guest tools (VirtualBox Guest Additions or VMware Tools).
Quick tips to troubleshoot and solve Error Parsing Token in VMware.
How to Install VMware Workstation Software
- Step 1: Download the installer file from the VMware website after selecting the appropriate version for your operating system (Windows, Linux, or macOS).
- Step 2: To begin the installation process, find the downloaded file and double-click it.
- Step 3: Follow the instructions, accept the license agreement, select installation settings, choose any extra features that are required, and select updates and shortcuts.
- Step 4: Click “Install” to finish the setup. Use Workstation Player for free or enter a license key if necessary. To create and run virtual machines, start VMware Workstation after restarting your computer if necessary.
Expert guide to configure a new VMware virtual machine with an existing VMDK.
[Need assistance with a different issue? Our team is available 24/7.]
Conclusion
Windows 11 VMware Workstation Player 17 Setup lets you run Windows 11 and other OS on a single computer. It provides Virtual TPM 2.0 for security, improved graphics, and improved speed. You can use features like autologon, full-screen mode, and multiple displays, as well as transfer data and modify hardware. It is perfect for learning and testing and is free for personal use.
In brief, our Support Experts demonstrated how to fix the “554 5.7.1 : Relay access denied” error.
