


Please Note: This article is part of our historical archive. Because it was published a while ago, some of the information, links, or context may now be outdated.
In a Docker system, the containers are created based on images which are like templates. An image can be of an OS, webserver, mail server or any application that you require to create a container instance for.
Docker itself provides a set of container images for use by the public. These images are stored in a public repository known as the Docker hub. Users can download and upload their images from this docker registry.
But the Docker hub is a publicly accessible registry and anyone can push and pull the container images in it. This may not be suitable for all online businesses as everyone can access the Docker images that you upload to the hub..
Setup and manage your Docker system
What is Docker private repository
For businesses that require to store their custom images in a secure and confidential manner, a docker private repository has to be setup to do this task.
A private repository is similar to the Docker hub, but it is setup in the user’s own server instead of an external or public location. A private registry can be further configured to provide all the features of a Docker hub.
Using private repository, businesses can configure locations to store their custom images and restrict the access to those images for their users only.
[ Running a Docker infrastructure doesn’t have to be hard, or costly. Get world class Docker management services at affordable pricing. ]
Benefits of setting up a Docker private repository
Having a private docker repository provides businesses with the following benefits:
- You can keep your custom images private and hidden from the public.
- It is easy to manage and keep the Docker images updated, as you have control over it.
- The private repository can be secured further using SSL.
- Bandwidth savings and speed of upload/download are also other benefits of using private repos.
Today, we’ll discuss how we setup a Docker private repository for our internal Docker infrastructure.
Pre-requisites for setting up Docker private repository
You can configure the private registry in any machine, even in a Docker container. Before setting up the private registry, choose a container and a directory location which has enough space for storing your images.
The storage space requirement should be assessed based on the number of users in the system and approximate image sizes. The ‘registry’ image is configured to start on port 5000 in the container.
So make sure that this port in the repository container is open in the firewall and accessible. Users should be able to connect to this Docker registry container via network, to download the images from the private repository.
Setting up a secure Docker private repository
Here, we’ll explain the step-by-step process that was followed to create our own Docker private registry in a Docker machine and how we secured it with TLS certificate:
1. Create a storage location
First step in setting up a private repository is to create a directory location for storing the images, inside the Docker machine, dedicated for this purpose. This can be done using the command:
mkdir -p /opt/registry/{data,ssl,config}
2. Setup SSL for container
To ensure secure transmission of the images stored in it, it is important to secure the Docker container with TLS certificate. We used ‘omgwtfssl‘, a Docker image for creating self signed SSL certs easily.
You can secure the Docker container with this command:
docker run --rm -v /opt/registry/ssl:/certs -e SSL_SUBJECT=registry.docker-repo.net paulczar/omgwtfssl
The hostname of the registry machine need be given as a parameter to the command to install SSL. The following SSL files are created by this Docker image:
SSL files for Docker private repository
These files include the certificate, CSR and the key files associated with the SSL. Now, a configuration file for the registry should be created, which should contain the path to these cert and key files.
The registry configuration file is named ‘registry.env’ and it located in the ‘config’ folder in the registry directory:
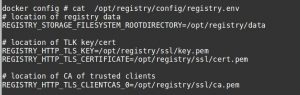
Private registry SSL settings
3. Setup the registry container
Next step is to start the registry container. The easiest way to do it is by downloading the ‘registry’ image into the container.
While running the registry container, provide the ‘data directory‘ we created in the first step (/opt/registry) and the ‘SSL config file‘ as arguments.
For users to access the Docker registry, which is available at the port 5000 of the Docker container, we need to expose Docker ports. This is because the Docker container ports are not directly accessible from the external network.
So we configured port 4043 in the host machine and exposed it to the internal port 5000 of the container. Users can connect to port 4043 of Docker host to access the private registry.
Thus, the command to setup the registry container is:
docker run -d --name registry -v /opt/registry:/opt/registry -p 4043:5000 --restart always --env-file /opt/registry/config/registry.env registry:2
4. Configure Docker startup options
By default, the Docker containers will not restart automatically after a host machine reboot. In such cases, to ensure availability of the registry, we need to set auto-restart for the registry container.
To ensure that the registry is activated and bound to the machine even after restart, we configured the ‘/etc/default/docker’ file with these options:
# Use DOCKER_OPTS to modify the daemon startup options.
DOCKER_OPTS="--insecure-registry registry.docker-repo.net:4043"
5. Add images to private registry
Now the registry container is setup and the host machine is configured to use it. Next step is to add the images to the repo.
You can download images from Docker hub and tag them and add them to your private repository, using these commands:
docker pull alpine
docker tag alpine registry.docker-repo.net:4043/alpine:bob1
docker push registry.docker-repo.net:4043/alpine:bob1
The ‘push’ command helps to add images to the repository. Tagging the images helps to identify them easily for management and use.
To list the images in the private repository, we can use the ‘docker images‘ command as seen here:

Docker images in repository
6. Download images from your private registry
Once the images are configured and added to the private repository that you have setup, users can later on download these images using ‘docker pull‘ command.

Download images from private repository
To locate the images in the repository, ‘docker search‘ command can be used.
[ Are your spending too much time managing your Docker containers? Our Docker experts take care of your infrastructure and ensure its smooth functioning. ]
Using SSL certificates for docker private repository
In our demo, we’ve configured SSL using self-signed certificates, but for live servers and businesses, it is not recommended as they are less secure.
A work around is to use valid SSL certificates. You can purchase SSL from vendors or use free SSL such as Let’s Encrypt. To know more about the latter, read our post here.
In short..
Today, we saw how to setup a Docker private repository. It is easily to setup one, but requires effort to manage the repository. Care has to be exercised in maintaining the images in the Docker repository updated and secure.
Any custom configuration done should be preserved well. Whenever a vulnerability is reported, immediate patching of the image has to be done. At Bobcares, our 24/7 security team manages these images up-to-date.
If you’d like to know how to manage your Docker system and repository updated to get the best out of them for your business, we’d be happy to talk to you.

Very helpful, thank you. I’ve been looking for this page for a while now (too many distractions at work with too much pre-packaged configurations which are then wrapped with enterprise customizations and difficult to unravel the underlying customizations). I especially like the omgwtfssl reference.