


Please Note: This article is part of our historical archive. Because it was published a while ago, some of the information, links, or context may now be outdated.
Tired of a slow website? Redis cache for WordPress can help you!
Redis caching helps to speed up database queries and PHP requests. As a result, it improves site performance.
To enable the Redis cache, we have to install Redis and configure it.
As part of our WordPress Hosting Support, we frequently receive requests to enable Redis caching.
In this write-up, we’ll see how our WordPress Engineers enable Redis cache in 4 simple steps.
How does Redis cache for WordPress work?
To begin with, let’s quickly check how Redis make websites faster.
Redis is an in-memory data structure store. It can work as a database, cache mechanism, etc.
Any WordPress website stores all its data in a database. For loading a webpage, it runs a database query via PHP scripts.
With Redis running on the server, it stores these queries into system memory. As a result, when another user accesses the same page, it retrieves the results from the memory. In other words, there is no need to make a database query again. Thus, it saves time and improves website performance as such.
Steps to enable Redis cache for WordPress
As we now know the benefits of the Redis server, let’s take a look at the exact steps to make it work.
On the server running WordPress website, our Support Engineers do these 4 major steps.
1. Install Redis server and PHP extension
The first step is to install the Redis server. Then we also add the PHP extension for Redis.
On an Ubuntu server, we do this using the commands:
apt-get update
apt-get install redis-server php-redis
This completed the Redis server installation and it starts listening on port 6379.
root@ip-172-xx-yy-150:~# redis-server --version
Redis server v=4.0.9 sha=00000000:0 malloc=jemalloc-3.6.0 bits=64 build=9435c3c2879311f3
root@ip-172-xx-yy-150:~# netstat -lpan | grep :6379
tcp 0 0 127.0.0.1:6379 0.0.0.0:* LISTEN 1008/redis-server 1
tcp6 0 0 ::1:6379 :::* LISTEN 1008/redis-server 1
2. Modify Redis configuration
Next, we modify the Redis configuration file to allow memory and eviction policy. We add the following lines in the file /etc/redis/redis.conf
maxmemory 256mb
maxmemory-policy allkeys-lfu
To make the changes effective, we restart the Redis server and PHP. On a server having PHP FPM, we execute:
systemctl restart redis-server
systemctl restart php7.2-fpm
3. Edit WordPress configuration
Further, we edit the WordPress configuration file at /var/www/html/wordpress/wp-config.php and then add the cache variables.
define( 'WP_CACHE_KEY_SALT', 'wpxx.com' );
define( 'WP_CACHE', true );
The exact path of the wp-config.php file depends on the path of your WordPress install.
4. Enable Redis plugin for WordPress
Finally, we enable a Redis plugin for WordPress. Many plugins like Redis Object cache, W3TC, etc. integrate the Redis cache with WordPress. Here we enable the Redis Object Cache plugin.
When everything works correctly, the status shows as “Connected”.
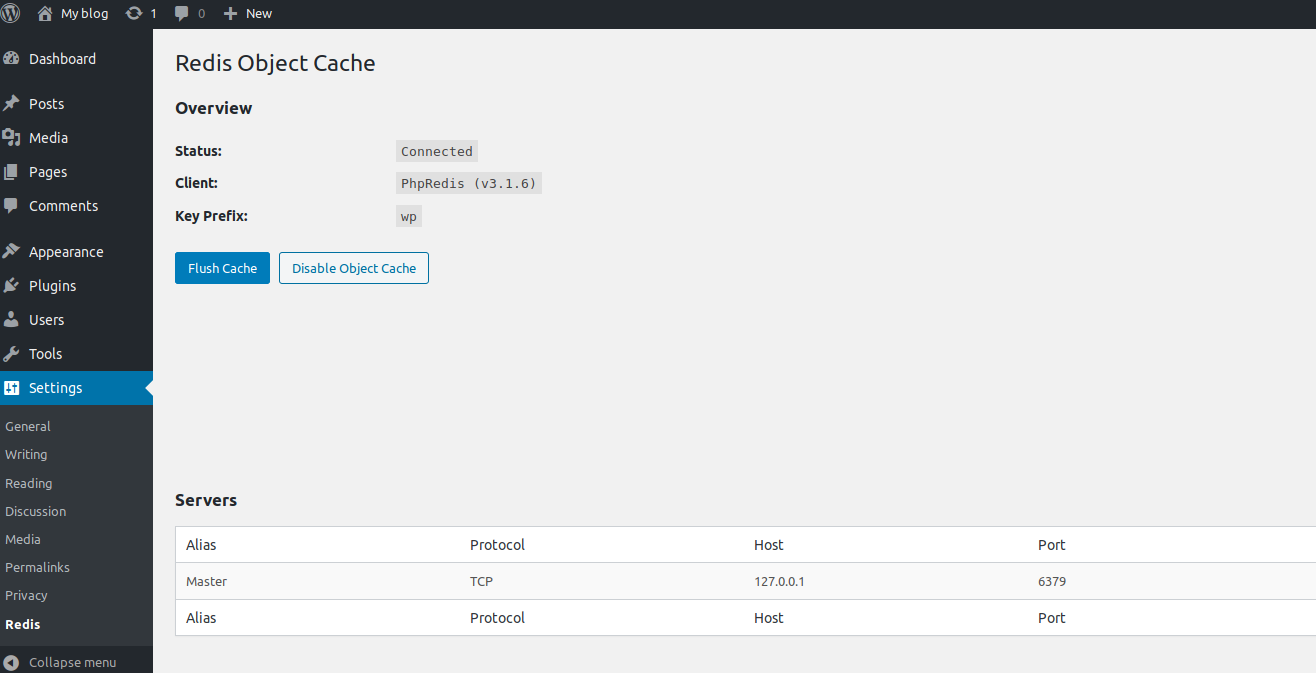
Depending on the plugin, there will be settings that allow us to customize caching. Some of them enable Page caching, database caching, etc.
[Need help to install Redis cache for WordPress website? We are available 24×7.]
Conclusion
In short, enabling Redis cache for WordPress is a quick way to improve WordPress website performance. Today, we saw how our WordPress Engineers enable Redis caching in 4 simple steps.
