


Hyper-V cluster setup on Windows Server with Windows Server Management Services. Configure nodes, storage, failover clustering, and VM migration.
Hyper-V enables Windows Server to run virtual machines. Your Windows Server can virtualize multiple computers if you enable Hyper-V. However, this means that you have created a single point of control: that single Hyper-V Server. Because if that single Server fails, all the virtual computers dependent on it fail as well.
A Hyper-V failover cluster mitigates this problem. It involves clustering Windows Servers together. In this situation, virtual machines are able to move to other servers in that cluster, thus remaining active.
We are going to demonstrate the creation of a simple example of a Hyper-V failover cluster. First, we will show you how to prepare your servers, how to set up networking, how to install Hyper-V, how to join your domain, how to set up shared storage, and we will also validate the cluster, create the cluster, and test failover and migration.
An Overview
- What Is a Hyper-V Failover Cluster?
- Lab Environment
- Prerequisites
- Step 1: Prepare the Windows Server Machines
- Step 2: Join the Servers to the Domain
- Step 3: Install the Hyper-V Role
- Step 4: Set Up the Virtual Switch
- Step 5: Configure Shared Storage
- Step 6: Install Failover Clustering
- Step 7: Validate the Cluster
- Step 8: Create the Failover Cluster
- Step 9: Configure Cluster Shared Volumes
- Step 10: Create a Virtual Machine
- Step 11: Make the VM Highly Available
- Step 12: Test Live Migration
- Step 13: Test Failover
- Troubleshooting and Common Problems
- Useful PowerShell Commands
- Best Practices for Production
What Is a Hyper-V Failover Cluster?
Hyper-V Failover Clusters are Windows Servers that are members of the Failover Cluster and Hyper-V.
For instance, say we have two Hyper-V Servers.
- HV01
- HV02
Normally, we have HV01 host VM01. When HV01 goes down, as part of the cluster, the other server (HV02) can host VM01. Thus, clustering improves the availability of the server and makes scheduled maintenance or outages easier.
The PowerShell command used to add a Hyper-V Virtual Machine as a clustered workload is:
Add-ClusterVirtualMachineRole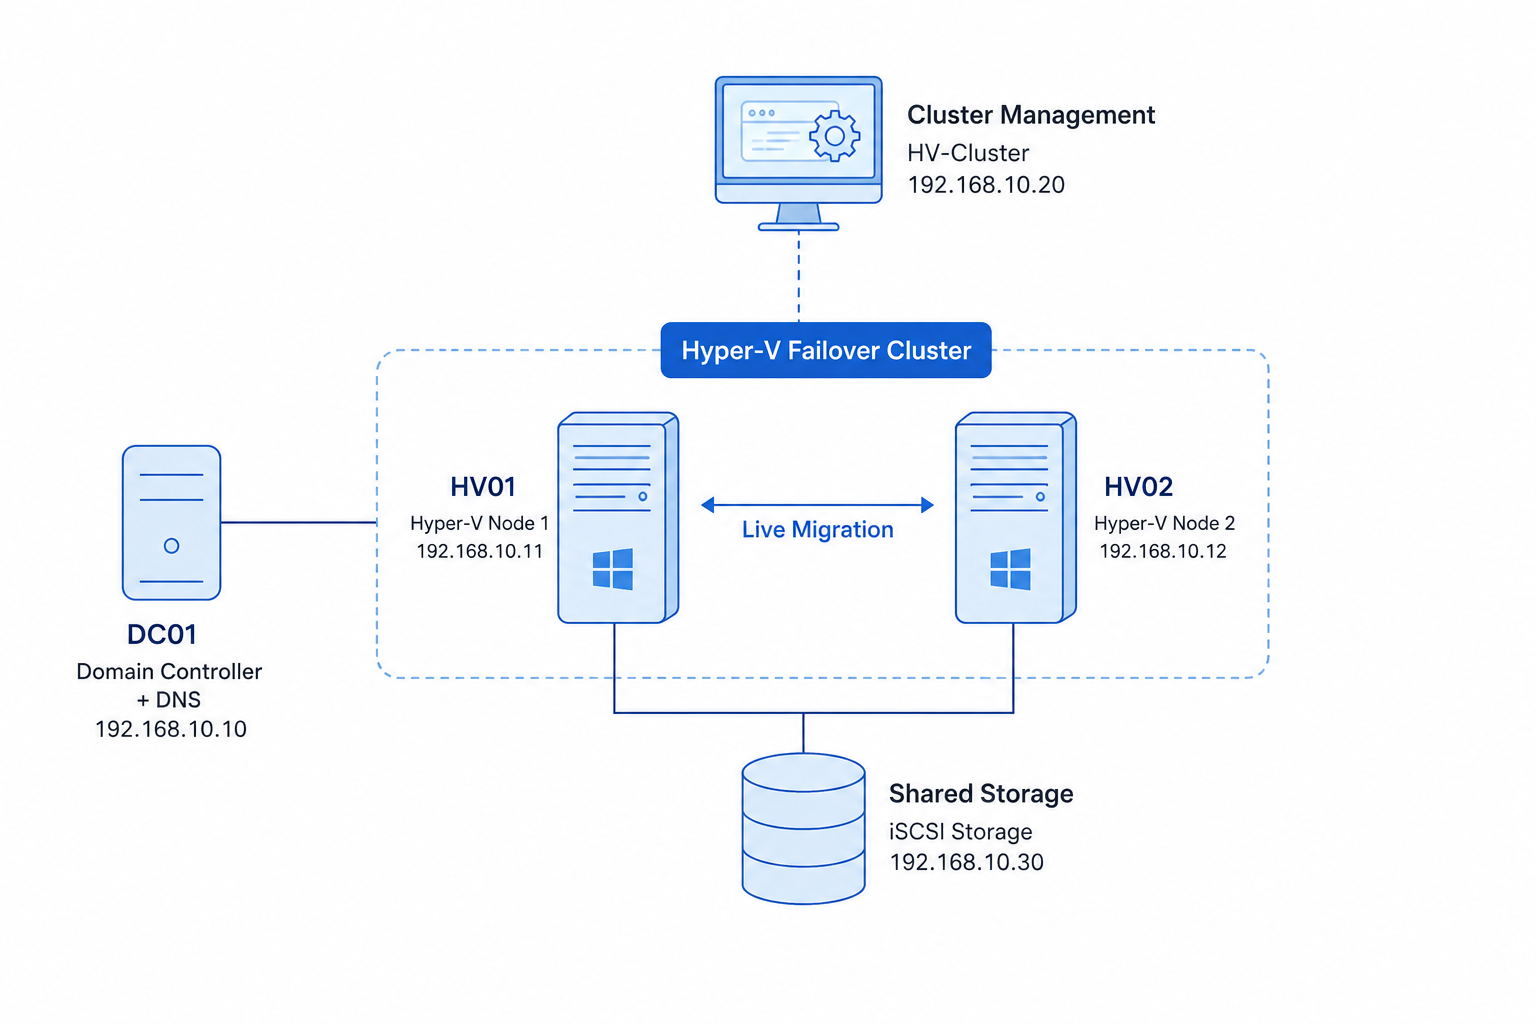
Get Expert Server Management.

Lab Environment
| Server | Role | IP Address |
|---|---|---|
| DC01 | Domain Controller + DNS | 192.168.10.10 |
| HV01 | Hyper-V Node 1 | 192.168.10.11 |
| HV02 | Hyper-V Node 2 | 192.168.10.12 |
| HV-Cluster | Cluster Name | 192.168.10.20 |
| Shared Storage | iSCSI Storage | 192.168.10.30 |
Example domain: lab.local
Both Hyper-V servers should have the same configuration and Windows Server version. The storage can use the server itself or an iSCSI target.
Prerequisites
Before you configure the cluster, prepare the following:
1. Windows Server Machines
You need at least two servers as Hyper-V cluster nodes:
- HV01
- HV02
Both should run the same Windows Server version.
2. Active Directory
Join both servers to the Active Directory domain.
Example: lab.local
3. DNS
To ensure name resolution for the servers and cluster components, set the DNS server for your internal network, such as your domain controller, as the primary DNS server and not an external DNS service.
4. Static IP Addresses
Use static IP addresses for the main servers and cluster.
Example:
- HV01 = 192.168.10.11
- HV02 = 192.168.10.12
- DC01 = 192.168.10.10
5. Shared Storage
Both Hyper-V nodes must have access to the storage that stores Virtual Machine files.
Cluster Shared Volumes (CSVs) allow access to a specific volume by multiple nodes at the same time with support for NTFS and ReFS volumes.
6. Network Connectivity
The nodes must be able to communicate with one another. Typically, administrators configure separate networks for management, virtual machines, storage, and clusters with the help of network adapters or network segmentation.
Step 1: Prepare the Windows Server Machines
First, install Windows Server on both Hyper-V hosts.
Then rename the servers and restart them.
On HV01:
Rename-Computer -NewName HV01 -RestartOn HV02:
Rename-Computer -NewName HV02 -RestartAfter the restart, configure the network and verify connectivity:
ipconfig /all

ping HV01

ping HV02
Next, check name resolution:
nslookup HV01

nslookup HV02
If name resolution fails, fix DNS before continuing.
Step 2: Join the Servers to the Domain
Next, add both Hyper-V servers to Active Directory.
Run:
Add-Computer -DomainName lab.local -RestartEnter the required domain credentials and restart the server.
Then verify domain membership:
systeminfo | findstr /B /C:"Domain"Both servers should show:
Domain: lab.localThe basic server setup is now complete.
Step 3: Install the Hyper-V Role
Install Hyper-V on both cluster nodes:
Install-WindowsFeature Hyper-V, IncludeManagementTools, RestartRun the command on:
- HV01
- HV02
After the restart, verify the installation:
Get-WindowsFeature Hyper-V

Get-Service vmms
The Hyper-V Virtual Machine Management service should be running.
Step 4: Set Up the Virtual Switch
Hyper-V virtual machines need virtual network adapters to communicate with the physical network.
First, identify the physical network adapter:
Get-NetAdapterFor this example, assume the adapter is named:
Ethernet
The external virtual switch should use this adapter, with management OS access enabled.
Then verify the switch:
Get-VMSwitchKeep the virtual switch configuration the same on both Hyper-V nodes. This helps when you migrate the VM between HV01 and HV02.
Step 5: Configure Shared Storage
Next, configure shared storage for the cluster.
For this lab, assume the iSCSI target uses:
192.168.10.30On both HV01 and HV02, open the iSCSI Initiator:
iscsicplEnter the iSCSI target IP and connect from both servers.
Then check the available disks:
Get-DiskThe shared disk should appear on both servers.
Important: Do not format or initialize the shared disk separately on both servers. Let the cluster control access to the disk.
When troubleshooting storage, check:
- Storage visibility
- Storage drivers
- Storage firmware
- MPIO configuration
- Storage paths
Step 6: Install Failover Clustering
Install Failover Clustering on both Hyper-V nodes:
Install-WindowsFeature Failover-Clustering –IncludeManagementToolsThen verify it:
Get-WindowsFeature Failover-ClusteringThe feature should appear as installed on both servers.
Step 7: Validate the Cluster
Before creating the cluster, run the validation test:
Test-Cluster -Node HV01,HV02The test checks:
- Hardware
- Operating system configuration
- Networking
- Storage
- Hyper-V configuration
After testing, Windows creates a validation report, usually under:
C:\Windows\Cluster\ReportsReview the report carefully. A warning does not always mean the cluster will fail, but a failure requires investigation.
For storage warnings, check:
Get-DiskFor network issues, check:
Get-NetAdapter

Test-Connection HV02
Do not ignore validation errors.
Step 8: Create the Failover Cluster
After successful validation, create the cluster.
Example:
- Cluster name: HV-Cluster
- Cluster IP: 192.168.10.20
- Nodes: HV01, HV02
Use:
New-Cluster `

-Name "HV-Cluster" `

-Node HV01,HV02 `

-StaticAddress 192.168.10.20 `

-NoStorage
The -NoStorage option lets you configure shared storage separately.
Then verify the cluster:
Get-Cluster

Get-ClusterNode
Expected result:
HV01    Up

HV02    Up
Step 9: Configure Cluster Shared Volumes
Once the cluster exists, add the shared storage.
First, check the available disks:
Get-ClusterAvailableDiskThen add the available disk:
Get-ClusterAvailableDisk | Add-ClusterDiskCheck the cluster resources:
Get-ClusterResourceNext, add the disk as a Cluster Shared Volume:
Add-ClusterSharedVolume -Name "Cluster Disk 1"The CSV will be available under:
C:\ClusterStorage\For example:
C:\ClusterStorage\Volume1Use this volume to store virtual machines. CSVs allow multiple cluster nodes to access the same volume.
Step 10: Create a Virtual Machine
Now create a test VM on one of the Hyper-V nodes.
Example:
- VM name: TestVM
- Memory: 2 GB
- Generation: 2
- Storage path: C:\ClusterStorage\Volume1
You can create the VM through Hyper-V Manager or PowerShell.
Example:
New-VM `

-Name "TestVM" `

-MemoryStartupBytes 2GB `

-Generation 2 `

-Path "C:\ClusterStorage\Volume1"
Connect the VM to:
ExternalSwitchThen start it:
Start-VM -Name "TestVM"Verify it:
Get-VM -Name "TestVM"Step 11: Make the VM Highly Available
The VM must become part of the cluster to support failover.
Run:
Add-ClusterVirtualMachineRole -VirtualMachine "TestVM"Then check the clustered VM:
Get-ClusterGroupThe VM should now appear as a clustered application.
Step 12: Test Live Migration
After enabling high availability, move the VM between nodes.
First, check where it is running:
Get-ClusterGroupFor example, assume it is running on HV01.
Move it to HV02:
Move-ClusterVirtualMachineRole `

-Name "TestVM" `

-Node "HV02"
Then check again:
Get-ClusterGroupThe VM should now run on HV02. This demonstrates how clustering can move a workload between nodes without recreating the VM.
Step 13: Test Failover
Finally, test failover instead of assuming that the cluster works.
If the VM is running on HV01, stop HV01 in the lab.
Before testing this in a live environment, understand the impact and follow the approved maintenance procedure.
From HV02, check the nodes:
Get-ClusterNodeHV01 should show as down.
Then check:
Get-ClusterGroupIf enough cluster resources are available, the cluster can bring the VM online on another available node.
This demonstrates the main purpose of a failover cluster: maintaining highly available workloads when a node becomes unavailable.
Troubleshooting and Common Problems
1. Cluster Validation Fails
Run:
Test-Cluster -Node HV01,HV02Then review the report.
Common causes include:
- DNS problems
- Network connectivity issues
- Different Windows Server versions
- Missing updates
- Storage visibility problems
- Driver or firmware issues
- Incorrect network configuration
Address the reported problems before creating the cluster.
2. Shared Storage Is Not Visible
If one server can see the shared disk but the other cannot, run:
Get-Diskon both nodes.
Then verify:
- iSCSI configuration
- Storage target access
- Network connectivity
- MPIO
- Storage permissions
- Storage firmware and drivers
Both nodes should have access to the shared storage.
3. Cluster Name Does Not Resolve
Test the cluster name:
nslookup HV-Cluster

ping HV-Cluster
If resolution fails, check the DNS records and the Active Directory computer object associated with the cluster.
4. VM Cannot Move to Another Node
Check whether the destination node has:
- The Hyper-V role
- The required virtual switch
- Access to the VM storage
- Sufficient CPU and memory
- A compatible configuration
Also check:
Get-VM -ComputerName HV02

Get-ClusterResource
Without storage access, migration and failover will fail.
Useful PowerShell Commands
| Task | Command |
|---|---|
| Check Hyper-V | Get-WindowsFeature Hyper-V |
| Check Failover Clustering | Get-WindowsFeature Failover-Clustering |
| Check cluster | Get-Cluster |
| Check cluster nodes | Get-ClusterNode |
| Check cluster groups | Get-ClusterGroup |
| Check cluster resources | Get-ClusterResource |
| Check cluster disks | Get-ClusterAvailableDisk |
| Validate cluster | Test-Cluster -Node HV01,HV02 |
| List Hyper-V VMs | Get-VM |
| Check VM state | Get-VM -Name “TestVM” |
| Add VM to cluster | Add-ClusterVirtualMachineRole -VirtualMachine “TestVM” |
Best Practices for Production
A two-node cluster is suitable for a lab, but for a production-ready environment, more effort is needed.
Use Supported Hardware
Ensure that the Windows Server version is supported by the hardware, storage, network cards, and the firmware on the network cards.
Keep Nodes Consistent
Use the same hardware for all the nodes in the cluster.
Separate Network Traffic
Use VLANs or QoS to ensure that the management, virtual machine, storage, and cluster traffic networks are separated.
Use Redundant Networking
Ensure that both the network adapters and the network switches do not become single points of failure.
Protect Storage Connectivity
Ensure that there are no single points of failure in the storage connectivity.
Monitor the Cluster
Monitor the following:
- Utilization of storage
- Cluster health
- VM availability
- Network utilization
- Windows event logs
Also, revalidate the configuration after major changes, such as the addition or removal of nodes, replacement of storage, replacement of adapters, changes in firmware, or the addition or removal of drivers.
Conclusion
A production-ready Hyper-V failover cluster requires at least three Windows Servers with the Hyper-V role. The servers require networking, are part of a domain, have shared storage and use Failover Clustering.

