


Learn how to install, configure, secure, and tune RabbitMQ for AI workloads on virtual machines. Get practical setup steps for production use.
If you’re running inference, embedding, or data-ingestion jobs on a VM, you’ve probably hit the same wall. One process doing everything means a slow model call can back up your whole pipeline. RabbitMQ fixes that by sitting between your producers and your compute workloads, so a spike in requests doesn’t turn into an OOM crash on your GPU box. For teams that need help managing this infrastructure, our Linux Server Management team can also handle RabbitMQ deployment and management.
Along with that, since the AI workloads are isolated, and you can control hardware allocation, running RabbitMQ inside a Virtual Machine (VM) also allows you to control hardware allocation and keep your AI workloads separate. This guide provides you with all the information you need to install, configure, tune, and secure a RabbitMQ broker for this type of use.
An Overview
- What is the point with a broker here?
- Prepare Your Virtual Machine Environment
- Updating Package List and Installing Erlang
- Install the RabbitMQ Server Package
- Import Repository Keys
- Execute the Installation
- Configure and Optimize the Service for AI Workloads
- Manage the Daemon
- Enable the Management Web UI
- Secure and Tune Your Production Broker
- Add an Administrator Account
- Tune Memory for AI Workloads
- Common Mistakes to Avoid
- Frequently Asked Questions
- Conclusion
What is the point with a broker here?
Typically, pipelines consist of multiple stages like the data collection, processing, execution, and post-processing. If these components communicate directly, the failure of one component may cause a failure on the remaining components.
RabbitMQ sits between the components and solves this. Producers push work into a queue, and the inference worker pulls from it when it is ready to process the task.
Instead of sending work directly to an AI model and risking memory problems during a traffic spike, the queue holds the incoming tasks until a worker can process them.
If a worker dies while processing a message, RabbitMQ can make the unacknowledged message available again instead of simply losing it.
It also handles routing. With multiple GPU workers behind the same queue, RabbitMQ’s exchange system can distribute requests across the available processing nodes.
RabbitMQ isn’t the right tool for every AI pipeline. If you want to replay long streams of historical data like training logs or event history, it’s better suited to the log-based model provided by Kafka. RabbitMQ is better suited to targeted task distribution and request-oriented workloads.
Prepare Your Virtual Machine Environment
RabbitMQ runs on Erlang, and the two versions need to line up. Installing a random RabbitMQ build against whatever Erlang your distro shipped is a common way to get boot failures. Pull both from RabbitMQ’s own repo rather than the default Ubuntu one, since the Ubuntu-packaged Erlang is often a couple of versions behind.
For hardware, this is what you’ll need based on the level of usage you make of this:
| Resource | Minimum Requirement | Recommended for AI Pipelines |
|---|---|---|
| vCPU | 2 Cores | 4 to 8 Cores |
| RAM | 4 GB | 16 GB (or higher) |
| Storage | 20 GB SSD | 100 GB NVMe SSD |
Likely a good choice for AI traffic, where you have only a handful of users and workloads. Best for AI traffic, if you have a few users and workloads.
If you’re only running a couple of light jobs, the minimum is fine. If workers are going to fall behind during traffic spikes and messages will pile up in the queue, give it more RAM, and that queue backlog lives in memory.
Updating package list and Installing Erlang
Once you log into your VM through SSH, update your local package manager index to pull the security patches. Here is an example with an Ubuntu server;
sudo apt update && sudo apt upgrade -y
Install modern Erlang from the official repository.
sudo apt install -y erlang-base erlang-asn1 erlang-crypto erlang-eldap erlang-ftp erlang-inets erlang-mnesia erlang-os-mon erlang-parsetools erlang-public-key erlang-runtime-tools erlang-snmp erlang-ssl erlang-syntax-tools erlang-tftp erlang-tools erlang-xmerl
Need help managing RabbitMQ for your AI workloads?

Install the RabbitMQ Server Package
With Erlang’s in place, now its time to add the official Team RabbitMQ repository to your VM sources, so you receive the director minor updates and optimizations straight from the source.
Import Repository Keys
Package downloads should be verified against repository signatures to prevent tampering. Add the official signing keys to your system keyring using the commands below:
curl -1sLf 'https://dl.cloudsmith.io/public/rabbitmq/rabbitmq-server/gpg.9F4586F2A3457AD1.key' | sudo gpg --dearmor -o /usr/share/keyrings/rabbitmq-archive-keyring.gpg
Then add the RabbitMQ repositor entry to your source list directly.
echo "deb [signed-by=/usr/share/keyrings/rabbitmq-archive-keyring.gpg] https://dl.cloudsmith.io/public/rabbitmq/rabbitmq-server/deb/ubuntu focal main" | sudo tee /etc/apt/sources.list.d/rabbitmq.list
Execute the Installation
Refresh your package index to the new repo to register and install the server package
sudo apt update

sudo apt install -y rabbitmq-server
This registers a background daemon under a worker group called ‘rabbitmq’. Your RabbitMQ virtual machine setup is now live.
Configure and Optimize the Service for AI Workloads
Out of the box, RabbitMQ isn’t tuned for large payloads like vectorized embeddings or image arrays. A few settings need adjusting before this is ready for production.
Manage the Daemon
Start it, and set it to launch automatically on every VM reboot:
sudo systemctl start rabbitmq-server

sudo systemctl enable rabbitmq-server
Verify that it’s actually running clean:
sudo systemctl status rabbitmq-server
Enable the Management Web UI
You’ll want eyes on queue performance and incoming message rates, not just a black box. Turn on the built in management plugin:
sudo rabbitmq-plugins enable rabbitmq_management
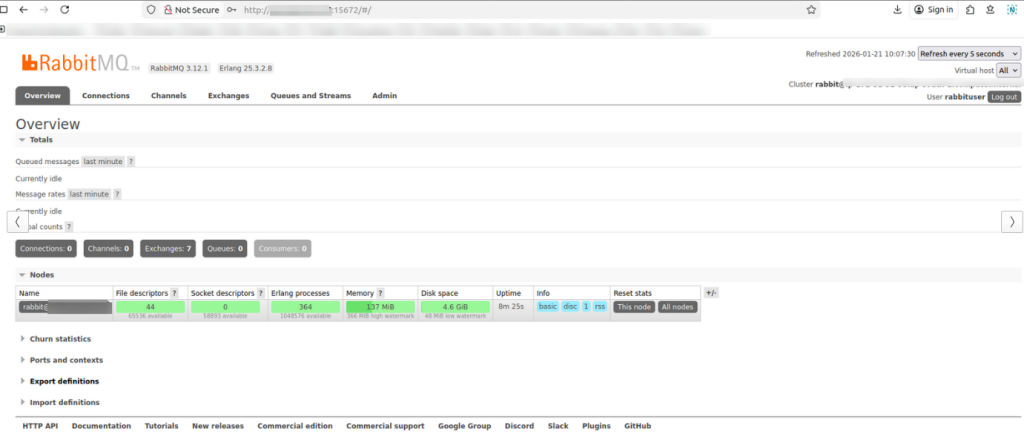
This will open a dashboard on port 15672. By pointing a browser to http://your_vm_ip:15672, you’ll get to see the activity of the queues in real-time.
Secure and Tune Your Production Broker
Default setups only allow connection through guest account and only via localhost. So production needs a real admin account and different memory limits inorder to accommodate large data payloads.
Add an Administrator Account
Swap out the default access path with a new user profile by creating a user, granting full administrative permissions, and applying the administrator tag. Run the following commands:
sudo rabbitmqctl add_user ai_admin SecurePassword123

sudo rabbitmqctl set_user_tags ai_admin administrator

sudo rabbitmqctl set_permissions -p / ai_admin ".*" ".*" ".*"
Try to use a stronger password for this one as this account has full control over your broker.
Tune Memory for AI Workloads
AI payloads chew through memory fast if your consumers can’t keep pace. RabbitMQ’s default alarm kicks in at 40% of available RAM and blocks producers past that point. On a VM dedicated purely to ML traffic, you can push that ceiling higher and put more of your hardware to work.
Open or configure the config file by
sudo nano /etc/rabbitmq/rabbitmq.conf
Add this line to set the absolute limit or ratio based on your hardware layout:
# Adjust the memory watermark to 60 percent of your VM RAM capacity
vm_memory_high_watermark.relative = 0.6
Save it, then restart the broker so the change takes effect:
sudo systemctl restart rabbitmq-server

Common Mistakes to Avoid
If you are looking to focus your team’s time on other projects, our Linux engineers can handle RabbitMQ setup, monitoring, scaling, and maintenance. Our team is experienced in providing Linux-based infrastructure support and production workloads, to ensure that your teams’ messaging layer remains reliable and allow your engineers to concentrate on the AI applications sitting on top of it.
There are a few recurring challenges in the first time you set up a RabbitMQ server for an AI workload.
- Sending large files through the queue itself. Raw images or arrays slow RabbitMQ down fast. Push the asset to object storage first, then pass only the URL through the queue.
- Leaving the memory watermark at default on a dedicated AI VM. 40% is a safe number for shared use, but it wastes capacity on a machine doing nothing but AI work.
- Skipping the admin account. Running production traffic on the default guest login isn’t a shortcut, it’s a security gap waiting to be found.
- Mismatched Erlang and RabbitMQ versions. Check compatibility before install. It’s the number one reason a broker refuses to start.
If your team’s time is better spent elsewhere than managing broker infrastructure, our managed IT services can take that off your plate by setup, monitoring, scaling, all of it. So your engineers stay focused on the models instead of the queue holding them together.
Frequently Asked Questions
1. Why choose RabbitMQ over Apache Kafka for AI workloads?
RabbitMQ’s exchange-based routing is built for targeted task distribution and fast request-reply patterns. Pick RabbitMQ when worker VMs need to grab distinct tasks on demand. Pick Kafka when you need to replay long, continuous streams of historical data.
2. How does RabbitMQ handle large data payloads like images?
Not well, if you send them directly, raw images and arrays slow things down. Upload the asset to object storage first, then pass a lightweight URL or metadata string through the queue for your worker to pick up.
3. What ports do I need to open in my cloud firewall?
Port 5672 for standard AMQP traffic. Port 15672 only if you need the management dashboard. Keep both restricted to known internal IPs, don’t expose them publicly.
4. Can one RabbitMQ instance coordinate work across multiple VMs?
Yes. Point your producer applications at the central RabbitMQ host IP, and have worker nodes on separate VMs subscribe to that same queue. They’ll pull and process concurrently.
5. What happens if the AI model consumer VM crashes?
RabbitMQ tracks delivery through message acknowledgments. If a worker drops offline mid-task, RabbitMQ catches the broken connection and puts the message back in the queue for another worker to grab.
6. How do I monitor RabbitMQ performance in production?
The management plugin you enabled earlier gives you a live view of queue depth, message rates, and consumer activity on port 15672. Most production setups pair that with centralized logging and alerting, so problems surface before they turn into a backlog.
7. Is RabbitMQ suitable for real-time LLM inference at scale?
With the right tuning, yes. RabbitMQ handles real-time request-reply patterns well on its own, but scaling to high-volume LLM inference usually needs the memory tuning and multi-VM setup covered above, plus ongoing monitoring as traffic grows.
Conclusion
Getting RabbitMQ ready for AI workloads means checking the Erlang and RabbitMQ versions, sizing the VM for the workload, securing the broker with a separate admin account, and adjusting the memory limit when needed. These steps help keep the queue running properly when traffic increases. If you don’t want to manage RabbitMQ in-house, our Linux engineers can handle the setup, security, monitoring, and tuning. They can manage the broker as the workload changes, while your team works on the AI applications.
Don’t want to manage broker infrastructure on top of your actual AI work? Our Linuxengineers can set up, secure, monitor, and optimize RabbitMQ for you. With experience managing Linux-based infrastructure and production workloads, our team can handle the operational side of the messaging layer while your engineers stay focused on the models and applications.

