


Get secure API integration services to integrate payment gateways like Stripe, PayPal, and Razorpay and enable secure, seamless online payments.
Ecommerce and SaaS apps require payment processing. An application requires an API for payment processing and also has to provide a payment option to its users.
Stripe, PayPal, and Razorpay provide API’s to execute payments in unique ways. Stripe’s API helps developers build quick payment interfaces. PayPal’s API extends payment options to PayPal and cards. Razorpay’s API focuses on the Indian market and offers payment options for cards, UPI, and Netbanking.
This documentation describes how to add payment gateways in a web application using Node.js and Express.js.
An Overview
Prerequisites
Before you begin, make sure you have:
- Node.js and the Express.js framework as well as the required libraries.
- Accounts on each of the payment gateways.
- An HTTPS server configured.
Use sandbox or test accounts while testing.
1. How to Integrate Stripe API
Stripe’s API allows for both card payments and subscription-based payments (in this example, they will be processed person stripe’s checkout flow and PaymentIntent).
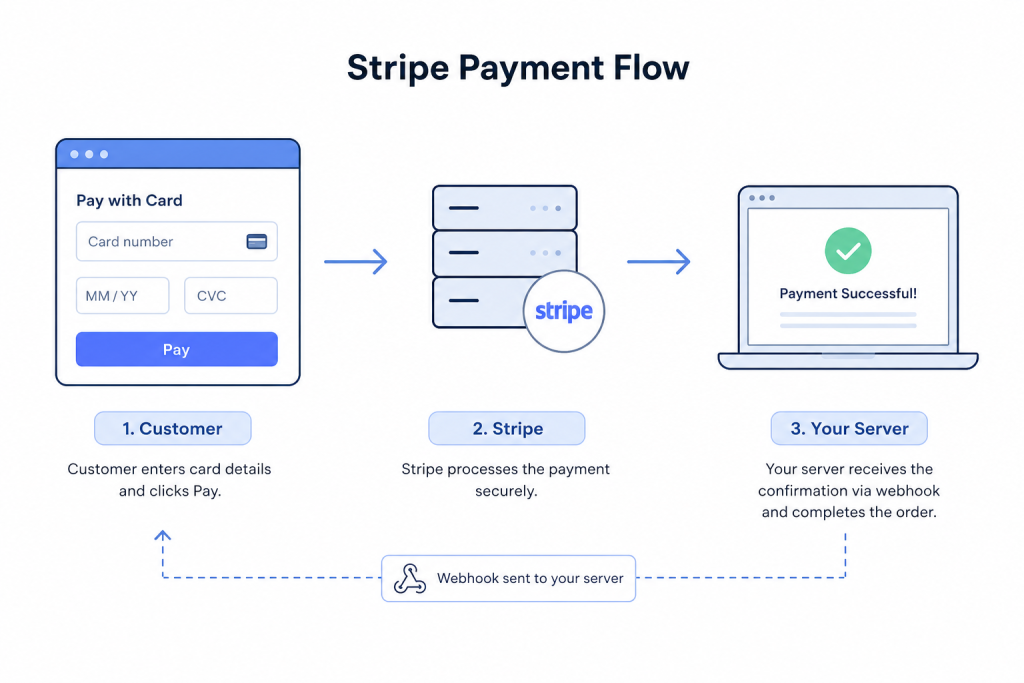
Step 1: Set Up Your Stripe Account
Sign up for Stripe. Then, get your publishable and secret API keys from the dashboard.
Install the Stripe Node.js library:
npm install stripeSimplify Payment API Integration.

Step 2: Configure the Server
Create an Express server to handle payment intents.
const express = require('express');
const stripe = require('stripe')('your-secret-key'); // Replace with your secret key
const app = express();
app.use(express.json());

app.post('/create-payment-intent', async (req, res) => {
  try {
    const paymentIntent = await stripe.paymentIntents.create({
      amount: req.body.amount * 100, // Amount in cents
      currency: 'usd',
      payment_method_types: ['card'],
    });

    res.send({ clientSecret: paymentIntent.client_secret });
  } catch (error) {
    res.status(500).send({ error: error.message });
  }
});

app.listen(3000, () => console.log('Server running on port 3000'));
Step 3: Add Stripe to the Frontend
Use Stripe Elements for secure card input. Add Stripe.js to your HTML.
  const stripe = Stripe('your-publishable-key');
  const elements = stripe.elements();
  const card = elements.create('card');
  card.mount('card-element');

  const form = document.getElementById('payment-form');
  form.addEventListener('submit', async (event) => {
    event.preventDefault();

    const { clientSecret } = await fetch('/create-payment-intent', {
      method: 'POST',
      headers: { 'Content-Type': 'application/json' },
      body: JSON.stringify({ amount: 10 }) // Example amount: $10
    }).then(res => res.json());

    const { error } = await stripe.confirmCardPayment(clientSecret, {
      payment_method: { card: card }
    });

    if (error) {
      console.error(error);
    } else {
      alert('Payment successful!');
    }
  });
Step 4: Handle Webhooks
Create a webhook endpoint for payment events. For example, you can listen for payment_intent.succeeded.
app.post('/webhook', express.raw({type: 'application/json'}), (req, res) => {
  const sig = req.headers['stripe-signature'];
  let event;
  try {
    event = stripe.webhooks.constructEvent(req.body, sig, 'your-webhook-secret');
    if (event.type === 'payment_intent.succeeded') {
      // Fulfill the order
      console.log('Payment succeeded!');
    }
    res.json({ received: true });
  } catch (err) {
    res.status(400).send(`Webhook Error: ${err.message}`);
  }
});
Testing and Going Live
- Use test cards in Stripe test mode.
- Test the full payment flow.
- Switch to live keys for production.
- Use HTTPS in production.
2. How to Integrate PayPal API
PayPal provides payment buttons. Users can pay with PayPal or cards.
Step 1: Set Up Your PayPal Account
Create a PayPal developer account. Get the client ID and secret from the sandbox.
Install the PayPal Node.js SDK:
npm install @paypal/checkout-server-sdk
Step 2: Configure the Server
Create an endpoint to create PayPal orders.
const express = require('express');
const paypal = require('@paypal/checkout-server-sdk');
const app = express();
app.use(express.json());

function environment() {
  return new paypal.core.SandboxEnvironment('your-client-id', 'your-client-secret');
}

const client = new paypal.core.PayPalHttpClient(environment());

app.post('/create-order', async (req, res) => {
  const request = new paypal.orders.OrdersCreateRequest();
  request.requestBody({
    intent: 'CAPTURE',
    purchase_units: [{ amount: { currency_code: 'USD', value: '10.00' } }]
  });
  try {
    const response = await client.execute(request);
    res.json({ id: response.result.id });
  } catch (error) {
    res.status(500).send(error);
  }
});

app.post('/capture-order', async (req, res) => {
  const request = new paypal.orders.OrdersCaptureRequest(req.body.orderID);
  request.requestBody({});
  try {
    const response = await client.execute(request);
    res.json(response.result);
  } catch (error) {
    res.status(500).send(error);
  }
});

app.listen(3000, () => console.log('Server running'));
Step 3: Add PayPal Buttons
Add PayPal buttons to your frontend.
  paypal.Buttons({
    createOrder: (data, actions) => {
      return fetch('/create-order', { method: 'POST' }).then(res => res.json()).then(order => order.id);
    },
    onApprove: (data, actions) => {
      return fetch('/capture-order', {
        method: 'POST',
        headers: { 'Content-Type': 'application/json' },
        body: JSON.stringify({ orderID: data.orderID })
      }).then(res => res.json()).then(details => {
        alert('Transaction completed by ' + details.payer.name.given_name);
      });
    }
  }).render('paypal-button-container');
Testing and Going Live
- Use the PayPal sandbox for testing.
- Test the order and capture flow.
- Switch to the live environment after testing.
- Use production credentials.
3. How to Integrate Razorpay API
Razorpay is aimed at Indian businesses. It supports UPI, cards, and netbanking.
Step 1: Set Up Your Razorpay Account
Sign up for Razorpay. Get the key ID and secret from the dashboard.
Install the Razorpay Node.js library:
npm install razorpay
Step 2: Create an Order
Create the order on the server.
const express = require('express');
const Razorpay = require('razorpay');
const app = express();
app.use(express.json());

const rzp = new Razorpay({ key_id: 'your-key-id', key_secret: 'your-key-secret' });

app.post('/create-order', async (req, res) => {
  const options = {
    amount: 1000 * 100, // Amount in paise (e.g., ₹1000)
    currency: 'INR',
    receipt: 'receipt1'
  };
  try {
    const order = await rzp.orders.create(options);
    res.json(order);
  } catch (error) {
    res.status(500).send(error);
  }
});

app.post('/verify-payment', (req, res) => {
  const crypto = require('crypto');
  const hmac = crypto.createHmac('sha256', 'your-key-secret');
  hmac.update(req.body.razorpay_order_id + '|' + req.body.razorpay_payment_id);
  const generated_signature = hmac.digest('hex');
  if (generated_signature === req.body.razorpay_signature) {
    res.send('Payment verified');
  } else {
    res.status(400).send('Payment verification failed');
  }
});

app.listen(3000, () => console.log('Server running'));
Step 3: Add Razorpay Checkout
Use the Razorpay Checkout script on the frontend.
  document.getElementById('rzp-button').onclick = async function (e) {
    const order = await fetch('/create-order', { method: 'POST' }).then(res => res.json());
    const options = {
      key: 'your-key-id',
      amount: order.amount,
      currency: order.currency,
      order_id: order.id,
      handler: function (response) {
        fetch('/verify-payment', {
          method: 'POST',
          headers: { 'Content-Type': 'application/json' },
          body: JSON.stringify(response)
        }).then(res => res.text()).then(msg => alert(msg));
      }
    };
    const rzp = new Razorpay(options);
    rzp.open();
    e.preventDefault();
  }
Testing and Going Live
- Use test keys and test mode first.
- Test the payment flow.
- Activate your account after testing.
- Switch to live keys for production.
Stripe vs PayPal vs Razorpay
| Payment Gateway | Main Focus | Payment Options |
|---|---|---|
| Stripe | E-commerce and SaaS | Cards and subscriptions |
| PayPal | Online payments | PayPal and cards |
| Razorpay | Indian businesses | UPI, cards, and netbanking |
Payment Gateway Integration Best Practices
Keep these points in mind:
- Before you do everything live, test the payment integration.
- Consider where you will store your secret key, maybe this will be on the server.
- On production, add HTTPS
- Add proper error handling.
- On a payment related event with a payment integration, put in a webhook, and verify the payment on your server.
- According to the Payment Card Industry Data Security Standard(PCI DSS), you should meet the requirements.
- Check the official documentation to see if any of the APIs you are using have new features and are updated.
Conclusion
Stripe, PayPal, and Razorpay all provide APIs for online payment processing and authorization. The core flow is always the same.
To process a payment, create a payment or a corresponding order on the server first. Provide a way to collect payment details on the frontend. Submit the payment details to the server for confirmation.
Based on your business and payment needs, select the gateway that fits best. Before going live, test the entire flow and make sure to secure the keys and use the proper production settings.

