


API integration services connect PostgreSQL with REST APIs for smooth data access, CRUD operations, secure connections, and scalable applications.
PostgreSQL is an example of an open-source database that maintains and organizes data for applications.
REST APIs allow applications to communicate with other applications via the HTTP protocol. PostgreSQL and REST APIs are a perfect combination for building web and mobile applications that rely on databases.
This article provides the necessary steps to run a PostgreSQL database and to perform basic CRUD operations with a Jane.js and Express REST API. The steps covered are setting up the application, running tests, and implementing some key practices for production.
An Overview
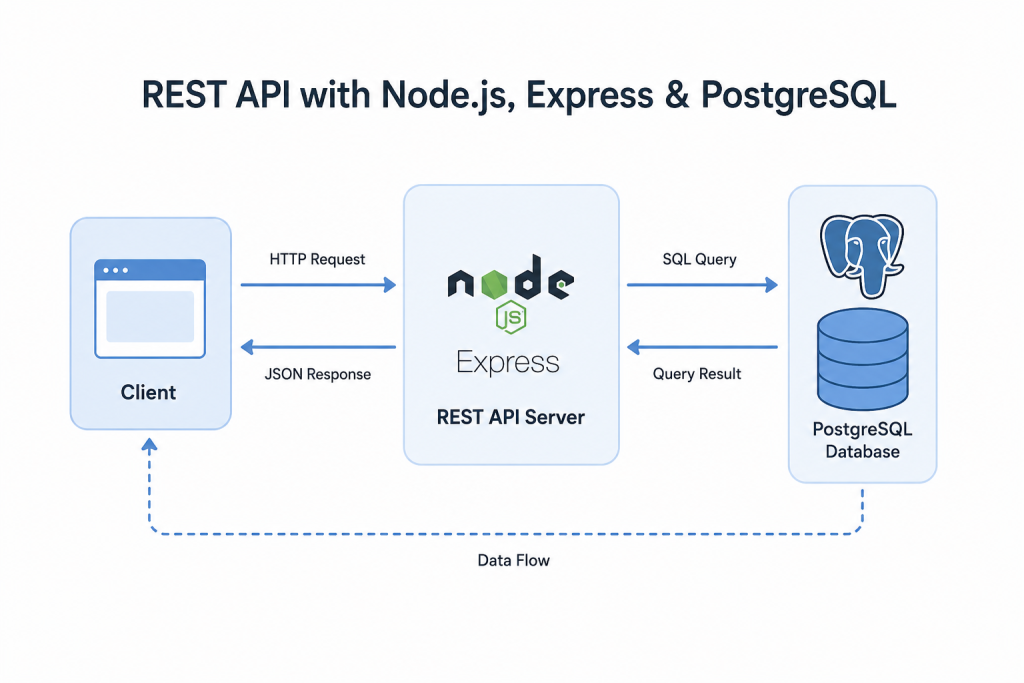
Prerequisites
Before you start, you need:
- PostgreSQL: Either locally install or use a cloud provider.
- Node.js and npm: To use the application, you need to locally install both along with your system.
- Code editor: VS Code or Sublime Text is a good option, as well as others.
- REST Client: Postman or curl.
- PostgreSQL GUI: It is recommended to have pgAdmin or DBeaver.
Step 1: Set Up PostgreSQL
Create the Database
First, open psql or a PostgreSQL GUI.
Create a database named myapp:
CREATE DATABASE myapp;
Connect to it:

\c myapp
Next, create the users table:

CREATE TABLE users (

    id SERIAL PRIMARY KEY,

    name VARCHAR(100) NOT NULL,

    email VARCHAR(100) UNIQUE NOT NULL

);
The table stores the user ID, name, and email.
Add sample data:
INSERT INTO users (name, email) VALUES

('John Doe', '[email protected]'),

('Jane Smith', '[email protected]');
Connect Your APIs Today.

Set Up the Node.js Project
Create a project folder:
mkdir rest-api-postgres

cd rest-api-postgres

npm init -y
Install the required packages:
npm install express pg dotenv
Express builds the REST API. The pg package connects Node.js to PostgreSQL. dotenv manages environment variables.
Step 2: Configure the PostgreSQL Connection
Use environment variables for the database settings.
Create a .env file:
DB_HOST=localhost

DB_USER=your_username

DB_PASSWORD=your_password

DB_NAME=myapp

DB_PORT=5432
Replace the username and password with your PostgreSQL details. If you use a cloud provider, update DB_HOST and DB_PORT.
Create the Database Connection
Create a db.js file:
const { Pool } = require('pg');

require('dotenv').config();
const pool = new Pool({

  host: process.env.DB_HOST,

  user: process.env.DB_USER,

  password: process.env.DB_PASSWORD,

  database: process.env.DB_NAME,

  port: process.env.DB_PORT,

});
module.exports = pool;
The Pool object manages database connections. This helps when the API handles several requests.
Step 3: Build the REST API
Now create the Express server.
Create an index.js file:
const express = require('express');

const pool = require('./db');

const app = express();

const port = 3000;
app.use(express.json()); // Parse JSON request bodies
// API Endpoints go here
app.listen(port, () => {

  console.log(`Server running on http://localhost:${port}`);

});
The express.json() middleware lets the API read JSON request data.
CRUD Endpoints
The API uses four main database actions:
| Method | Endpoint | Action |
|---|---|---|
| GET | /users | Get all users |
| GET | /users/:id | Get one user |
| POST | /users | Add a user |
| PUT | /users/:id | Update a user |
| DELETE | /users/:id | Delete a user |
Get All Users
Use GET /users to retrieve all users.
app.get('/users', async (req, res) => {

  try {

    const result = await pool.query('SELECT * FROM users');

    res.json(result.rows);

  } catch (err) {

    console.error(err.stack);

    res.status(500).json({ error: 'Database error' });

  }

});
The endpoint returns the records as JSON.
Get a User by ID
Use GET /users/:id to retrieve one user.
app.get('/users/:id', async (req, res) => {

  const { id } = req.params;

  try {

    const result = await pool.query('SELECT * FROM users WHERE id = $1', [id]);

    if (result.rows.length === 0) {

      return res.status(404).json({ error: 'User not found' });

    }

    res.json(result.rows[0]);

  } catch (err) {

    console.error(err.stack);

    res.status(500).json({ error: 'Database error' });

  }

});
The $1 placeholder helps prevent SQL injection.
Create a User
Use POST /users to add a new user.
app.post('/users', async (req, res) => {

  const { name, email } = req.body;

  try {

    const result = await pool.query(

      'INSERT INTO users (name, email) VALUES ($1, $2) RETURNING *',

      [name, email]

    );

    res.status(201).json(result.rows[0]);

  } catch (err) {

    console.error(err.stack);

    res.status(500).json({ error: 'Database error' });

  }

});
The RETURNING * clause returns the new user.
Update a User
Use PUT /users/:id to update user details.
app.put('/users/:id', async (req, res) => {

  const { id } = req.params;

  const { name, email } = req.body;

  try {

    const result = await pool.query(

      'UPDATE users SET name = $1, email = $2 WHERE id = $3 RETURNING *',

      [name, email, id]

    );

    if (result.rows.length === 0) {

      return res.status(404).json({ error: 'User not found' });

    }

    res.json(result.rows[0]);

  } catch (err) {

    console.error(err.stack);

    res.status(500).json({ error: 'Database error' });

  }

});
The endpoint updates the name and email for the selected user.
Delete a User
Use DELETE /users/:id to remove a user.
app.delete('/users/:id', async (req, res) => {

  const { id } = req.params;

  try {

    const result = await pool.query('DELETE FROM users WHERE id = $1 RETURNING *', [id]);

    if (result.rows.length === 0) {

      return res.status(404).json({ error: 'User not found' });

    }

    res.json({ message: 'User deleted' });

  } catch (err) {

    console.error(err.stack);

    res.status(500).json({ error: 'Database error' });

  }

});
The endpoint removes the selected user.
Complete index.js
Here is the full API file:
const express = require(‘express’);
const pool = require(‘./db’);
const app = express();
const port = 3000;
app.use(express.json());
// Get all users
app.get(‘/users’, async (req, res) => {
try {
const result = await pool.query(‘SELECT * FROM users’);
res.json(result.rows);
} catch (err) {
console.error(err.stack);
res.status(500).json({ error: ‘Database error’ });
}
});
// Get a user by ID
app.get(‘/users/:id’, async (req, res) => {
const { id } = req.params;
try {
const result = await pool.query(‘SELECT * FROM users WHERE id = $1’, [id]);
if (result.rows.length === 0) {
return res.status(404).json({ error: ‘User not found’ });
}
res.json(result.rows[0]);
} catch (err) {
console.error(err.stack);
res.status(500).json({ error: ‘Database error’ });
}
});
// Create a user
app.post(‘/users’, async (req, res) => {
const { name, email } = req.body;
try {
const result = await pool.query(
‘INSERT INTO users (name, email) VALUES ($1, $2) RETURNING *’,
[name, email]
);
res.status(201).json(result.rows[0]);
} catch (err) {
console.error(err.stack);
res.status(500).json({ error: ‘Database error’ });
}
});
// Update a user
app.put(‘/users/:id’, async (req, res) => {
const { id } = req.params;
const { name, email } = req.body;
try {
const result = await pool.query(
‘UPDATE users SET name = $1, email = $2 WHERE id = $3 RETURNING *’,
[name, email, id]
);
if (result.rows.length === 0) {
return res.status(404).json({ error: ‘User not found’ });
}
res.json(result.rows[0]);
} catch (err) {
console.error(err.stack);
res.status(500).json({ error: ‘Database error’ });
}
});
// Delete a user
app.delete(‘/users/:id’, async (req, res) => {
const { id } = req.params;
try {
const result = await pool.query(‘DELETE FROM users WHERE id = $1 RETURNING *’, [id]);
if (result.rows.length === 0) {
return res.status(404).json({ error: ‘User not found’ });
}
res.json({ message: ‘User deleted’ });
} catch (err) {
console.error(err.stack);
res.status(500).json({ error: ‘Database error’ });
}
});
app.listen(port, () => {
console.log(`Server running on http://localhost:${port}`);
});
Step 4: Test the API
Start the Server
Run:
node index.jsYou should see:
Server running on http://localhost:3000Next, use Postman, Insomnia, or curl to test the endpoints.
Test the Endpoints
Get all users:
curl http://localhost:3000/usersGet a user by ID:
curl http://localhost:3000/users/1Create a user:
curl -X POST http://localhost:3000/users -H "Content-Type: application/json" -d '{"name":"Alice Brown","email":"[email protected]"}'Update a user:
curl -X PUT http://localhost:3000/users/1 -H "Content-Type: application/json" -d '{"name":"John Updated","email":"[email protected]"}'Delete a user:
curl -X DELETE http://localhost:3000/users/1If an error occurs, check the .env file. Also, make sure PostgreSQL is running. Then check the table structure.
Step 5: Best Practices
Error Handling
Use error-handling middleware. Return useful messages without exposing sensitive details.
app.use((err, req, res, next) => {

  console.error(err.stack);

  res.status(500).json({ error: 'Something went wrong!' });

});
Input Validation
Use express-validator to check request data.
npm install express-validator
For example, check that the name is not empty and the email is valid.
Security
Use parameterized queries. They help prevent SQL injection.
Also, keep database credentials in .env. Do not hardcode them.
If the API serves a frontend, configure CORS with the cors package.
Connection Pooling and Rate Limits
The pg Pool supports concurrent connections. Monitor the maximum number of connections in production.
You can also use express-rate-limit to limit requests.
Logging
Use a logging library such as winston or morgan. It can track requests and errors.
Step 6: Optional Enhancements
You can add more features as the API grows.
- ORM: Use Sequelize or TypeORM.
- Authentication: Use JWT with
andjsonwebtoken
.bcrypt - JSONB: Store and query JSON data.
- Full-text search: Add search features.
- Indexes: Improve query performance.
- Deployment: Deploy the API to Heroku, AWS, or Vercel.
For example:
CREATE INDEX idx_users_email ON users(email);
Conclusion
To connect PostgreSQL to a REST API using a Jane.js and Express application you can also use the pg package.
This node.js application allows for CRUD operations as well as a starting point for implementing validation, security, logging, authentication and deployment.
Begin with the database connection and CRUD endpoints. Add additional features needed for your application.

