


Please Note: This article is part of our historical archive. Because it was published a while ago, some of the information, links, or context may now be outdated.
Wondering how to send Syslog with SSL/TLS to Nagios Log Server? We can help you.
As part of our Server Management Services, we assist our customers with several Nagios queries.
Today, let us see how to set up encryption between Nagios Log Server and Syslog on Linux using self-signed certificates.
Send Syslog with SSL/TLS
Encryption ensures that the traffic between the Linux machine and Nagios Log Server is not sent in plain text.
- Prerequisites
We already have Syslog on our Linux machine. If otherwise, the installation steps are available in Nagios Log Server by clicking + Add Log Source on the navigation bar. Here, we select Linux.
- SSL = Secure Sockets Layer
- TLS = Transport Layer Security
TLS replaces SSL, however, the tools used to implement both generally use SSL in their name/directives.
The steps here will create a CA and that CA will sign a certificate. This allows the client to trust that the CA certificate the destination use is valid.
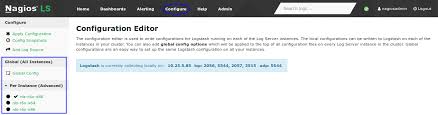
- Global Config vs Per Instance
Our Support Engineers look forward help create certificate files to use in the Logstash Input we create.
If we define this Input in the Global Config, we will require to place the certificate files on ALL of Nagios Log Server instances. If we do not, the configuration will not apply to the instances that do not have the certificate files.
This means that the input configuration will never update on these instances.
If we do not wish to implement the certificates on each Nagios Log Server instance, we will need to create the Input as a Per Instance config for the instance that has the certificate files.
Send Syslog with SSL/TLS to Nagios Log Server
Moving ahead, let us see how our Support Techs set up encryption between NLS and Syslog. Initially, we establish a terminal session to the Nagios Log Server as root.
Then we execute the following command to install the necessary components:
RHEL|CentOS|Oracle Linux
yum install -y mod_ssl openssl
Debian|Ubuntu
apt-get install -y openssl
Rest will perform from within the root user’s home directory. It is to ensure the files we create are not accessible to anyone except the root user.
Usually, we change into the home directory with this command:
cd ~
-
Create Certificate Authority
The first step is to generate the private key file. We execute:
openssl genrsa -out syslog-ca.key 2048
That will generate some random text. Next, we will generate a request and sign the key:
openssl req -x509 -new -nodes -key syslog-ca.key -sha256 -days 1024 -out syslog-ca.pem
We will need to supply some values, some can be left blank.
For example:
Country Name (2 letter code) [XX]:AU
State or Province Name (full name) []:NSW
Locality Name (eg, city) [Default City]:Sydney
Organization Name (eg, company) [Default Company Ltd]:My Company Pty Ltd
Organizational Unit Name (eg, section) []:
Common Name (eg, your name or your server's hostname) []:syslog-ca
Email Address []:
-
Create Nagios Log Server Certificate
Now we need to create a certificate for Nagios Log Server instance(s).
We execute the following command:
openssl genrsa -out syslog-nls.key 2048
It will generate some random text. Next, we will generate a request:
openssl req -new -key syslog-nls.key -out syslog-nls.csr
We will need to supply some values, some can be left blank.
For instance:
Country Name (2 letter code) [XX]:AU
State or Province Name (full name) []:NSW
Locality Name (eg, city) [Default City]:Sydney
Organization Name (eg, company) [Default Company Ltd]:My Company Pty Ltd
Organizational Unit Name (eg, section) []:
Common Name (eg, your name or your server's hostname) []:syslog-nls
Email Address []:
We make sure to enter the following ‘extra’ attributes:
A challenge password []:
An optional company name []:
Finally, to sign the key, we execute:
openssl x509 -req -in syslog-nls.csr -CA syslog-ca.pem -CAkey syslog-ca.key
-CAcreateserial -out syslog-nls.crt -days 500 -sha256
This will produce output saying the Signature was OK and it was Getting Private Key.
-
Copy New Certificates
We use the following commands to copy the new certificates to the correct locations:
cp syslog-ca.key /etc/pki/tls/private/
cp syslog-nls.key /etc/pki/tls/private/
cp syslog-ca.pem /etc/pki/tls/certs/
cp syslog-nls.crt /etc/pki/tls/certs/
If we plan to create the Input as part of the Global Config, we need to copy these certificate files to all the instances in the Nagios Log Server cluster.
[Need help with certification? We’d be happy to assist]
-
Create Firewall Rule
We need to create a firewall rule to allow the incoming TCP traffic. In the terminal session we execute the following commands:
RHEL 6|CentOS 6|Oracle Linux 6
iptables -I INPUT -p tcp --dport 7778 -j ACCEPT
service iptables save
RHEL 7|CentOS 7|Oracle Linux 7
firewall-cmd --zone=public --add-port=7778/tcp
firewall-cmd --zone=public --add-port=7778/tcp --permanent
Debian:
They don’t enable the local firewall on Debian by default. If otherwise, the commands are:
iptables -I INPUT -p tcp --destination-port 7778 -j ACCEPT
Ubuntu:
Similarly, they don’t enable the local firewall on Ubuntu by default. Otherwise, the commands are:
sudo ufw allow 7778/tcp
sudo ufw reload
If we plan to create the Input as part of the Global Config, we need to create this firewall rule on all the instances in the Nagios Log Server cluster.
-
Create Input
It creates an Input that uses the certificates we create and listen on TCP port 7778.
Initially, we log in to one of Nagios Log Server instances as an Admin user. Then we click Configure on the navigation bar.
Then, we select one of these options:
- For a Global Config
◦ In the left pane under Global (All Instances) click Global Config - For a Per Instance Config
◦ In the left pane under Per Instance (Advanced) click the Log Server Instance which has the certificate files.
The remaining steps are common to either option.
Subsequently, on the right side of the screen there click the + Add Input button and select Custom:
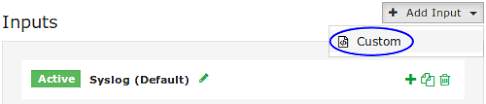
A new block appears at the bottom of the Inputs table. Here, we type a unique name for the input which will be Syslog (SSL/TLS).
In addition, in the text area field we enter the following code:
tcp {
port => 7778
type => 'syslog_tls'
ssl_extra_chain_certs => ['/etc/pki/tls/certs/syslog-ca.pem']
ssl_cert => '/etc/pki/tls/certs/syslog-nls.crt'
ssl_key => '/etc/pki/tls/private/syslog-nls.key'
ssl_enable => true
ssl_verify => false
}
If we have a version of Nagios Log Server before 1.5.0 then the
ssl_extra_chain_certsssl_cacertssl_cacert => '/etc/pki/tls/certs/syslog-ca.pem'
The
ssl_extra_chain_certsFinally, click the Save button to create this input.
-
Create Filter
This creates a Filter that breaks the incoming Syslog data into fields. While still on the Configure screen, click the + Add Filter button and select Custom.
A new block appears at the bottom of the Filters table.
Here, we type a unique name for the filter which will be Syslog (SSL/TLS). In the text area field we enter the following code:
if [type] == 'syslog_tls' {
grok {
match => { "message" => "<%{POSINT:priority}>%
{SYSLOGTIMESTAMP:timestamp} %{SYSLOGHOST:hostname} %{DATA:program}(?:\[%
{POSINT:pid}\])?: %{GREEDYDATA:message}" }
overwrite => [ 'message' ]
}
syslog_pri { }
mutate {
replace => [ 'type', 'syslog' ]
}
}
Finally, click the Save button to create this filter.
-
Verify And Apply Configuration
At this point, we should click the Verify button to ensure the filter is valid.
Once the verification is successful, we need to apply the configuration. In the left pane under Configure, click Apply Configuration.
Click the Apply button and then click Yes, Apply Now when prompted.
-
Configure Syslog On Linux
We will need to install the TLS module for
rsyslogIn this example, the client machine is CentOS 7, and the command to install these are:
yum install -y rsyslog-gnutls
Next, we need to copy the CA certificate to a Linux machine:
/root/syslog-ca.pem
copied to
/etc/pki/tls/certs/syslog-ca.pem
We could do this using the
scpscp /root/syslog-ca.pem root@client_address:/etc/pki/tls/certs/syslog-ca.pem
Keep in mind the
scpopenssh-clientsOnce we have done this, edit the
/etc/rsyslog.d/99-nagioslogserver.conf filevivi /etc/rsyslog.d/99-nagioslogserver.conf
When using the vi editor, to make changes press i on the keyboard first to enter insert mode. Press Esc to exit insert mode.
We need to add several lines to the beginning of the configuration. In addition, the port on the remote host line needs to be 7778.
Here is an example:
### Begin forwarding rule for Nagios Log Server
$DefaultNetstreamDriver gtls
$ActionSendStreamDriverMode 1
$ActionSendStreamDriverAuthMode x509/certvalid
$DefaultNetstreamDriverCAFile /etc/pki/tls/certs/syslog-ca.pem
$WorkDirectory /var/lib/rsyslog
$ActionQueueFileName nlsFwdRule0
$ActionQueueHighWaterMark 8000
$ActionQueueLowWaterMark 2000
$ActionQueueMaxDiskSpace 1g
$ActionQueueSaveOnShutdown on
$ActionQueueType LinkedList
$ActionResumeRetryCount -1
# Remote host is: name/ip:port, e.g. 192.168.0.1:514, port optional
*.* @@nagios_log_server_address:7778
### End of Nagios Log Server forwarding rule
Once done, save the changes.
Now we need to restart the Syslog service on the Linux machine. On CentOS 7 we accomplish it by:
systemctl restart rsyslog
-
Verify Incoming Logs
To confirm that Nagios Log Server is receiving data from the Linux server navigate to the Dashboards page. Perform a Query on the host field using the IP Address of the Linux host:
host:<Linux Host Address>
Additional Information:
If we would like to verify that traffic is encrypted, we can verify this by using
tcpdumptcpdumpRHEL|CentOS|Oracle Linux
yum install -y tcpdump
Debian|Ubuntu
apt-get install -y tcpdump
After installation, we execute the following command to observe the traffic:
tcpdump -i eth0 -nnvXSs 0 host 10.25.13.37
In that command, eth0 is the network interface on the Nagios Log Server and 10.25.13.37 is the IP address of the Linux machine.
Here is an example of output before implementing SSL/TLS.
13:22:42.122028 IP (tos 0x0, ttl 64, id 24258, offset 0, flags [DF], proto TCP
(6), length 800)
10.25.13.37.40086 > 10.25.5.84.5544: Flags [P.], cksum 0x987e (correct), seq
2705226557:2705227305, ack 2060624355, win 229, options [nop,nop,TS val
202974717 ecr 428191577], length 748
0x0000: 4500 0320 5ec2 4000 4006 b26b 0a19 0d25 E...^.@.@..k...%
0x0010: 0a19 0554 9c96 15a8 a13e 7b3d 7ad2 a1e3 ...T.....>{=z...
0x0020: 8018 00e5 987e 0000 0101 080a 0c19 25fd .....~........%.
0x0030: 1985 af59 3c33 303e 4f63 7420 2032 2031 ...Y<30>Oct..2.1
0x0040: 333a 3232 3a34 3220 6365 6e74 6f73 3139 3:22:42.centos19
0x0050: 2073 7973 7465 6d64 3a20 5374 6f70 7069 .systemd:.Stoppi
0x0060: 6e67 2053 7973 7465 6d20 4c6f 6767 696e ng.System.Loggin
We can see on the right-hand side the plain text such as “.systemd:.Stopping.System.Loggin.”
Here is an example of output after implementing SSL/TLS.
13:20:45.359313 IP (tos 0x0, ttl 64, id 50753, offset 0, flags [DF], proto TCP
(6), length 1312)
10.25.5.84.7778 > 10.25.13.37.60328: Flags [P.], cksum 0x2bbd (incorrect ->
0xe766), seq 3447726428:3447727688, ack 1805938821, win 122, options [nop,nop,TS
val 428074815 ecr 202857919], length 1260
0x0000: 4500 0520 c641 4000 4006 48ec 0a19 0554 E....A@.@.H....T
0x0010: 0a19 0d25 1e62 eba8 cd80 215c 6ba4 7085 ...%.b....!\k.p.
0x0020: 8018 007a 2bbd 0000 0101 080a 1983 e73f ...z+..........?
0x0030: 0c17 5dbf 1603 0304 e702 0000 4d03 035b ..].........M..[
0x0040: b2e4 0d91 32b7 b042 7d58 5d39 1a18 1ab8 ....2..B}X]9....
0x0050: b6e2 223d 0093 9e69 fe26 2bd0 f606 3b20 .."=...i.&+...;.
0x0060: 5bb2 e40d 830e e57c b620 6ffb 805d 20b4 [......|..o..]..
0x0070: 6dc5 956b 1245 e955 d014 a8a2 dada fef1 m..k.E.U........
0x0080: c013 0000 05ff 0100 0100 0b00 0341 0003 .............A..
0x0090: 3e00 033b 3082 0337 3082 021f 0209 00d0 >..;0..70.......
0x00a0: 3c8a 52cc a810 b530 0d06 092a 8648 86f7 <.R....0...*.H..
We can see on the right-hand side the data is encrypted and cannot be understood.
[Need further assistance? We are available 24*7]
Conclusion
To conclude, encryption ensures that the traffic between the Linux machine and Nagios Log Server is not sent in plain text. Today, we saw an effective way our Support Techs employ in order to Send Syslog with SSL/TLS to Nagios Log Server
