


Build a better blog by learning how to set up a Vue front end for a headless CMS. Get expert tips from our Headless CMS Support team today.
How to Create a Modern Vue Blog Using a Headless CMS
Browsing a blog feels effortless when the design is fast, clean, and easy to update. A headless CMS makes that happen behind the scenes, and Vue takes care of how everything looks on screen. Pairing them allows content teams to publish from one dashboard while the website stays smooth for readers on any device. In this guide, you’ll learn how to build a Vue 3 blog using GraphCMS, complete with categories, individual posts, and a simple comment section that keeps your audience engaged.
What is Headless CMS?
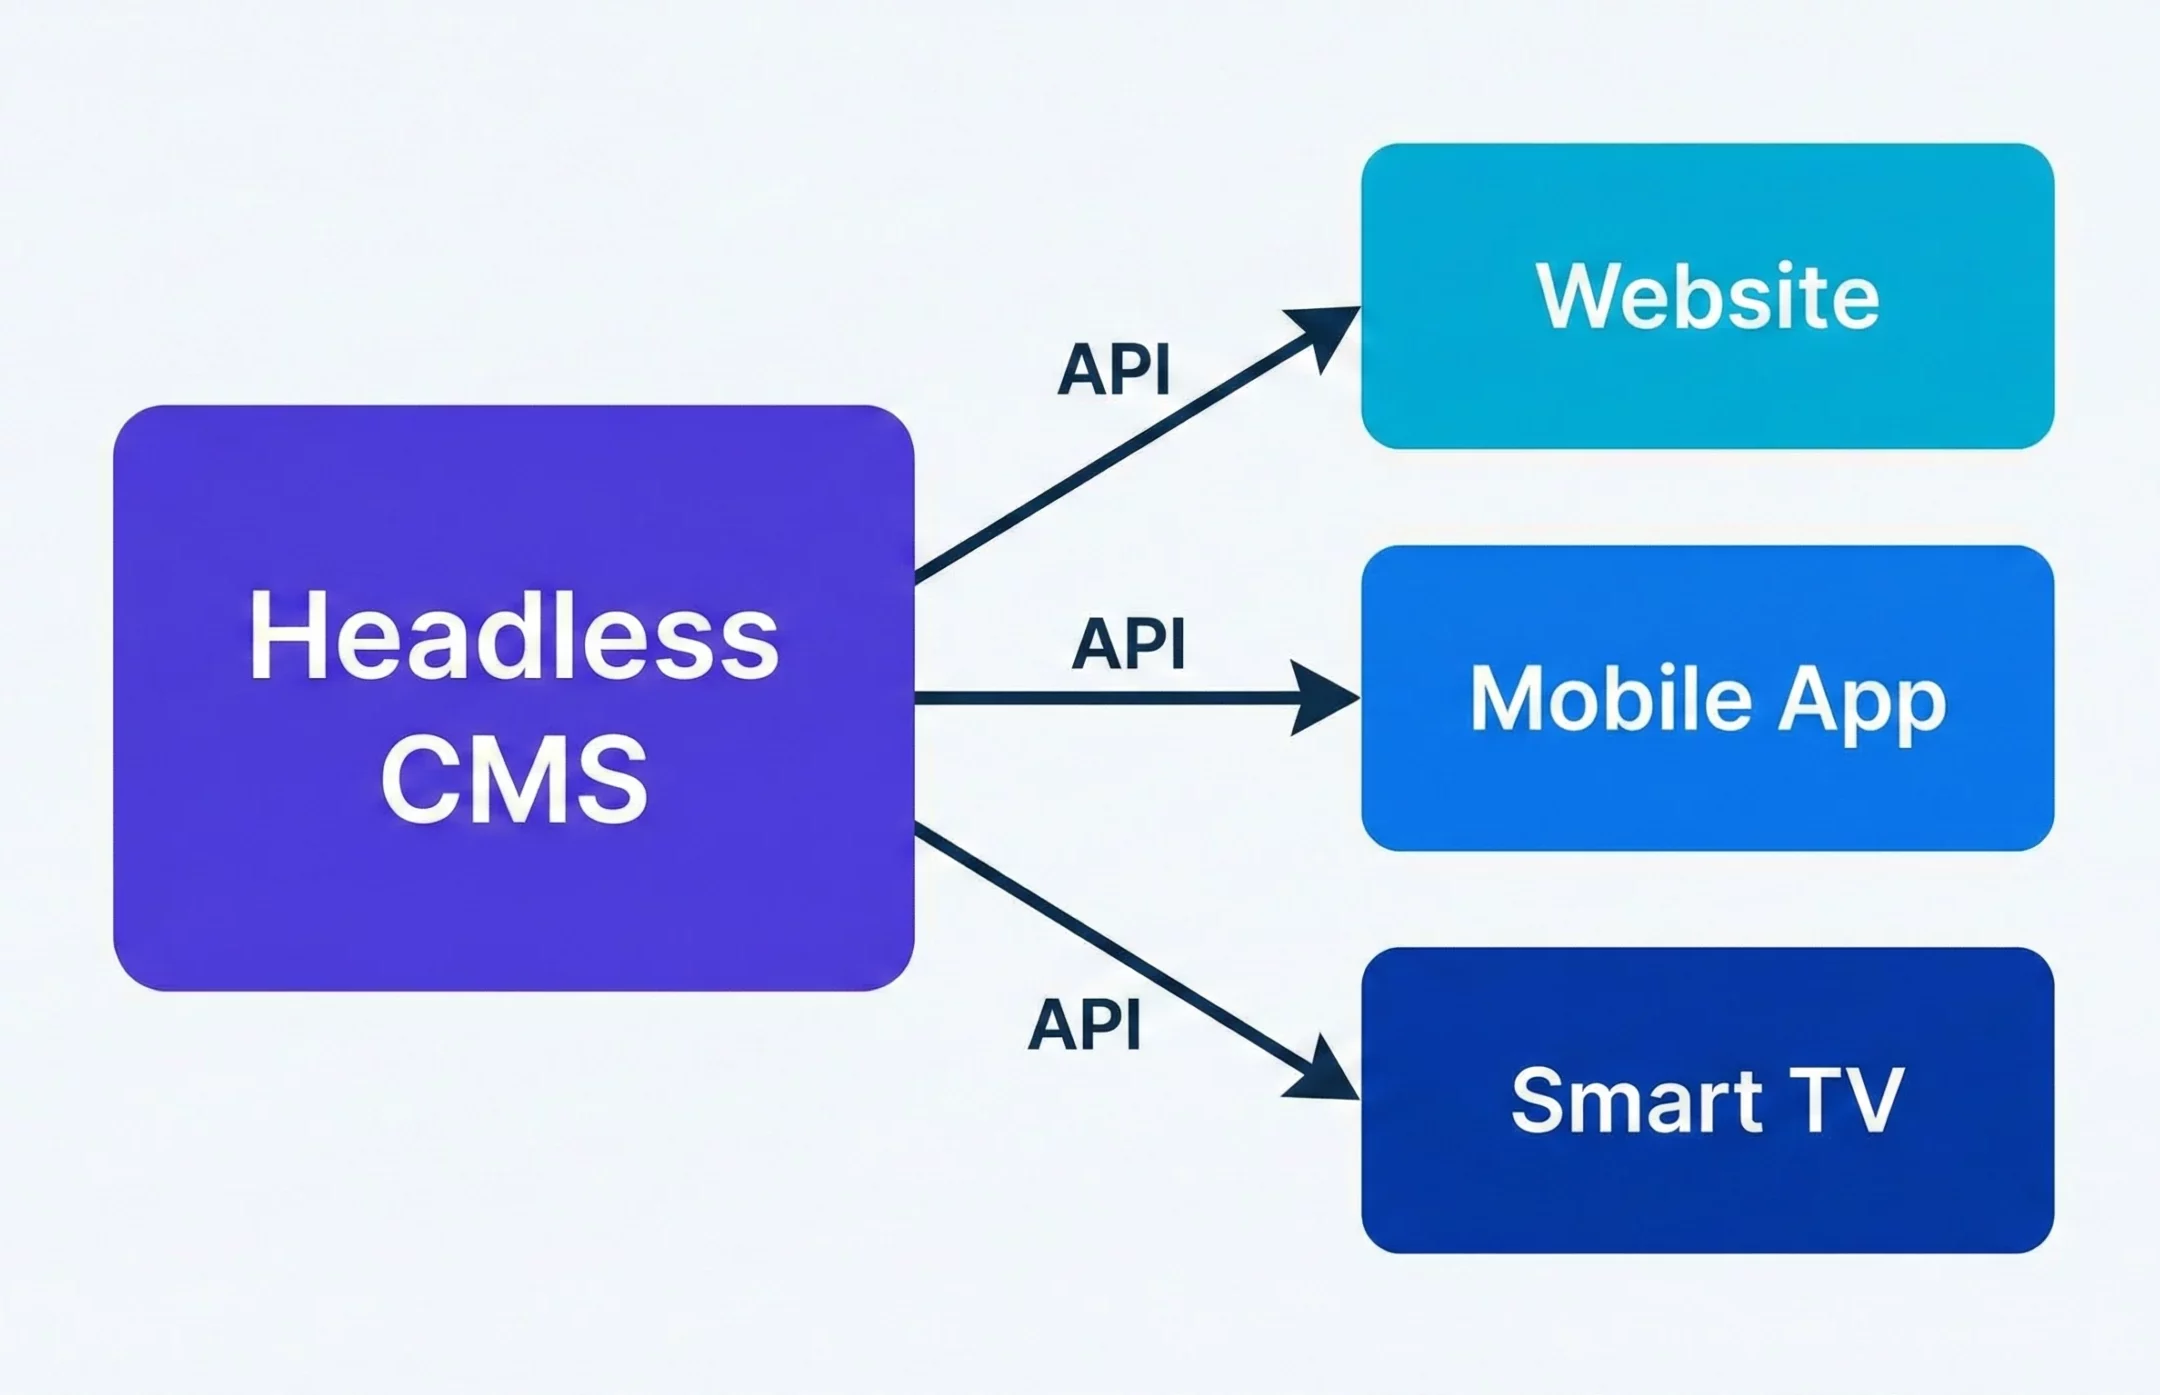
A headless CMS stores content in the backend and sends it to any website or app through APIs like REST or GraphQL, without locking you into a fixed design. It separates content creation from its presentation, allowing teams to publish once and use the same content across phones, laptops, smart TVs, and other devices. Developers get the freedom to use tools like React or Vue, and content creators handle everything from one dashboard. This enables faster updates, maintains a consistent brand message across all platforms, and avoids the limitations of traditional theme-based CMS platforms.
What is Vue?
Vue is a lightweight JavaScript framework used for building user interfaces and single-page applications. It feels easy to learn, even for beginners, and it still supports complex projects. Developers can start small and grow their applications step by step because Vue adapts to any need. Its component-based structure keeps the code organized, and its reactive system updates the screen instantly when data changes.
Features like two-way data binding with the V model make form handling simple, and its growing ecosystem helps build larger apps without adding heavy complexity. Many compare Vue with React and Angular, yet it stands out for being easier to adopt while offering a balanced mix of flexibility and practical tools for modern web development.
The Vue and Headless CMS Connection Explained
Vue and a headless CMS team up by separating how content is managed from how it is presented to users. A headless CMS stores and organizes text, media, and product data at the backend, then sends it to any platform through APIs. Vue takes this content and displays it using reusable components that shape the interface of a website or app. Content teams update everything from one dashboard, while Vue handles how it looks and behaves across different devices. This approach keeps development flexible and makes content delivery faster across web, mobile, and emerging platforms.
Create a fast Vue blog now.

Benefits of Using Vue with a Headless CMS
- One content source for websites, apps, and other digital platforms
- Faster updates without waiting for development changes
- Smooth and responsive user experiences across devices
- Developers choose the tools they want without CMS restrictions
- Content teams manage text, images, and media from one dashboard
- Consistent branding across every channel
- Scales easily as business needs grow
- Supports real-time content changes without redesigning the frontend
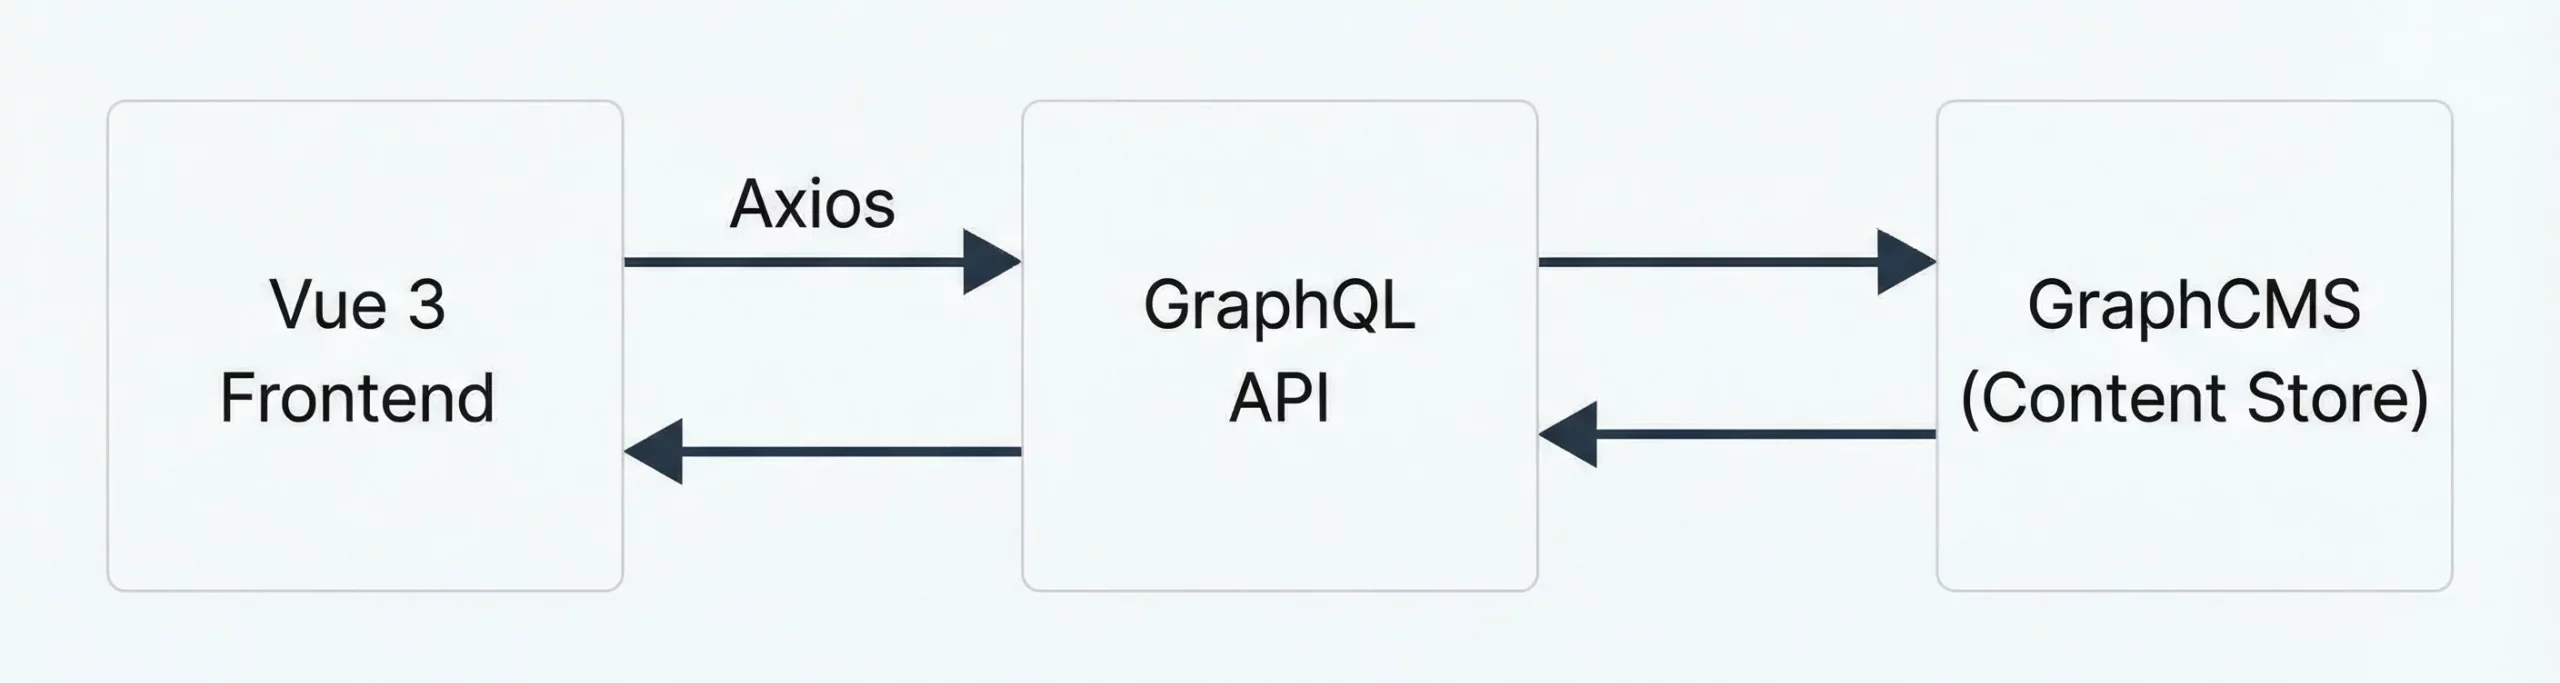
Build a Vue 3 Blog Frontend with GraphCMS and Comments
This guide explains how to build a complete blog frontend with Vue 3 and GraphCMS. Readers see category pages, single posts, and a live comment section. Content editors enjoy a clean content dashboard while the frontend stays fast and flexible.
The stack looks like this
- Vue 3 for the frontend
- GraphCMS as the headless content store
- GraphQL for queries and mutations
- Axios for HTTP requests
Everything below is ready to adapt for your own blog or brand site.
Prerequisites
To set up a Vue frontend with a headless CMS, a few basics should be ready before starting the build.
-
Node.js and npm (or Yarn)
Node.js runs JavaScript outside the browser, and npm or Yarn helps install Vue and other packages.
node -v

npm -v-
Vue CLI
Vue CLI speeds up project setup and gives useful tools like a dev server.
npm install -g @vue/cli-
A Code Editor
Use an editor that supports Vue syntax. Visual Studio Code is the most common choice.
-
Headless CMS Account and API Access
Choose a CMS such as Strapi, Contentful, Prismic, or Sanity. Create a project, add content models, and copy your API keys to connect Vue with the CMS.
-
Basic Vue Knowledge
You should understand how components, directives, and data reactivity work before building the frontend.
-
REST or GraphQL Understanding
Know how to fetch data from APIs. Tools like Axios are commonly used for this step.
Step 1: Set up the GraphCMS project
Create a free account on the GraphCMS site and start a new project. After the project loads, define three content models.
Models and fields
Category
name as single line text, required and unique
Post
- slug as single line text, required and unique
- title as single line text, required and unique
- content as multi-line text
Comment
- name as single line text, required
- message as multi-line text, required
Then create the relations
- Post to Categories as many-to-many
- Post to Comments as one to many
Use the Reference field for these links. Once these relations exist, a post can hold many comments and categories, and you can query posts through a category.
Step 2: Add sample content with a migration tool
GraphCMS lets you add content manually through the Content tab. That works for a few records. If you want quick sample content, you can use a migration helper that reads CSV files and sends the data to your project.
Example commands
git clone git@github.com:sitepoint-editors/graphcsms-data-migration.git

cd graphcsms-data-migration

npm install
Create a file named
.envAdd the endpoint and token from your GraphCMS project settings. Use an Open permission token so the script can read and write.
ENDPOINT=your_graphcms_endpoint_here

TOKEN=your_open_permission_token_here

Sample CSV content
Categories
- Name
- Featured
- Food
- Fashion
- Beauty
Posts
title,slug,content,categories

Food Post 1,food-post-1,Breeze through Thanksgiving by making this Instant Pot orange cranberry sauce,Food|Featured

Food Post 2,food-post-2,This is my second food post,Food

Food Post 3,food-post-3,This is my last and final food post,Food

Fashion Post 1,fashion-post-1,This is truly my very first fashion post,Fashion|Featured

Fashion Post 2,fashion-post-2,This is my second fashion post,Fashion

Fashion Post 3,fashion-post-3,This is my last and final fashion post,Fashion

Beauty Post 1,beauty-post-1,This is truly my very first beauty post,Beauty|Featured

Beauty Post 2,beauty-post-2,This is my second beauty post,Beauty
Run the scripts in this order so categories exist before posts that reference them.
npm run categories

npm run posts
If you want to clear the data and start fresh, use
npm run resetAfter that, open the GraphCMS dashboard and confirm that Categories and Posts show the new records.
Step 3: Create a Vue 3 project
For a modern Vue setup, use the official create command powered by Vite.
npm create vue@latestFollow the prompts and choose these options
Project name example
vue-graphcms- Select Vue Router support
- Select TypeScript only if you feel comfortable with it
- Select ESLint if you like linting
Then move into the folder and install dependencies.
cd vue-graphcms

npm install

npm install axios
You now have a fresh Vue 3 project ready for a headless CMS frontend.
Step 4: Configure environment variables
Use environment variables to keep secrets out of the code. Vite reads variables that start with VITE.
Create a file named
.env.localAdd the GraphCMS details.
VITE_GRAPHCMS_ENDPOINT=https://your-project-api-endpoint

VITE_GRAPHCMS_TOKEN=your-open-permission-token
These values load through import meta env inside the code.
Step 5: Create a GraphCMS client and GraphQL queries
Create a file at
src/graphcmsClient.jsAdd this content
import axios from "axios";

const ENDPOINT = import.meta.env.VITE_GRAPHCMS_ENDPOINT;

const TOKEN = import.meta.env.VITE_GRAPHCMS_TOKEN;

export const apiClient = axios.create({

baseURL: ENDPOINT,

headers: {

"Content-Type": "application/json",

Authorization: `Bearer ${TOKEN}`,

},

});

// Query posts by category name

export const POSTS_BY_CATEGORY_QUERY = `

query PostsByCategory($category: String!) {

category(where: { name: $category }) {

name

posts(orderBy: createdAt_DESC) {

id

slug

title

content

categories {

name

}

}

}

}

`;

// Query a single post by slug

export const POST_BY_SLUG_QUERY = `

query PostBySlug($slug: String!) {

post(where: { slug: $slug }) {

id

title

content

categories {

name

}

comments {

id

name

message

}

}

}

`;

// Create a new comment attached to a post

export const CREATE_COMMENT_MUTATION = `

mutation CreateComment(

$post: PostWhereUniqueInput!

$name: String!

$message: String!

) {

createComment(

data: {

name: $name

message: $message

post: { connect: $post }

status: PUBLISHED

}

) {

id

name

message

}

}

`;
This file uses axios to send GraphQL queries and mutations to GraphCMS. The queries match the models from the schema step.
Step 6: Set up Vue Router for categories and posts
Create a router file for navigation between category pages and single posts.
Create
src/router/index.jsAdd this content
import { createRouter, createWebHistory } from "vue-router";

import HomeView from "@/views/HomeView.vue";

import PostView from "@/views/PostView.vue";

const routes = [

{

path: "/",

name: "Featured",

component: HomeView,

},

{

path: "/food",

name: "Food",

component: HomeView,

},

{

path: "/fashion",

name: "Fashion",

component: HomeView,

},

{

path: "/beauty",

name: "Beauty",

component: HomeView,

},

{

path: "/post/:slug",

name: "Post",

component: PostView,

props: true,

},

];

const router = createRouter({

history: createWebHistory(import.meta.env.BASE_URL),

routes,

scrollBehavior() {

return { top: 0 };

},

});

export default router;
Each category routes to HomeView with a different name. The post route passes the slug as a parameter to PostView.
Step 7: Wire up the main entry file and layout
Open
src/main.jsReplace the content with
import { createApp } from "vue";

import App from "./App.vue";

import router from "./router";

import "./assets/main.css";

const app = createApp(App);

app.use(router);

app.mount("#app");
Now create a simple site layout with a top navigation bar.
Open
src/App.vueReplace with
<template>

<div id="app">

<header class="site-header">

<nav class="nav">

<div class="nav-brand">GraphCMS Vue Blog</div>

<ul class="nav-links">

<li>

<RouterLink to="/" exact-active-class="active-link">Home</RouterLink>

</li>

<li>

<RouterLink to="/food" active-class="active-link">Food</RouterLink>

</li>

<li>

<RouterLink to="/fashion" active-class="active-link">Fashion</RouterLink>

</li>

<li>

<RouterLink to="/beauty" active-class="active-link">Beauty</RouterLink>

</li>

</ul>

</nav>

</header>

<main class="site-main">

<RouterView />

</main>

</div>

</template>

<script setup>

import { RouterLink, RouterView } from "vue-router";

</script>
Add some basic styling in
src/assets/main.css

You can adjust the styling later to match your brand.

* {

box-sizing: border-box;

}

body {

margin: 0;

font-family: system-ui, -apple-system, BlinkMacSystemFont, "Segoe UI",

sans-serif;

background-color: #f5f5f7;

color: #222;

}

.site-header {

background-color: #0d6efd;

color: #fff;

padding: 1rem 1.5rem;

}

.nav {

display: flex;

align-items: center;

justify-content: space-between;

}

.nav-brand {

font-weight: 600;

font-size: 1.1rem;

}

.nav-links {

list-style: none;

display: flex;

gap: 1rem;

margin: 0;

padding: 0;

}

.nav-links a {

color: #e5e5e5;

text-decoration: none;

font-size: 0.95rem;

}

.nav-links a.active-link {

color: #fff;

font-weight: 600;

border-bottom: 2px solid #fff;

}

.site-main {

max-width: 960px;

margin: 2rem auto;

padding: 0 1rem 2rem;

}

.card {

background-color: #fff;

border-radius: 0.75rem;

padding: 1.25rem 1.5rem;

margin-bottom: 1.25rem;

box-shadow: 0 1px 4px rgba(15, 23, 42, 0.08);

}

.card-title {

margin: 0 0 0.5rem;

font-size: 1.1rem;

}

.card-subtitle {

font-size: 0.85rem;

color: #6c757d;

margin-bottom: 0.75rem;

}

.card-text {

font-size: 0.95rem

color: #444;

}

.button-primary {

display: inline-block;

margin-top: 0.75rem;

padding: 0.5rem 0.9rem;

border-radius: 0.5rem;

border: none;

background-color: #0d6efd;

color: #fff;

font-size: 0.9rem;

cursor: pointer;

text-decoration: none;

}

.button-primary:disabled {

opacity: 0.7;

cursor: default;

}

.spinner {

width: 42px;

height: 42px;

border-radius: 50%;

border: 4px solid #ddd;

border-top-color: #0d6efd;

animation: spin 0.8s linear infinite;

margin: 2rem auto;

}

.text-center {

text-align: center;

}

.post-title {

font-size: 1.6rem;

margin-bottom: 0.3rem;

}

.post-meta {

color: #6c757d;

font-size: 0.9rem;

margin-bottom: 1rem;

}

.post-body {

line-height: 1.6;

margin-bottom: 1.5rem;

}

.comment-section,

.comment-form {

margin-top: 2rem;

}

.comment-heading {

font-size: 1.1rem;

color: #6c757d;

margin-bottom: 0.75rem;

}

.comment-card {

border-radius: 0.75rem;

background-color: #fff;

padding: 0.9rem 1rem;

margin-bottom: 0.75rem;

box-shadow: 0 1px 3px rgba(15, 23, 42, 0.06);

}

.comment-author {

font-weight: 600;

margin-bottom: 0.25rem;

}

.comment-text {

font-size: 0.95rem;

color: #555;

}

.form-group {

margin-bottom: 0.9rem;

}

.form-label {

display: block;

font-size: 0.9rem;

margin-bottom: 0.25rem;

}

.form-input,

.form-textarea {

width: 100%;

padding: 0.5rem 0.65rem;

border-radius: 0.5rem;

border: 1px solid #ced4da;

font-size: 0.95rem;

}

.form-textarea {

resize: vertical;

min-height: 80px;

}

.form-input:focus,

.form-textarea:focus {

outline: none;

border-color: #0d6efd;

box-shadow: 0 0 0 1px rgba(13, 110, 253, 0.2);

}

.helper-text {

font-size: 0.8rem;

color: #6c757d;

margin-top: 0.25rem;

}

@keyframes spin {

to {

transform: rotate(360deg);

}

}
This styling keeps everything clean and easy to read for visitors.
Step 8: Create the Home view that lists posts by category
HomeView acts as a wrapper and passes control to a PostList component.
Create
src/views/HomeView.vueAdd
<template>

<section>

<PostList />

</section>

</template>

<script setup>

import PostList from "@/components/PostList.vue";

</script>
Now create PostList with Vue 3 composition API and route-based category lookup.
Create
src/components/PostList.vueAdd
<template>

<section>

<h1>{{ headingText }}</h1>

<div v-if="loading" class="text-center">

<div class="spinner"></div>

</div>

<div v-else>

<div v-if="posts.length === 0" class="card">

<p class="card-text">
No posts found for this category.
</p>

</div>

<article

v-for="post in posts"

:key="post.id"

class="card"

>

<h2 class="card-title">{{ post.title }}</h2>

<p class="card-subtitle">

{{ formatCategories(post.categories) }}

</p>

<p class="card-text">

{{ truncateContent(post.content) }}

</p>

<RouterLink

class="button-primary"

:to="`/post/${post.slug}`"

>

Read post

</RouterLink>

</article>

</div>

</section>

</template>

<script setup>

import { ref, computed, watch, onMounted } from "vue";

import { useRoute, RouterLink } from "vue-router";

import {

apiClient,

POSTS_BY_CATEGORY_QUERY,

} from "@/graphcmsClient";

const route = useRoute();

const categoryName = ref(route.name || "Featured");

const posts = ref([]);

const loading = ref(false);

const headingText = computed(() => {

return `${categoryName.value} articles`;

});

function formatCategories(categories) {

if (!categories || categories.length === 0) {

return "Uncategorized";

}

return categories.map((cat) => cat.name).join(", ");

}

function truncateContent(text, limit = 160) {

if (!text) {

return "";

}

if (text.length <= limit) {

return text;

}

return text.slice(0, limit) + "...";

}

async function fetchPosts() {

try {

loading.value = true;

posts.value = [];

const response = await apiClient.post("", {

query: POSTS_BY_CATEGORY_QUERY,

variables: {

category: categoryName.value,

},

});

const data = response.data?.data;

posts.value = data?.category?.posts || [];

} catch (error) {

console.error("Error fetching posts", error);

} finally {

loading.value = false;

}

}

onMounted(fetchPosts);

watch(

() => route.name,

(newName) => {

categoryName.value = newName || "Featured";

fetchPosts();

}

);

</script>
This component responds to route changes, pulls posts based on the active category, and shows them as simple cards.
Step 9: Create components for comments
Next, add a component to display a list of comments under a post.
Create
src/components/CommentList.vueAdd
<template>

<section class="comment-section">

<h3 class="comment-heading">Comments</h3>

<div v-if="comments && comments.length > 0">

<div

v-for="comment in comments"

:key="comment.id"

class="comment-card"

>

<p class="comment-author">{{ comment.name }}</p>

<p class="comment-text">{{ comment.message }}</p>

</div>

</div>

<p v-else class="helper-text">

No comments yet. Be the first to share your thoughts.

</p>

</section>

</template>

<script setup>

defineProps({

comments: {

type: Array,

default: () => [],

},

});

</script>
Now add a CommentForm component that sends a mutation to GraphCMS and passes the new comment back to the parent.
Create
src/components/CommentForm.vueAdd
<template>

<section class="comment-form">

<h3 class="comment-heading">Leave a comment</h3>

<form @submit.prevent="handleSubmit">

<div class="form-group">

<label class="form-label" for="name">Name</label>

<input

id="name"

v-model="name"

class="form-input"

type="text"

required

autocomplete="name"

placeholder="Enter your name"

/>

</div>

<div class="form-group">

<label class="form-label" for="message">Message</label>

<textarea

id="message"

v-model="message"

class="form-textarea"

required

rows="3"

placeholder="Write your comment"

></textarea>

<p class="helper-text">

Keep comments friendly and on topic.

</p>

</div>

<button

class="button-primary"

type="submit"

:disabled="submitting"

>

<span v-if="submitting">Sending...</span>

<span v-else>Submit comment</span>

</button>

</form>

</section>

</template>

<script setup>

import { ref } from "vue";

import {

apiClient,

CREATE_COMMENT_MUTATION,

} from "@/graphcmsClient";

const props = defineProps({

postId: {

type: String,

required: true,

},

});

const emit = defineEmits(["commentCreated"]);

const name = ref("");

const message = ref("");

const submitting = ref(false);

async function handleSubmit() {

if (!name.value.trim() || !message.value.trim()) {

return;

}

try {

submitting.value = true;

const variables = {

name: name.value.trim(),

message: message.value.trim(),

post: {

id: props.postId,

},

};

const response = await apiClient.post("", {

query: CREATE_COMMENT_MUTATION,

variables,

});

const newComment =

response.data?.data?.createComment || null;

if (newComment) {

emit("commentCreated", newComment);

name.value = "";

message.value = "";

}

} catch (error) {

console.error("Error creating comment", error);

} finally {

submitting.value = false;

}

}

</script>
Now readers can post a comment, and the parent component can update the comment list instantly.
Step 10: Create the Post component with comments
Create a Post component that fetches a single post by slug, shows its content, and nests the comment list and comment form.
Create
src/components/Post.vueAdd
<template>

<section>

<div v-if="loading" class="text-center">

<div class="spinner"></div>

</div>

<article v-else-if="post">

<h1 class="post-title">{{ post.title }}</h1>

<p class="post-meta">

{{ formatCategories(post.categories) }}

</p>

<div class="post-body">

{{ post.content }}

</div>

<CommentList :comments="post.comments" />

<CommentForm

:post-id="post.id"

@commentCreated="handleCommentCreated"

/>

</article>

<div v-else class="card">

<p class="card-text">

Post not found. Try a different link from the menu.

</p>

</div>

</section>

</template>

<script setup>

import { ref, onMounted, watch } from "vue";

import { useRoute } from "vue-router";

import {

apiClient,

POST_BY_SLUG_QUERY,

} from "@/graphcmsClient";

import CommentList from "@/components/CommentList.vue";

import CommentForm from "@/components/CommentForm.vue";

const route = useRoute();

const slug = ref(route.params.slug);

const post = ref(null);

const loading = ref(false);

function formatCategories(categories) {

if (!categories || categories.length === 0) {

return "Uncategorized";

}

return categories.map((cat) => cat.name).join(", ");

}

async function fetchPost() {

try {

loading.value = true;

post.value = null;

const response = await apiClient.post("", {

query: POST_BY_SLUG_QUERY,

variables: {

slug: slug.value,

},

});

const data = response.data?.data;

post.value = data?.post || null;

} catch (error) {

console.error("Error fetching post", error);

} finally {

loading.value = false;

}

}

function handleCommentCreated(newComment) {

if (!post.value) {

return;

}

if (!post.value.comments) {

post.value.comments = [];

}

post.value.comments.push(newComment);

}

onMounted(fetchPost);

watch(

() => route.params.slug,

(newSlug) => {

slug.value = newSlug;

fetchPost();

}

);

</script>
This component handles loading state, missing posts, and live comment updates clearly and directly.
Step 11: Create the Post view
Finally, connect the Post component to the router through a view file.
Create
src/views/PostView.vueAdd
<template>

<Post />

</template>

<script setup>

import Post from "@/components/Post.vue";

</script>
Now the route path that uses slug displays the Post view and the full post layout.
Step 12: Run the app
Start the development server.
npm run devOpen the local address from the terminal. Navigate between Home, Food, Fashion, and Beauty. Click into a post. You now see
- Category-based post lists
- Single post pages with content
- A live comment section that talks to GraphCMS
[Need assistance with a different issue? Our team is available 24/7.]
Conclusion
Building with Vue and GraphCMS gives you a blog that loads fast, looks modern, and stays easy to update from one dashboard. It’s a practical way to grow any content-driven site without theme limits or slow redesigns. If you want a flexible publishing setup, start by setting up a Vue front end for a headless CMS and shape it to fit your brand. Ready to add features like search or image galleries? Tell us what you need, and we can help you build it.
