


SSL is one of the standard technology to authenticate and encrypt communication between clients and servers.
Also, SSL encrypts network traffic so that an attacker cannot listen to sensitive information like passwords and credit card numbers on the network.
In some control panels like Webmin, there is a feature to install SSL certificate on Apache to secure website sensitive data.
At Bobcares, we often get requests from our customers to install and configure SSL certificate on Apache with Webmin as part of our Server Management Services.
Today, we’ll see how our Support Engineers install and configure SSL certificate on Apache with Webmin and fix the related errors.
Understanding SSL/TLS Certificates and Their Role in Website Security
How to install Apache SSL certificate with Webmin
SSL is a protocol for establishing secure and authenticated connections across an unsafe network like the Internet.
Let’s see how our Support Engineers installed Apache SSL certificate by using Webmin.
Pre-requirements
Before the installation process starts, we need some pre-requirements as follows.
1. The OpenSSL should installed in Webmin
2. A generated CSR for the website.
3. Uploaded private key.
4. Need the files “example_com.crt” and “example_com.ca-bundle” from the SSL provider.
Once the Certificate Authority issues the SSL certificate, it is time to install it on the server.
SSL certificate installation procedures
To install the SSL certificate with Webmin, we took the following steps.
1. We logged into the Webmin interface.
2. Then our Support Engineers clicked on Others > File Manager. Navigate to the folder where the private key contains, then we clicked on File > Upload to current directory in the top right corner. After that, uploaded the certificate (your_domain_name.cer) and the CA Bundle.
3. Once the file is uploaded, go to Server > selected Apache Web server.
4. Then, we clicked on Create Virtual Host and selected Any address and enabled Listen on port.
After that, we filled the following parameters too.
- Port: 443.
- Document Root: Root path of the website that wants to secure.
- Server Name: Website’s domain name.
- Add virtual server to file: Choosed New file under virtual servers directory /etc/apache2/sites-enabled
- Copy directive from: Selected Automatic in the dropdown menu.
After doing these settings, we clicked on Create Now.

4. Now the virtual host listening on port 443 appeared on Apache Web server page.
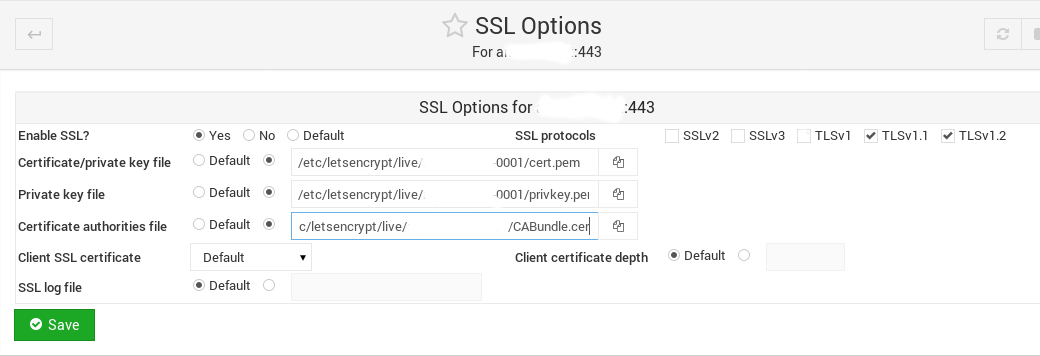
5. Then we clicked on the newly created server to open its settings, then we clicked on SSL Options.
6. At last, we enabled SSL and disabled SSLv2, SSLv3 and TLSv1. In addition, we specified the paths to the domain certificate, to the private key and to the CA Bundle files in the corresponding fields and clicked Save button.
Secure your website: Manually install an SSL certificate on Apache
Manually installing an SSL certificate on an Apache server is an essential step in protecting your website and ensuring secure communication with users. This process encrypts data transfers, preventing unauthorized access and enhancing trust among visitors.
To start, locate all necessary SSL files, including the primary certificate, intermediate certificates, and the private key. Upload these files to your Apache server, typically in the SSL directory associated with your site configuration. Once uploaded, open your Apache configuration file and add the correct paths for your SSL certificates. Make sure to define the SSLCertificateFile, SSLCertificateKeyFile, and SSLCertificateChainFile directives accurately.
After updating the configuration, run a syntax test to ensure there are no errors. If the configuration passes, restart the Apache service to activate the SSL setup. Finally, open your website in a browser using HTTPS to confirm that the SSL certificate is correctly installed and functioning. Completing this process enhances your site’s security, builds user confidence, and contributes to improved SEO performance.
How we fixed errors related to Apache SSL certificate in Webmin
Let’s see how our Support Engineers fixed errors related to Apache SSL certificate on Webmin.
1. Missing CA certificate
Recently, one of our customers had a website issue after installing the Apache SSL certificate in Webmin. The error looked like,

Then our Support Engineers identified that the problem was due to the improper Apache SSL certificate installation in Webmin.
In Virtualmin,
1. We logged into Virtualmin.
2. Then we go to Server Configuration -> Manage SSL Certificate -> CA Certificate.
3. We uploaded the right cert.
4. At last, we restarted the Apache service.
/etc/init.d/apache2 restart
That’s it. This is how we fixed the issue.
2. SSL protocol issue
Similarly, another customer had a website issue, his website worked fine with non SSL but when switched to https, he had an ERR_SSL_PROTOCOL_ERROR in the browser.
Then our Support Engineers took the following steps to solve the error.
1. Firstly, we checked the apache error log /var/log/apache2/error.log and got the error like,
[Tue May 02 09:55:23.077848 2017] [ssl:warn] [pid 12276] AH01906: urlofmyvirtualhere:443:0 server certificate is a CA certificate (BasicConstraints: CA == TRUE !?)>/code>
2. Then we opened ssl.conf and verified the SSL parameters in settings.
vi /etc/apache2/sites-enabled/000-default-ssl.conf
3. We found that SSLProtocol TLSv1.2 code was commented. Therefore it won’t execute.
4. After that, we uncommented the SSLProtocol TLSv1.2 and saved the file.
5. Finally, we restarted the Apache service.
/etc/init.d/apache2 restart
That’s fixed the problem.
[Having trouble after installing Apache SSL certificate in Webmin? We’ll fix it for you.]
Why your website needs an SSL certificate
An SSL certificate plays a vital role in protecting your website and the people who visit it. It secures communication between the web server and the user’s browser by encrypting sensitive information such as passwords, credit card details, and personal data. As a result, hackers cannot intercept or misuse this information, keeping online transactions safe and private.
In addition to protecting data, an SSL certificate also verifies your website’s identity. It helps users confirm that they are visiting the right site and not a fake version created by attackers. When a website uses HTTPS, browsers display a secure lock icon that reassures visitors the connection is safe. This visible trust signal encourages users to share information confidently and engage more with your site.
Another major reason to have an SSL certificate is improved visibility. Search engines like Google favor secure websites, ranking them higher in search results. Therefore, installing SSL not only strengthens security but also boosts organic traffic and credibility. It also prevents browsers from showing “Not Secure” warnings that can discourage visitors from exploring your pages.
Overall, an SSL certificate is more than just a security tool. It is an essential step toward building trust, protecting users, and improving your website’s performance across search engines.
Conclusion
In short, Apache SSL certificate is a standard technology for establishing secure and authenticated connections across insecure networks. Today, we saw how our Support Engineers installed Apache SSL in Webmin and fixed related errors.
