PHP is a commonly used scripting language for websites, and its configuration settings can be managed using a server-wide php.ini file.
Most shared hosting providers enforce server-wide php ini settings on all users. But some software such as WordPress, Joomla, etc. require custom PHP ini for websites.
To allow users to configure their custom PHP settings, SuPHP can be enabled in a server. This will allow them to override the server-wide PHP settings.
PHP configuration in cPanel/WHM servers
In cPanel/WHM servers, the script EasyApache is used to recompile Apache/PHP in the server and to customize the php.ini settings.
Our 24/7 US based phone support team coordinates with the helpdesk support team to quickly customize server settings for the customers. Learn more.
When the latest version EasyApache 4 was released, it came with many features such as PHP 7 support and custom PHP version per website.
Today we’ll see the steps to enable custom php ini for users in cPanel servers with suPHP using EasyApache 4.
Enable custom php ini in cPanel servers using EasyApache 4
Unlike its previous versions, EasyApache 4 uses ‘rebuild_phpconf’ script to manage PHP settings. As a result, its configuration is a bit different.
On servers with EasyApache 4, multiple ‘php.ini' and ‘local.ini' files manages the PHP settings. To enable custom php ini, the steps are:
Step 1 – Locate the local.ini file
The first step is to ensure that ‘local.ini’ file is present for the PHP version in the following folder:
/opt/cpanel/ea-php<php version>/root/etc/php.dExamples:
/opt/cpanel/ea-php55/root/etc/php.d/local.ini
/opt/cpanel/ea-php56/root/etc/php.d/local.ini
/opt/cpanel/ea-php70/root/etc/php.d/local.ini
Step 2 – Generate ini file
If local.ini file is NOT present in the location ‘/opt/cpanel/ea-php<php version>/root/etc/php.d’, go to “MultiPHP INI Editor” in WHM.

PHP ini editor in WHM
See how our 24/7 support team helps you!
Step 3 – Choose the corresponding version of PHP
Since Easyapache 4 supports multiple PHP versions, it will show them as options in the editor. Select a PHP version that you want to be installed in your server.
Once you select the PHP version that you want from the drop down, you would be presented with the php.ini file corresponding to that version.

Edit php ini for PHP version
Step 4. Scroll down & press “Apply” button
If you want any custom PHP setting such as memory limit, it can be edited now. After making the required changes in the php.ini file, save the changes.

Generate custom php.ini file
Now, we can see that ‘local.ini’ files are generated in the folder ‘/opt/cpanel/ea-php<php version>/root/etc/php.d’.
===================================
 (root)>ll /opt/cpanel/ea-php*/root/etc/php.d/local.ini
 -rw-r--r-- 1 root root 65515 Sep 17 02:15 /opt/cpanel/ea-php55/root/etc/php.d/local.ini
 -rw-r--r-- 1 root root 65515 Sep 17 02:22 /opt/cpanel/ea-php56/root/etc/php.d/local.ini
 -rw-r--r-- 1 root root 60538 Sep 17 02:22 /opt/cpanel/ea-php70/root/etc/php.d/local.ini
 ===================================
These are the server-wide php.ini files for each PHP version settings.
[ Take care of your customers, before your competitors do. Get world-class support specialists to delight your customers. ]
Step 5 – Identify the PHP version for the website
Next step is to setup custom php ini file for a customer’s website in the cPanel server. Go to document root of the website, usually ‘/home/user/public_html/’ .
Run these commands to see PHP version of the website and its php.ini file location.
 php -v
 php -i | grep php.ini
You can now see the PHP version for that website and the php.ini file used for it.
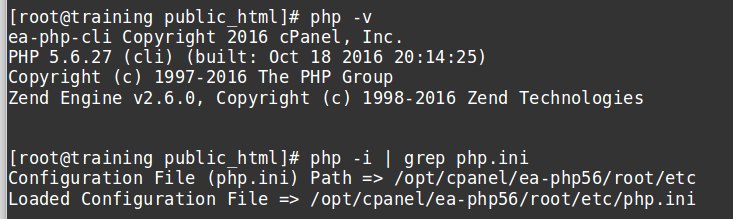
Verify PHP version and ini file of website
Step 6 – Configure custom php ini file for website
The server-wide php.ini file that is used for the website can be copied over to the site and edited for custom settings.
The custom php ini files for users are named as “.user.ini”. Copy ‘/opt/cpanel/ea-php56/root/etc/php.ini’ to the document root of the website and rename it to ‘.user.ini’.
Now, we can modify this ‘.user.ini’ file and customize the parameters that are required for the website. This custom php ini file will be applied to all sub folders.
The changes that are made to this ini file can be verified using a ‘phpinfo()’ page for the website.
[ Running a hosting business doesn’t have to be hard, or costly. Get 24/7 world class Hosting Support Specialists and get peace of mind. ]
Points to note..
There are a few other points to note during the custom php ini in cPanel:
- Make sure that ‘suPHP_ConfigPath’ is NOT defined in the ‘.htaccess’ file for the website, as it will not work in EasyApache 4 servers with suPHP.
- The “Loaded Configuration File” in “PHP info” page will not be changed to ‘/home/user_name/public_html/.user.ini’, but any changes in .user.ini will be shown in “PHP info page”.
- The name of custom php.ini file is “.user.ini” by default. This can be changed to “php.ini” using the directive:
=======================
user_ini.filename = "php.ini"
=======================
This directive is also required for the php.ini file generated by cPanel => “MultiPHP INI Editor” to work.
While it is advisable to implement feature updates in the servers, sudden updates and feature changes in cPanel/WHM may tamper with the normal user functions.
It is always important to test and verify a feature change before applying it in a live server, to avoid a business downtime for the websites hosted in it.
At Bobcares, we maintain and manage cPanel/WHM servers to ensure 100% uptime for the websites. If you’d like to know how to do that for your servers, we’d be happy to talk to you.


Any tutorial on how to disable custom user.ini files in public_html for easyapache4?
Here you go 🙂
https://bobcares.com/blog/disable-custom-user-ini-easyapache-4/
In my case I needed to copy php.ini to the public_html folder because it wouldn’t recognize the .user.ini file for some reason, but it worked.
Honestly, I fail to see why people use CPanel. In my extensive experience over the last 10 years, I find that CPanel causes far more problems than it solves. If you spent the time required to troubleshoot CPanel learning how to manage the basic config files for Apache, PHP and MySQL instead you’d be well ahead of the game.