The option to easily create replica of your app server is one of the biggest advantage of Cloud solutions.
But, there is no one-click option to clone your Droplet. It involves a series of steps to securely create a copy of your server.
At Bobcares, we help customers to clone their Droplets as part of our Managed Cloud Services.
Today, we’ll see how our Support Engineers effectively clone the Droplet without data loss.
The need for cloning a Droplet
In cloud hosting, the need to create a clone arises often. Let’s see these typical scenarios first.
1. Staging server
These days, website owners cannot afford even a single failure on their website. It can affect the page ranking, company reputation, etc. Luckily, that’s were staging server helps. A staging server is the place where you install and test the new features of your application.
This staging server need the exact settings of your live server. Therefore, an easy way to create it is by taking a clone of your Droplet.
2. Reselling customized droplet
Other than that, cloning helps to create multiple copies of the same server.
Suppose, you have installed an application on your Droplet and spent considerable effort in customizing it. Cloud hosting allows you to clone and sell these preset Droplets. With this option, you need not have to make the customization individually. As a result, it helps you to save time and effort.
Steps to clone a DigitalOcean Droplet
When you clone a Droplet with websites, we are working with live data. And, a wrong step can cause the cloned Droplet to fail. So, the sequence of steps in the cloning process really matter.
Now, let’s see how our Cloud Specialists actually create a clone of the Droplet without breaking the configuration.
1. Take snapshot of Droplet.
To start with the process of cloning, we need to take a snapshot of the Droplet. In a live server, data is continuously written into the databases, log files etc. Taking snapshot in this dynamic state of your database will probably result in loss or inconsistency of data. That’s why, our Support Engineers recommend to power off the droplet and then take snapshot.
2. Create a new Droplet
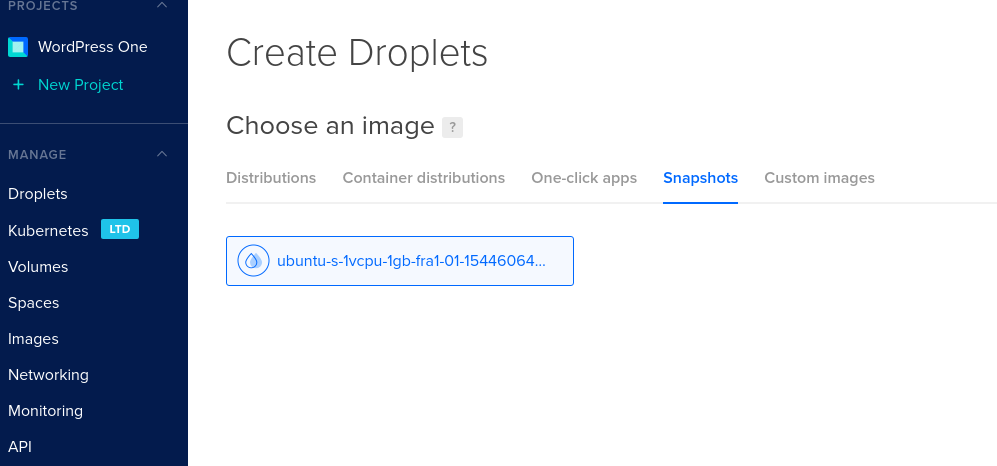
Now, we need to create a new droplet. Here, we need to choose the snapshot image that we just created.
This can be done from the DigitalOcean panel as shown in the picture.

Here, ubuntu-s-1vcpu-1gb-fra1-01-1544606479753 is the snapshot backup of our original droplet.
Now, we have the same data files on new Droplet. But, the IP address and network configuration of the new Droplet will be different from the original one. As a result, it is possible to run both original Droplet and the cloned ones.
This method helps us to create any number of clones.
Again, to clone the volumes attached to the Digitalocean server, we just need to take the snapshot of a block volume, and then create a new volume from that snapshot. This is accessible from the panel at Images -> Snapshots -> Volumes. And the new volume will contain the same data content as that of the original volume.
Common failure points in cloning
Although, the process of cloning completes in few steps, we often see problems reported by customers after cloning.
Let’s have a look at the top problems that we see.
1. Forgetting DNS
We already saw that cloned Droplet has new IP address. So, for the websites to work, the dns records will have to be modified with the new Droplet IP. Often, this step is missed and that causes website errors.
To fix, our Cloud Specialist Engineers just edit the DNS records of the staging website and point to new IP address. Again, we need to change the reference of IP address in all configuration files.
Additionally, for WordPress websites, this involves changing IP address and home URL in WP Admin.
2. Replacing original droplet with clone.
In scenarios like corrupt configuration, disk issues or migration of droplet to a different country, etc., there is a need to replace the Droplet with clone.
Here, we need to preserve the IP address of the original Droplet. The clone should have the exact IP as of the original server.
To achieve this, our Support Engineers do the following steps.
- Take snapshot of original Droplet
- Destroy the original Droplet
- Create new Droplet with the snapshot image
As a result, when you power ON the new droplet, it will renew the same IP address.
[Need help to create a staging server? Our Expert Engineers can clone the Droplet for you.]
Conclusion
The process of cloning helps to create copies of website data, applications and customization in a Droplet. Today, we’ve seen how our Support Engineers effectively clone DigitalOcean Droplet without configuration errors.


Thanks for the details. It was helpful for me to start with the clone. I would also recommend to add a note to clone the external volumes as well for complete solution (if needed).