Looking forward to configure SmarterMail SSL? We can help you with it.
SmarterMail is a Windows-based mail server. The SSL/TLS protocols with SmarterMail allow mail communication to be encrypted for increasing privacy and security.
At Bobcares, we often receive requests from our customers to configure SmarterMail SSL as a part of our Server Management Services.
Today, let’s see how our Support Engineers our customers configure this SSL.
Why SmarterMail?
SmarterMail is an enterprise class mail server.
It is the email server that allows users to send and receive emails by connecting to a web browser.
Configuring SSL with this email server is the best way for securing the email contents send over the networks.
How to configure SmarterMail SSL?
At Bobcares, where we have more than a decade of expertise in managing servers, we see many customers requesting to configure SSL in SmarterMail.
Recently many customers approached us for configuring SSL in this email client for securing the emails. After purchasing the certificate from the certificate authority, the user got stuck with the configuration of SSL in SmarterMail.
Now, let’s see how our Support Engineers help our customers in configuring SSL in the SmarterMail.
Exporting certificate:
Initially, we have added the purchased certificate to the VPN and exported the SSL certificate to a PFX file that is password protected. It also contains the private key of the certificate.
We exported the certificate by following the below steps.
1. Firstly, we opened Microsoft Management Console (MMC)
2. Then we clicked Add new Snap-In and after that we selected Certificates
3. A new window appeared. Here, we chose Computer account and hit Next.
4. Then we selected the local computer and hit Finish.
5. Then we Expanded the Personal certificate store and selected the certificate that we wanted to export
6. Thereafter, we right-clicked on the certificate and selected Export under All tasks
7. Finally, Selected PKCS #12 (PFX) and clicked Next to save the file
Now the certificate is exported in the PFX file format.
Configuring SSL ports to SmarterMail
After the Initial procedure of exporting the certificate, then we have to continue with the configuration procedure.
For this,
1. We logged in to the SmarterMail as admin.
2. Then select the Settings option.
3. After that, we clicked Bindings in the navigation pane. And then we clicked on the Ports tab.

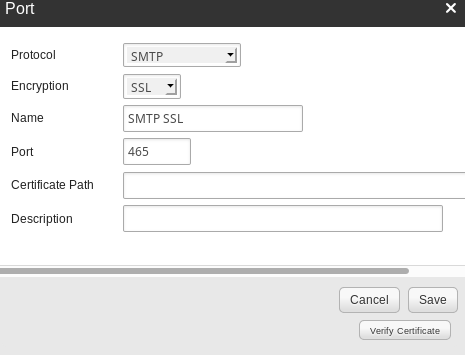
4. Then we clicked New and the following window popped up. Thereafter, we filled the required fields.
Here, we entered the certificate path to the PFX file that was exported in the previous steps.

5. By clicking on Verify Certificate we validated the path and certificate password as correct. After successful completion of verification, we then saved.
6. We then repeated the steps for adding POP3, SMTP and IMAP ports to configure with SSL
[Need any assistance with configuring SSL in SmarterMail? – We’ll help you]


0 Comments