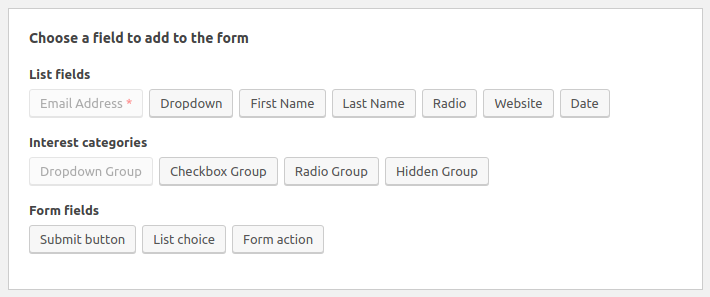
It’s possible to use various field types when adding a MailChimp signup form to a WordPress page.
In accordance with our WordPress Support Service, Bobcares responds to all inquiries, small or large.
Let’s look at how our Support team integrated a MailChimp signup form with WordPress in more detail.
Add MailChimp Signup form to WordPress
Use of various field types is possible with Mailchimp. Simply put, these field types specify the type of data Mailchimp and our plugin should expect. We advise keeping things straightforward and avoiding including more fields than absolutely necessary. Make sure to renew the lists in the plugin after adding a new Mailchimp audience or altering the list so that the plugin is aware of the changes.
Create the first form
It’s time to set up the first form once the list is prepared.
- Firstly, go to the WordPress Admin area.
- Then, go to MC4WP > Forms.
- Finally, we ought to be immediately redirected to the “Edit form” page.
Edit the form
Our form editor will be visible on the Edit form page. Starting off, we create a form using Mailchimp’s default list fields. Now it is up to us to modify that form as we see fit.

By adding fields to our form using one of the available field buttons, the plugin will automatically generate the right HTML for us. In order for data to properly enter Mailchimp, the field helper will make sure that the generated HTML adheres to the desired format. As an alternative, we can manually write the HTML for our form fields.
Showing the form on the website
The form shortcode allows us to display our sign-up form wherever we want, such as in posts, pages, or widget areas. This is how it will appear:
[mc4wp_form id="12345"]
We can use the following snippet if we’re creating a WordPress theme and want to display a form from the theme files:
<?php echo do_shortcode('[mc4wp_form]'); ?>Inserting a Pop-Up Signup
Mailchimp enables us to create a variety of form types. To add a popup form to the website follow the below steps:
- Firstly, go to Mailchimp’s Lists > Signup forms > Subscriber pop-up.
- By selecting a design, we can then further alter the popup. These options also cover formatting and display.
- Then, we can choose the Fields we want to include, like “name” and “email address,” and add additional information like background images.
- During the customization process, we can preview the popup and make any necessary adjustments.
- Then, select the code, highlight it, and copy it by clicking Generate Code at the bottom of the popup form editor.
- Finally, go to the WordPress dashboard. We’ll have to insert the code into the website’s HTML, and we advise doing so while using a child theme. By doing this, any modifications are saved rather than lost when the theme is updated.
Inserting an Inline Signup
We can collect subscriber emails using an inline signup form without interfering with the user experience (UX).
- Firstly, open Mailchimp and navigate to Lists > Signup forms > Embedded forms.
- The inline signup form can be designed in one of four ways: Classic, Super Slim, Horizontal, or Naked.
- Given that it takes up little room, horizontal is a good option. We are free to select any style we believe best suits our requirements.
- Then, click Generate Code after we have customised the form to our liking.
- Finally, copy it and navigate to an appropriate WordPress blog post or page after returning to WordPress. We’ll want to select the Custom HTML block in the block editor and then paste the code in.
Inserting a Sidebar Signup
- Firstly, open Mailchimp and navigate to Lists > Signup forms > Embedded forms.
- Then, choose the design option we’d like to use. We suggest Super Slim or Naked as a sidebar.
- Now that the form has been customised, we can copy the code at the bottom of the page.
- Then, using the WordPress Customizer, we might be able to directly add this code to the sidebar, depending on the theme.
- The Custom HTML widget can also be chosen and dragged to the Sidebar column by going to Appearance > Widgets in WordPress.
- Then, paste the HTML code directly into the Content field.
- Finally, click on Save, and the form should display on the site.
[Looking for a solution to another query? We are just a click away.]
Conclusion
In conclusion, Mailchimp allows us to create a variety of forms. We have gone over using the MailChimp signup form to add a Popup Signup, an Inline Signup, and a Sidebar Signup to WordPress.
PREVENT YOUR SERVER FROM CRASHING!
Never again lose customers to poor server speed! Let us help you.
Our server experts will monitor & maintain your server 24/7 so that it remains lightning fast and secure.


0 Comments