Backup and restore are made incredibly simple via AWS Elasticsearch. At Bobcares, with our 24/7 AWS Support Services, we can handle your AWS issues.
Backup and Restore via AWS Elasticsearch
AWS Elasticsearch is frequently used for use cases involving log analytics, full-text search, security intelligence, business analytics, and operational intelligence. In this article, we will look into the snapshots (backup), restore the snapshot, and monitor the backup using AWS Elasticsearch.
The main steps of the backup and restore process are as follows:
- Register Snapshot Repository
- Capturing Snapshot
- Restoring Snapshot
- Progress Monitoring
Let’s look into the details of each step one by one.
Register Snapshot Repository
A snapshot is a saved copy of an active Elasticsearch cluster. Either a snapshot of a single index or the complete cluster is possible. Snapshots for the index only store data that was not present in a previous snapshot since they are incremental.
A repository stores the snapshots. We can use local or remote repositories for this purpose. We can use the below code to find the details about the registered ones:
In order to take snapshots and restore from a repository, we’ve to register it first. The below steps will help us to add AWS S3 as a repository for snapshots:
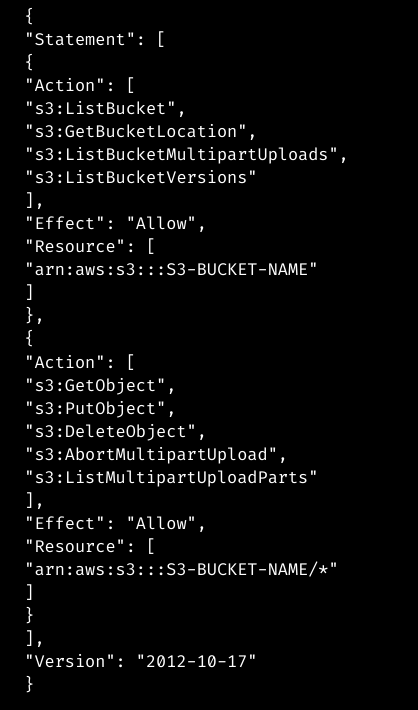
1. Set up AWS: We need to create an S3 bucket named S3-BUCKET-NAME. Then we need a custom policy with the below policy document:
Then we need to create an IAM user attaching the custom policy. Also, make sure to save the ACCESS_KEY_ID and SECRET_ACCESS_KEY.
2. Plugin Installation: We can install the plugin using the below code:
3. Repository registration: We must define this S3 bucket as a repository for snapshots in order to store backups in it. From the command line, we can do this:
Capturing Snapshot
We can use the below code to take a snapshot from an EWS Elasticsearch:
We can see all the snapshots currently in the repository using the code:

Restoring Snapshot
In order to restore the backup, we can use the code:
Progress Monitoring
Lastly, we can also keep a track of the restoring process using the below command:

[Need help with another issue? We’re available 24/7.]
Conclusion
The article provides the steps to create a snapshot, store it in S3 buckets, and finally use it for the restoring process. Lastly, the article sums up by giving the command to monitor the restore process.
PREVENT YOUR SERVER FROM CRASHING!
Never again lose customers to poor server speed! Let us help you.
Our server experts will monitor & maintain your server 24/7 so that it remains lightning fast and secure.


0 Comments