Let us learn how to add expires headers litespeed. With the support of our Litespeed hosting support services at Bobcares we can give you a complete guide on how to add expires headers.
What is add expires headers in LiteSpeed?
“Add Expiration Headers” is a performance optimization strategy that includes establishing a time restriction or expiration date for specific types of files on a website.
When a browser requests a file with an expiration date, the file is cached locally. This means that the next time the user visits the site, the browser can load the file from the cache rather than requesting it from the server. This can minimize server load and improve page load times.
LiteSpeed supports optimization, a web server software. We can add headers in LiteSpeed by doing the following:
- Access the website’s.htaccess file (if one does not exist, build one in the website’s root directory).
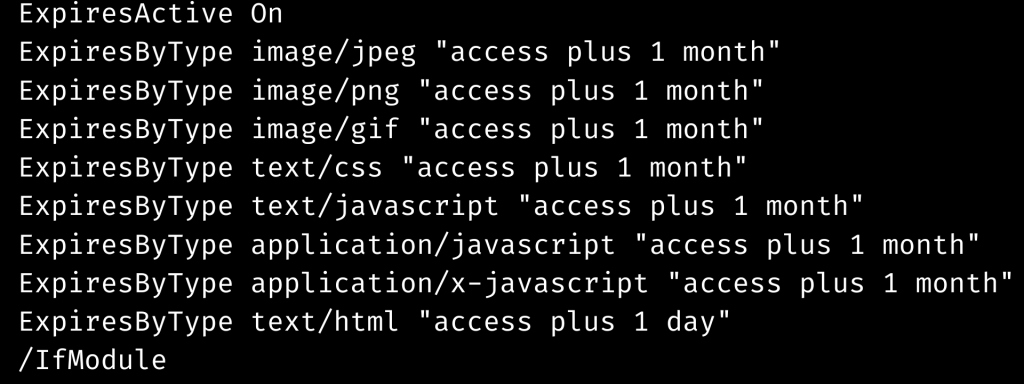
- Add the lines of code listed below.

This code specifies an expiration date for specific file types. For example, all JPEG pictures will cache for one month after their first request. During one day, HTML files will cache up. This is the final step to add expires headers litespeed.
While adding expires headers might increase efficiency, it can also pose problems if there is a constant file change. In such circumstances, we may need to change the expiration periods or employ different caching methods.
[Need assistance with similar queries? We are here to help]
Conclusion
To sum up, we can add expires headers litespeed within a few simple steps. With the support of our LiteSpeed support services at Bobcares we have now gone through the whole configuration steps.
PREVENT YOUR SERVER FROM CRASHING!
Never again lose customers to poor server speed! Let us help you.
Our server experts will monitor & maintain your server 24/7 so that it remains lightning fast and secure.


0 Comments