To add an error message in Magento 2 using JS, we can use Magento’s built-in messaging system. Here, we’ll discuss the process in detail. As part of our Magento Development Services, Bobcares provides answers to all of your questions.
Overview
- How to Add an Error Message in Magento 2 using JS?
- Effective Methods for Displaying Success and Error Messages in Magento 2
- Customizing Success and Error Messages in Magento 2
- Benefits of Using these Methods
- Conclusion
How to Add an Error Message in Magento 2 using JS?
Magento 2 error and success messages are a good way to engage with users and offer feedback depending on their behavior. Displaying effective messaging can assist improve the user experience of the business. We may use Magento 2’s controller to display messages to users. However, it often follows the standard request-response cycle, which is commonly utilized for page reload events. But what if we want to show an error message without refreshing the page in Magento 2? To display a success or problem message in Magento 2, send an AJAX request using JS JQuery.
In Magento 2, showing error messages using JavaScript is critical for delivering user feedback and improving the overall user experience. This method consists of several critical components:
Message Container: An HTML element where the error message will be displayed.
JavaScript Logic: The code that generates and appends the error message to the container.
Error Message Content: The content of the error message.
Effective Methods for Displaying Success and Error Messages in Magento 2
By default, Magento 2 allows us to display success and error messages to both shop visitors and administrators. We may notify users on the frontend and backend about the completion of their activity. In this post, we discuss two ways to display success and fault notifications in Magento 2: messageManager and Observer.
messageManager Method
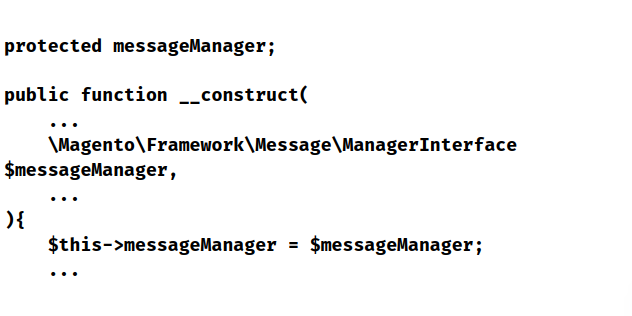
In Magento 2, the messageManager object handles messaging. It means we have to obtain its instance in order to write messages. The preferred solution is as follows: inject this class into the class by adding the following snippet to the __construct function.

Now, we can call one of these messages:

Observer Method
Let’s now discuss how to use the observer to provide success and error messages. However, if we are an observer, there is no method to display messages. Additionally, the right message block does not reload if we call the observer function while making an AJAX call.
Fortunately, we can throw an error to get around the restriction. As a result, an error notice will appear. We may use the following code, for example:

Since the corresponding message is the outcome of the AJAX request, it is shown on the frontend. Use the sales_order_save_before observer to test it.
Customizing Success and Error Messages in Magento 2
Let’s now examine how to tailor Magento 2’s success and error messages. As we’ve already covered how to show them, this section is divided into two parts:
messageManager Method
We covered how to use messageManager to call one of the following messages in the section before:

We need to replace a new message for Error, Warning, Notice, and Success in order to change them.
Observer Method
We must alter the text “Prices have been changed!” in Magento 2 success and error messages that were generated with the assistance of observers.

Benefits of Using these Methods
1. Displaying immediate feedback (success or error messages) directly on the page helps users understand the outcome of their actions without needing to reload the page. This instant communication improves user satisfaction and reduces confusion.
2. By utilizing JavaScript and AJAX requests to display messages, Magento 2 allows for real-time updates. This means users can see error or success messages instantly, providing a more dynamic and responsive experience.
3. The messageManager and observer methods provide flexibility in where and how messages are displayed. We can show messages on the frontend and backend, ensuring that all users (both store visitors and administrators) are informed about the results of their actions.
4. Using built-in components like messageManager ensures that error and success messages are integrated seamlessly with Magento’s existing UI components and messaging systems. This reduces the need for custom solutions and leverages Magento’s robust architecture.
5. Magento 2 allows for easy customization of messages using both messageManager and observers. We can tailor the messaging to better fit the store’s tone and communication style, enhancing the overall brand experience.
6. The observer method allows for more sophisticated error handling by catching and displaying exceptions during AJAX requests. This helps developers ensure that users are properly informed when an error occurs, even if it’s part of a background process or a server-side action.
7. By avoiding full page reloads through AJAX requests, we reduce the server load and improve the performance of the Magento store. This leads to faster page interactions and a smoother browsing experience.
8. The use of standardized methods (messageManager and observer) ensures consistent handling and presentation of messages throughout the Magento platform. This uniformity helps users know where to look for feedback and what to expect, improving overall usability.
[Want to learn more? Click here to reach us.]
Conclusion
With the Magento 2 business, we can maintain a high level of engagement and happiness, improve the shopping experience, and manage user communication effectively by employing the error or success messages in Magento 2 with JS.


Dear Author have you checked you post , your title is for js and code is for the class file of php
Hello,
Please contact our support team via live chat(click on the icon at right-bottom).