AdGuard on pfSense enhances network security and privacy. Read the article to know the steps to set up AdGuard on pfSense. As part of our pfSense Support Services, Bobcares provides answers to all of your questions.
Overview
- An Introduction to AdGuard Home
- Setup Steps for AdGuard on pfSense
- Benefits of AdGuard on pfSense
- Conclusion
An Introduction to AdGuard Home
AdGuard Home is a well-liked option for anyone looking to improve their internet experience through network-level virus, tracker, and ad blocking. AdGuard Home may be used for the following purposes, among others:
Blocking Ads:
AdGuard Home efficiently filters adverts on all network-connected devices, including PCs, tablets, smartphones, and Internet of Things gadgets. Thus, results in a faster, cleaner surfing experience free of obtrusive ads.
Protection of Privacy:
By preventing trackers as well as analytics scripts that businesses use to follow the online activity and gather details for targeted advertising, AdGuard Home also contributes to the protection of the privacy.
Malware Defense:
It also stops users from unintentionally visiting dangerous websites that could infect their devices with malware or phishing efforts, and it filters out hazardous websites.
Personalization:
With the many customization options that AdGuard Home provides, users may fine-tune their ad-blocking preferences to suit their needs, whitelist or blacklist specific domains, as well as establish custom filtering rules.
Protection for the entire network:
AdGuard Home functions at the network level, offering complete protection to all devices linked to the network, including devices that do not support conventional ad-blocking solutions, in contrast to browser extensions or standalone software.
Open-Source:
Since AdGuard Home is open-source software, anyone can examine and alter it without restriction. Because of this transparency, trust is increased and technically skilled people can audit the code to find security flaws or improve the project.
Performance:
AdGuard Home can dramatically speed up page loads and minimize bandwidth usage by blocking advertising and trackers before they reach the devices, enabling faster and more effective browsing.
Setup Steps for AdGuard on pfSense
AdGuardHome is fully compatible with the WireGuard and OpenVPN protocols. With this setup, port forwarding and firewall rules are not necessary. Right “OUT OF THE BOX,” it functions “as is.” The setup steps are the following:
1. Don’t Adjust the pfSense DNS Resolver’s Port. Initially, we must enable “DHCP Registration” and “Static DHCP” in the DNS Resolver settings in order to allow rDNS lookups and hostname lookups for devices on the LAN.
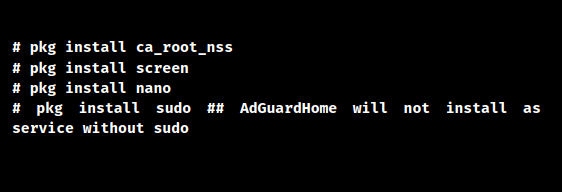
2. Then, set up the AdGuardHome by installing the packages listed below.

3. Now, visit this page to download the auto installation script, which will download the correct package based on the architecture. For most people, using the AGH install script is less complicated and easier. Since their Edge builds are the most recent, we can just use them. In addition, it will also alert user if any dependencies are missing.

4. Following the running of the installation scripts, the screen should look like below. Depending on the network interfaces, we may naturally see a different IP address; however, for the initial AdGuardHome setup, we must use the LAN.

Now, pick out the LAN interface so that we can perform initial setup of AdGuardHome . Here, we are going to use AdGuard Home with UNBOUND.
A – Choose LAN Address For Web Interface – Port 8088 / Choose Localhost ( 127.0.0.1 ) For DNS – Change to Port 5353
5. It is now necessary to set up UNBOUND for AdGuardHome. So, to access custom options, go to Services > DNS Resolver > General Settings > Display Custom Options > Custom options. So, enter the following in the “Custom options” box below:

Then Go To System > General Setup > DNS Server Settings > DNS Servers and provide the following details for DNS Servers :
A – 127.0.0.1
B – ::1
both without any gateway and
C – Remove ( Do Not ) Check ” DNS Server Override ”
” Allow DNS server list to be overridden by DHCP/PPP on WAN ” Option
D – Leave Option ” DNS Resolution Behavior ” at Default Setting
6. In order to make AdGuard Home start on boot, follow the script at
https://github.com/AdguardTeam/AdGuardHome/issues/1352A – # mv /usr/local/etc/rc.d/AdGuardHome /usr/local/etc/rc.d/adguardhome.sh
B – # nano /usr/local/etc/rc.d/adguardhome.sh
C – Delete the contents of the file and fill it with these contents below :

D- Make it runnable, we can use the following command:

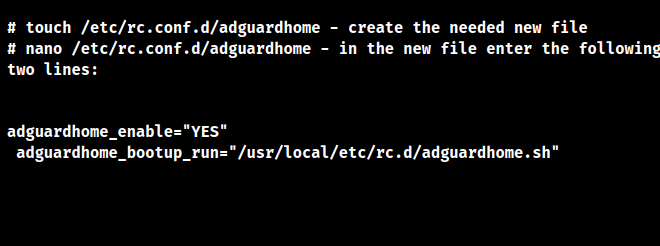
E – In order to have pfSense use default start up script ( /usr/local/etc/rc.d/adguardhome.sh ) at boot time we will have to create a boot time start up script for it in /etc/rc.conf.d/. Not to prolong this – do the following :

Save and exit. Then make the file executable once again by using the following code:

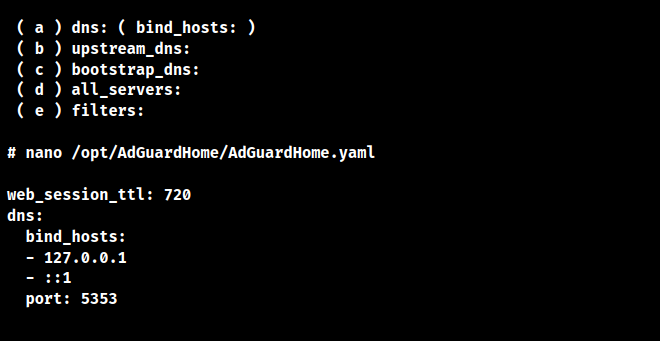
7. Use AdGuardHome.yaml to set up AdGuardHome for UNBOUND. The following sections will be edited:

8. Following AdGuardHome configuration via AdGuardHome.yaml, execute both of the following commands:

Restarting pfSense after activating AdGuardHome with AdGuardHome.yaml is the recommended step. Simply put, in order to set up AdGuard on pfSense, install the AdGuard package via the pfSense package manager, configure the settings according to your preferences, enable the AdGuard service, and update DNS settings to point to the AdGuard DNS server.
Benefits of AdGuard on pfSense
When AdGuard and pfSense are integrated, users are provided with a complete solution to enhance network security and privacy by effectively blocking trackers, harmful material, and advertisements on all connected devices. This simplified method strengthens internet security, boosts performance, and improves surfing enjoyment. Users may efficiently secure their network and provide a more secure and private online experience for themselves and their devices by combining the strengths of AdGuard and pfSense. AdGuard and pfSense connection can assist users who want to improve network security and browsing in a number of ways:
1. We can block trackers, ads, and unsafe data at the network level by installing AdGuard on pfSense. This implies that ad blocking will work on all of the devices linked to the pfSense router, including those that don’t have software or addons for blocking ads.
2. AdGuard blocks access to well-known harmful websites and domains, helping to safeguard the network against malware, phishing attempts, and other malicious content. Thus, improving the security of the network and lowers the possibility that devices will have malware infections or fall prey to online frauds.
3. Reducing usage of bandwidth at the network level can help us get faster internet speeds and make better use of the internet connection by blocking advertising and other undesired traffic. Those with slow internet connections or limited bandwidth may find this to be really helpful.
4. AdGuard on pfSense has the ability to disable analytics tools and tracking scripts that websites use to track the online activity and gather information for targeted advertising. AdGuard helps safeguard the privacy by blocking these trackers from loading and minimizing the amount of private data that is shared with advertisers and data brokers.
5. AdGuard on pfSense provides an array of customization options, letting us fine-tune the ad-blocking preferences to suit the needs, whitelist or blacklist certain domains, and create custom filtering rules. Because of its adaptability, we may customize AdGuard to meet the unique needs and tastes.
6. We can control content filtering and ad blocking for the whole network from a single interface by combining AdGuard with pfSense. This streamlines management and facilitates maintaining uniform security and privacy configurations on all devices linked to the network.
[Searching solution for a different question? We’re happy to help.]
Conclusion
AdGuard integration with pfSense can offer a potent, adaptable, and privacy-focused solution for network-level ad, tracker, and harmful content filtering, improving browsing and security for all devices on the network. Our Tech team can always offer additional help with your pfSense AdGuard Setup.
PREVENT YOUR SERVER FROM CRASHING!
Never again lose customers to poor server speed! Let us help you.
Our server experts will monitor & maintain your server 24/7 so that it remains lightning fast and secure.


Hi.
It’s not clear to me how to edit the AdGuardHome.yaml file. I did the best I could to no avail. The rest of the tutorial is clear and easy to follow.
Any help would be appreciated.
Thanks.
Hello,
To edit the AdGuardHome.yaml file, use a text editor like nano or vim and ensure you have the necessary permissions. After making changes, save the file and restart AdGuard Home.
If you need any assistance, our experts are available to assist you with your concerns. We would be delighted to discuss this with you via our live chat feature. Simply click on the icon located in the bottom right corner to get started.
Hello,
Our experts are available to assist you with your concerns. We would be delighted to discuss this with you via our live chat feature. Simply click on the icon located in the bottom right corner to get started.