Get ready to explore the many features of Admin Consent Workflow in Azure Portal with our experts. Our DevOps Support team is here to help you with your questions and concerns.
How to set up Admin Consent Workflow in Azure Portal
Managing app permissions in Azure can sometimes feel overwhelming. Fortunately, the admin consent workflow makes it easier for everyone involved. This feature lets users request access to applications that require more permissions than they currently have while giving administrators the power to grant or deny these requests securely.
Let’s break down how this process works and why it’s beneficial.
How the Admin Consent Workflow Works
- Imagine a user trying to access an application that requires admin-level permissions, like accessing sensitive user data. They see an “Approval required” message.
- The user has to then explain why they need the access and submit a request for admin approval.
- This request is then forwarded to designated reviewers—administrators with the right roles. They can view it in the Microsoft Entra admin center.
The request includes details about the application, the permissions needed, and the user’s justification.
- At this point, reviewers can approve, deny, or block the request. The user gets to know about the decision via email.
Why the Admin Consent Workflow is a Game-Changer
- All permission requests are managed in one place, streamlining the approval process.
- Users provide explanations for their access needs, helping reviewers make informed decisions.
- Controlling permissions at a granular level minimizes the risk of unauthorized access.
How to set up the Admin Consent Workflow
To enable the admin consent workflow, we need to be a Global Administrator. Here’s a step-by-step guide by our experts:
- First, log into the Microsoft Entra admin center as a Global Administrator.
- Then, go to Identity > Applications > Enterprise applications > Consent and permissions > Admin consent settings.
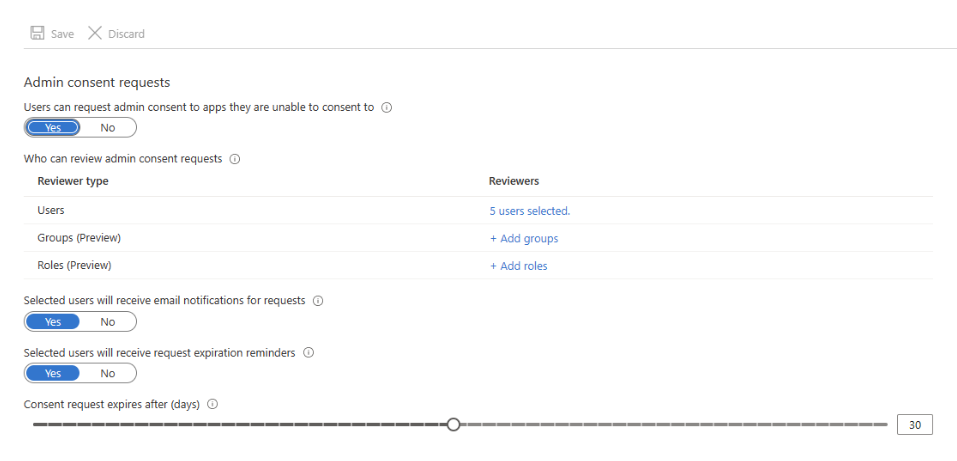
- Now, set “Users can request admin consent to apps they are unable to consent to” to Yes under Admin consent requests.

- Next, select users, groups, or roles designated as reviewers. Reviewers can view, block, or deny requests, but only Global Administrators can approve requests for apps needing Microsoft Graph app roles.
- Furthermore, enable or disable email notifications for reviewers when a request is made or about to expire.
- Also, configure how long requests stay valid and set up reminders for reviewers.
- Finally, click save. It can take up to an hour for the workflow to be fully enabled.
Pro Tips for Smooth Configuration
- Select the most appropriate reviewers who understand the application and its required permissions.
- Ensure users know they need to provide a strong justification for their access requests.
- Periodically review and adjust settings to ensure the process remains efficient and secure.
[Need assistance with a different issue? Our team is available 24/7.]
Conclusion
By following these steps, we can create a secure and efficient process for managing application permissions in Azure, ensuring that users get the access they need without compromising security.
In brief, our Support Experts demonstrated how to set up Admin Consent Workflow in Azure Portal and its many benefits.


0 Comments