Learn more about Docker NGINX auth_request from our experts. Our Docker Support team is here to help you with your questions and concerns.
Docker NGINX auth_request | An Introduction
Docker NGINX auth_request refers to when NGINX is deployed within a Docker container and configured to use the auth_request module for authentication and authorization purposes.
Let’s take a quick look at how to setup Docker NGINX auth_request:
- First, we have to create a directory for our NGINX configuration files and Dockerfile.
- Then, we must create a Dockerfile within this directory:

- Next, it is time to customize the NGINX configuration files to define our server settings, proxy rules, and protected locations.
- After that, we have to open a terminal and navigate to the directory that has our Dockerfile and configuration files.
- Then, we can run this command to build our Docker image:
docker build -t my-nginx - Now, we have to run an NGINX Container based on that image with this command:
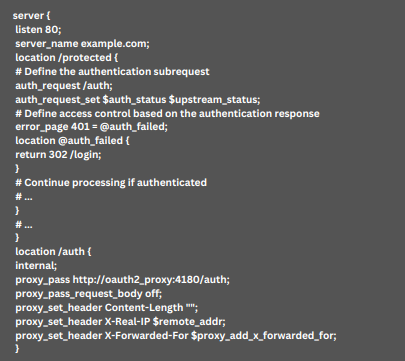
docker run -d -p 80:80 --name my-nginx-container my-nginx - Then, we have to head to our NGINX configuration file and configure the protected location with auth_request:

- Then, run an oauth2_proxy container to handle authentication:

How to Access Our Application
- First, we have to head to http://localhost/protected in our web browser to access our application.
- Then, NGINX will trigger the auth_request subrequest to oauth2_proxy for authentication.
- After that, oauth2_proxy will handle the OAuth 2.0 authentication flow and redirect as needed.
- Now, NGINX will grant access to the protected location.
[Need assistance with a different issue? Our team is available 24/7.]
Conclusion
In summary, our Support Techs demonstrated how to implement auth_request with ease.
PREVENT YOUR SERVER FROM CRASHING!
Never again lose customers to poor server speed! Let us help you.
Our server experts will monitor & maintain your server 24/7 so that it remains lightning fast and secure.


0 Comments