


Are you looking on to set up the LEMP stack in Ubuntu 18.04? We can help you with it.
LEMP stack is a set of open-source software that allows users to create websites and web applications.
It involves installing an Nginx web server, MySQL database server together with PHP in a Linux OS.
At Bobcares, we get requests to setup LEMP stack in servers, as a part of our Server Management Services.
Today, let’s see how our Support Engineers setup the LEMP stack in Ubuntu 18.04.
What is a LEMP Stack?
LEMP stack is the acronym for Linux (E)Nginx MySQL PHP. This is a set of open-source software.
This stack of software allows one to create a web application and web pages.
Here we will take Linux (Ubuntu 18.04) OS and install Nginx webserver. Also, we use MySQL for database management and PHP for dynamic data processing.
Now let’s see how to set up a LEMP stack in an Ubuntu 18.04 for web application development.
How to setup LEMP stack in Ubuntu 18.04?
Here is how our Support Engineers install Nginx, MySQL, and PHP in Ubuntu 18.04.
Initially, we take an Ubuntu 18.04 server which has a UFW firewall and SSH installed in it.
However, before installing the LEMP stack, we make sure to update the server using the command,
apt update
apt upgrade
After updating and upgrading the packages, we can start the installation.
1. Installing Nginx in Ubuntu 18.04
Initially, we begin with the Nginx installation. Nginx is open-source software that can be used as a web server, reverse proxy, load balancer, etc. So, to install Nginx, we use the command,
apt install Nginx
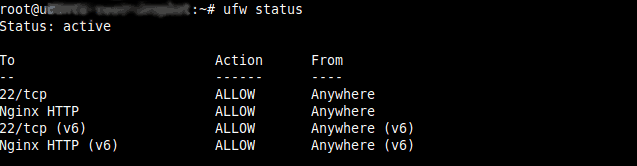
After installing Nginx we have to allow connections via the firewall. For this, we make use of the command,
ufw allows 'Nginx HTTP'
Hence, after allowing the Nginx over ufw, the status appears as,
Now to check the Nginx installation, we access the IP via a browser. In the case of a successful installation, it displays the Nginx default page.
2. MySQL for database management
To manage the data in a web application, we need a database management system. So to install MySQL we use the command,
apt install mysql-server
Additionally, we can use the
mysql_secure_installationUsually, this allows a user to set a secure root password and also prompt to remove the anonymous user.
Later configure the database software by answering Yes/No for the queries.
3. Installing PHP in Ubuntu 18.04
A website needs PHP for generating dynamic content. Hence we install PHP-FPM using the command,
apt install php-fpm php-mysql
Here we also install a helper package
php-mysqlAdditionally, to check if the PHP is working, we create a PHP info page. We create it in the default location of Nginx.
So if we access the server IP via a browser it displays the PHP info page.
However, publically displaying the phpinfo() results of the server is a security risk. So, after verifying the PHP configuration, our Dedicated Engineers always remove this to prevent a possible malicious attack.
Now the LEMP stack installation is complete.
4. Configure Nginx to use PHP in Ubuntu 18.04
Finally, we need to configure Nginx so that it uses the PHP for creating dynamic content.
For this, we need to create a configuration file for the required domain and create the corresponding configuration.
In Nginx, we need to keep the default configuration in
/etc/nginx/sites-available/nano /etc/nginx/sites-available/domain_name.com
It is this file that holds the configuration. A sample configuration for domain_name.com appears as,
server {
listen 80;
root /var/www/html;
index index.php index.html index.htm index.nginx-debian.html;
server_name domain_name.com;

location / {
try_files $uri $uri/ =404;
}

location ~ \.php$ {
include snippets/fastcgi-php.conf;
fastcgi_pass unix:/var/run/php/php7.2-fpm.sock;
}

location ~ /\.ht {
deny all;
}
}
Later we re-check the new configuration and reload Nginx.
[Need assistance in setting up LEMP stack in Ubuntu 18.04? – We can help you.]
Conclusion
So far, we saw how to install the LEMP stack in Ubuntu 18.04. Today, we saw how our Support Engineers configure Nginx to make use of PHP to build web applications.


0 Comments