


Wondering how to set up Let’s Encrypt in WAMP server? We can help you with it.
Here at Bobcares, we have seen several such let’s encrypt related queries as part of our Server Management Services for web hosts and online service providers.
Today we’ll take a look at how to set up Let’s Encrypt in the WAMP server.
More about Let’s Encrypt
Let’s Encrypt is a free, automated, and open Certificate Authority (CA) that provides free TLS/SSL certificates. These certificates help in encrypting communication between the web server and your users.
Enabling SSL encryption on a website provides many benefits that include securing user information.
Enable Let’s Encrypt in WAMP server
Now let’s take a look at how our Support Engineers enable Let’s Encrypt in the WAMP server.
1. Enable SSL (HTTPS)
The latest Wamp 64 has already included Open SSL built-in. So we needn’t install the Open SSL. We can simply enable it by following the below steps.
First, we open httpd.conf file and uncomment the following lines:
LoadModule ssl_module modules/mod_ssl.so
Include conf/extra/httpd-ssl.conf
LoadModule socache_shmcb_module modules/mod_socache_shmcb.so
Then open the php.ini file and uncomment the following line.
extension=php_openssl.dll
2. Add a virtual host for your website
We open httpd-vhosts.conf file and add a virtual host running on HTTP (port 80) for the website, below is an example:
<VirtualHost *:80>
ServerName mydomain.com
ServerAlias www.mydomain.com
DocumentRoot “c:/wamp/www/www.mydomain.com”
<Directory “c:/wamp/www/www.mydomain.com/”>
Options Indexes FollowSymLinks
AllowOverride all
Order Deny,Allow
Allow from all
Require all granted
</Directory>
ErrorLog “logs/mydomain.com-error.log”
CustomLog “logs/mydomain.com-access.log” common
Alias /.well-known c:/wamp/www/www.mydomain.com/.well-known
</VirtualHost>
Here, a .well-known folder will be used to store a key to challenge with Let’s Encrypt server for creating the free SSL certificate.
In order to check if we have made the right syntax, we open the command prompt and go to the Apache bin folder and run the below command.
httpd -t
If the syntax is correct then we restart the Apache server. Then we check the website on the browser.
3. Download the letsencrypt-win-simple from Github
Since the official letsencrypt-auto script does not support Windows, we will use a third-party tool called letsencrypt-win-simple, which runs specifically for the Windows platform.
So we download the zip file and extract the details in C:\ Folder which will look once extracted like this “C:\letsencrypt-win-simple\”.
4. Obtain an SSL certificate (Test Run)
Now, we open the command prompt and navigate to the letsencrypt-win-simple folder.
cd C:\letsencrypt-win-simple
Then we run the letsencrypt tool to generate a certificate for our domain in test mode. The generated certificates will not count against the rate limit by using the test mode.
letsencrypt.exe –manualhost <domain-name> –webroot <document-root> –test
If successfully the certificate generates then a similar message as below will appear.
Authorizing Identifier <domain-name> Using Challenge Type http-01
Writing challenge answer to <document-root>\.well-known/acme-challenge/<challenge-text>
Answer should now be browsable at <document-root>/.well-known/acme-challenge/<challenge-text>
Submitting answer
Refreshing authorization
Authorization Result: valid

Requesting Certificate
Request Status: Created
Saving Certificate to C:\Users\<username>\AppData\Roaming\letsencrypt-win-simple\httpsacme-stage.api.letsencrypt.org\<domain-name>-crt.der
Saving Issuer Certificate to D:\Users\<username>\AppData\Roaming\letsencrypt-win-simple\httpsacme-stage.api.letsencrypt.org\ca-<hex>-crt.pem
Saving Certificate to D:\Users\<username>\AppData\Roaming\letsencrypt-win-simple\httpsacme-stage.api.letsencrypt.org\<domain-name>-all.pfx
5. Obtain an SSL certificate (Actual Run)
We proceed to this step only if the test generation is successful. Now we generate the actual certificate by removing the –test argument from the command.
letsencrypt.exe –manualhost <domain-name> –webroot <document-root>
Lastly, the tool will create a scheduled task that will run every 9.00 am in the morning. Generally, Let’s Encrypt certificates are issued with a validity of 90 days. This task will help to renew the certificates within 30 days before expiry.
6. Configure Apache to use the SSL certificate
Now we configure an SSL-enabled virtual host for the domain. In the virtual host configuration, we specify the path to the certificate file, certificate key file, and the certificate chain (issuer certificate) file.
We recommend redirecting all the HTTP traffic to the HTTPS site with the correct domain name of the certificate.
Here is an example of a partial Apache configuration. On the non-SSL virtual host:
<VirtualHost *:80>
ServerAdmin admin@bobcares.com
ServerName www.bobcares.com

RewriteEngine On
# Redirect to the HTTPS site
RewriteCond %{HTTPS} off
RewriteRule ^/?(.*)$ https://www.bobcares.com/$1 [NE,L,R=301]
</VirtualHost>
On the SSL virtual host:
<VirtualHost *:443>
ServerAdmin admin@bobcares.com
ServerName www.bobcares.com

RewriteEngine On
# Redirect to the correct domain name
RewriteCond %{HTTP_HOST} !^www.bobcares.com$ [NC]
RewriteRule ^/?(.*)$ https://www.bobcares.com/$1 [NE,L,R=301]

Alias /.well-known C:/wamp/www/.well-known

SSLEngine on
SSLCertificateFile “C:/ProgramData/win-acme/httpsacme-v01.api.letsencrypt.org/www.bobcares.com-crt.pem”
SSLCertificateKeyFile “C:/ProgramData/win-acme/httpsacme-v01.api.letsencrypt.org/www.bobcares.com-key.pem”
SSLCertificateChainFile “C:/ProgramData/win-acme/httpsacme-v01.api.letsencrypt.org/ca-www.bobcares.com-crt.pem”
</VirtualHost>
7. Opening the Port in Windows Firewall Security in Windows Machine
We search for Windows Firewall Security for Windows and open it. Then we click on Inbound Rule, and follow the below steps:
- First, we click on New Rule from the right panel.
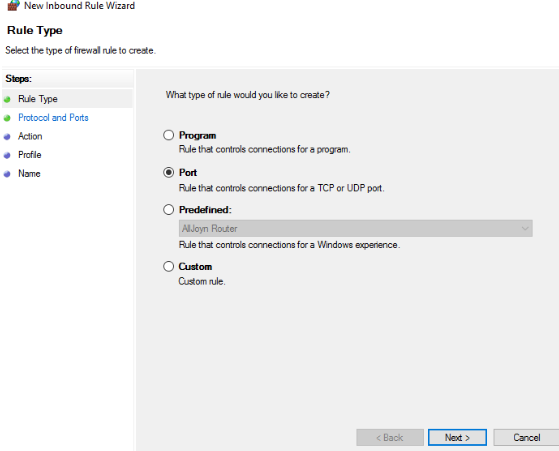
- Next, we select the Port and hit Next.
- Then we click on TCP and Give a Specific Port number as 443,80
- Allow all connection
- After that, we check on Domain, private and Public
- Also, we give the respective name and Click Finish
- And then, we repeat the same steps for Outbound Rules and Finish
[Need any assistance with Let’s Encrypt queries? – We’ll help you]
Conclusion
Today, we saw how our Support Engineers set up Let’s Encrypt in the WAMP server.


I am trying to create SLcertificates using your tutorial on my local wampserver but authorization failes: 404 error when trying to connect to challenge files, is it possible o make the local vhost visible to the outside internet?
Hi,
Please contact our support team through live chat (click on the icon at right-bottom).
Very nice article, totally what I wanted to find.
Hi,
Thanks for the feedback. We are glad to know that our article was helpful for you 🙂