Know the steps to run Traefik in a Proxmox LXC container with our new article. At Bobcares, with our Proxmox Support, we can handle your Proxmox LXC issues.
Steps to run Traefik in a Proxmox LXC container
1. Create a new LXC container by logging onto the Proxmox web interface. Give it a name, choose the resources we want (CPU, memory, drive), and specify the networking settings.
2. After it has been created, we can access the container through the Proxmox web interface or SSH into it using an SSH client like PuTTY.
3. By executing the following commands, we can upgrade the current packages and update the package lists inside the container:

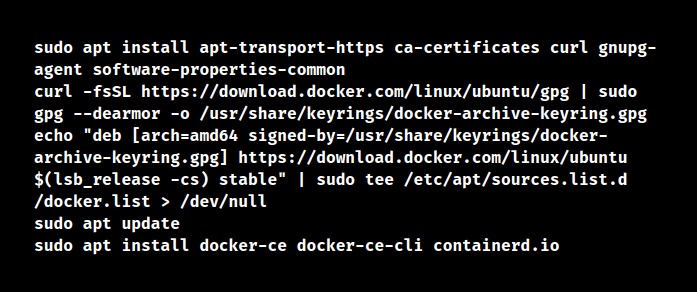
4. Use the commands below to install Docker within the LXC container

5. Make a directory for Traefik, then enter it:

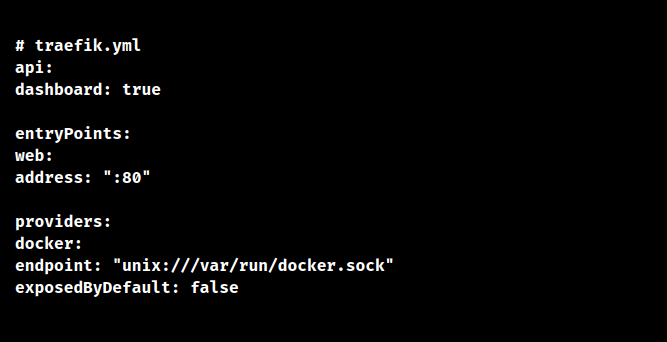
6. To configure Traefik, make a traefik.yml file. The file can be made and the required configuration options added using a text editor. To get started, here is a sample configuration file:

Configure the settings to suit the requirements, such as activating the Traefik dashboard, choosing entry points, and setting the Docker provider.
7. Using the Docker command, launch the Traefik container

When the Traefik container starts, ports 80 and 443 will be available for HTTP and HTTPS traffic. To allow Traefik to communicate with Docker, it additionally mounts the traefik.yml file and the Docker socket.
8. We can use the Traefik dashboard to check the operation of the Traefik container once it has started running. Then, open a web browser and type the Proxmox server’s IP address or hostname, followed by port 80 or port 443 (depending on the setup). /dashboard.
[Need to know more? Click here to reach us.]
Conclusion
Traefik is now operating in the Proxmox LXC container. As a reverse proxy, Traefik may be set up to manage traffic for the apps and services.
PREVENT YOUR SERVER FROM CRASHING!
Never again lose customers to poor server speed! Let us help you.
Our server experts will monitor & maintain your server 24/7 so that it remains lightning fast and secure.


following these instructions I receive an error 404 at the last step trying to access the dashboard