Looking for additional protection of the network?
Shorewall is an open-source firewall tool that always makes the task of network security easier.
It helps in restricting the access of unwanted IP’s to the website based on the configuration.
At Bobcares, we often get requests from our customers to configure Shorewall firewall as part of our Server Management Services.
Today, let’s get into the details on how our Support Engineers help to configure the Shorewall firewall.
Working of Shorewall firewall
The Shorewall firewall is the high-level configuration tool used for ensuring the security of the network.
Working of Shorewall is by reading the configuration files located at /etc/shorewall folder.
Shorewall reads those configuration files, with the help of the iptables utility. Shorewall configures the Netfilter framework to match our requirements.
Usually, it uses Netfilter’s connection state tracking capabilities and not ipchains compatibility mode.
Let’s now see how our support engineers help the customers to install and configure the Shorewall firewall.
How to install Shorewall firewall
Installing the Shorewall firewall is an easy task by a single command.
Before the installation, we have to uninstall “ipchains” if already present in the machine using the command:
apt-get remove ipchains
After removing this we proceed with installing Shorewall. The command to install the Shorewall,
apt-get update
apt-get install shorewall
After that, the accept prompt opens up. This asks permission for a couple of dependencies to install along with Shorewall.
However, in some cases, even after completing the installation, it gives a warning message that it won’t initialize. It won’t run unless we change the settings in /etc/shorewall/shorewall.conf
Therefore, we open the configuration file,
vim /etc/shorewall/shorewall.conf
Then we proceed with editing the first line of the file by changing
toSTARTUP_ENABLED=No
STARTUP_ENABLED=Yes
Finally, we save it. That completes the installation.
Shorewall firewall configuration – various steps
The configuration files of Shorewall are of two types:
/usr/share/shorewall
–⇒ stores supporting and action files
/etc/shorewall/
–⇒ store all program files.
For configuring Shorewall we copy the sample file from /usr/share/doc/shorewall/default-config to default directory /etc/shorewall/.
For instance, we copy the required files from the following directories to /etc/shorewall.
cp /usr/share/doc/shorewall/examples/one-interface/* /etc/shorewall/
Now the configuration file will be available at /etc/shorewall. Here we edit the configuration according to our requirements.
Again, for the proper working of Shorewall, we have to configure the following files.
1. /etc/shorewall/interfaces – explains the interfaces on the firewall system
2. /etc/shorewall/policy – defines the policies for connections between zones.
3. /etc/shorewall/rules –define the connection establishment via exceptions to the main policy file /etc/shorewall/policy.
4. /etc/shorewall/zones – It defines all network zones.
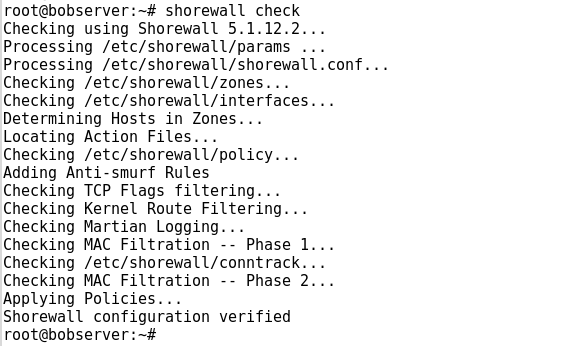
After configuration, we save the file. The Shorewall has an inbuilt check tool for checking the configuration by applying the following command.
shorewall check
The results appear as:

While checking, If we could not trace any problem in configuration file then we can clear the Shorewall.
shorewall clear
Finally, we restart Shorewall with the command,
shorewall restart
Shorewall configuration for SSH
Recently, one of the customers approached us to restrict SSH access to the server. He wanted to access the server only from one of the IP addresses. Let’s now check how our Dedicated Engineers did this by editing the zones, interfaces, policy, and rules files.
Before editing, we required the name of the interface used by the customer. So we ran the following command
ifconfig
1. Initially, we created the zone file and call it loc (for local traffic). We opened the file /etc/shorewall/zones and added the following two lines in the bottom.
net ipv4loc ipv42. Then we saved the file.
3. Next, we opened the file /etc/shorewall/interfaces and added the following to the bottom.
loc enp0s3After that, we saved and closed the file.
4. Then we opened the 3rd file /etc/shorewall/policy and added the following line above the second to the last line.
loc    net    ACCEPT


Now the bottom lines of file appeared like:
We then saved and closed the file.
5. Finally, we edited the last file /etc/shorewall/rules.
For providing a secure shell from 192.168.1.162 into 192.168.1.81 we added the following two lines to the bottom of the rules file.
SSH(ACCEPT)    loc:192.168.1.162    $FW    tcp    ssh

DNAT            loc:192.168.1.162    loc:192.168.1.81    tcp    ssh
For port forwarding, we added the DNAT entry. If the entry doesn’t exist, then Shorewall would not know where to send the ssh request to.
After that, we saved and closed the file.
6. After all editing in the configuration files, we have then checked the Shorewall and restarted.
shorewall check
shorewall clear
shorewall restart
Thus, we fixed the requirement of the Shorewall configuration for SSH.
[Having trouble in configuring Shorewall firewall? We’ll fix it for you.]
Conclusion
In short, Shorewall is an open-source firewalling tool for making the task of network security easier. It also helps easier handling of zones. Today, we saw how our Support Engineers helped the customer in the Shorewall firewall configuration.


0 Comments