SSL certificates are extremely important for the security of your online business.
But, what if you have multiple subdomains to manage?
There comes wildcard SSL certificates that secure multiple subdomains with a single SSL certificate, which reduces the management time and costs.
At Bobcares, we help server owners secure their web servers and domains with wildcard certificates as part of our Dedicated Support Services for web hosts.
Today, we’ll see how our Support Engineers install Nginx wildcard certificate.
Wildcard Certificate in Nginx – A Brief description
Before we move on, let’s get a brief idea of the Nginx wildcard SSL certificate.
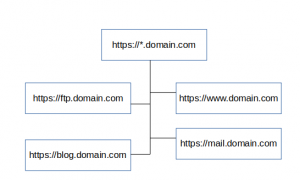
A wildcard SSL certificate secures multiple sub domains within the same top level domain.
This usually includes a wildcard notation which consists of an asterisk and period before the domain name.
For example, a wildcard certificate for *.domain.com will protect mail.domain.com, ftp.domain.com, www.domain.com, and so on.

Pictorial representation of wildcard SSL
Wildcard Certificate in Nginx – Steps to install it
Now, let’s see how our Dedicated Support Engineers install wildcard certificate on Nginx.
We can divide it into 4 different steps.
1) Generate CSR on Nginx
Firstly, our Support Engineers create the CSR(Certificate Signing Request) and the Private Key on the server.
We usually use the command line option to generate the CSR and the private key.
For example, see the below command.
openssl req –new –newkey rsa:2048 –nodes –keyout (domain).key –out (domain).csr
Here, replace domain with the name of the CSR and private key. This command generates a CSR file “domain.csr” and private key file “domain.key“.
Most importantly, we ensure that the domain name given during CSR generation is “*.domain.com” because it’s a wildcard certificate.
2) Get the certificate files
The next step is to obtain the SSL certificate files from the provider.
Upon purchase, the certificate provider sends the certificate files to the technical contact. This includes both the primary and intermediate SSL certificates.
Once we have the certificate files, we copy these files to the relevant directories along with the private key. Usually, we place these files in /etc/ssl folder.
3) Combine the certificate files
Some of the browsers may consider the connection as unsafe, if there is no valid intermediate certificate. So, proper installation of intermediate certificate is a critical step.
Most of the times, the primary certificate and intermediate certificate will be given as 2 different files.
So, our Hosting Engineers always ensure that the primary certificate is combined with the intermediate certificate.
For example, we combine the primary certificate and the intermediate certificate using the below command.
cat domain.crt domain_intermediate.ca-bundle >> ssl_bundle.crt4) Edit Nginx Virtualhost file
Finally, we add the files to the Nginx virtual host file and add the virtual host record for SSL port 443.
In addition to that, we turn on SSL and add the path of the SSL certificate and private key files.
ssl on;
ssl_certificate /etc/ssl/ssl_bundle.crt; (or bundle.crt)
ssl_certificate_key /etc/ssl/your_domain_name.key;
Most importantly, Nginx service restart is needed to apply these changes and enable the SSL certificate.
[Want to setup Nginx wildcard certificate on your server to encrypt the connections? We can do it for you.]
Wildcard Certificate in Nginx – Common failure points
These steps looks pretty simple. But, we’ve seen customers report problems with wildcard certificate in Nginx. Let’s see some common issues and how our Dedicated Support Engineers fix them.
1) Order of combining intermediate certificates
The order of concatenating certificate files is really important. If it’s wrongly combined, many browsers will detect the intermediate certificate as broken and display a warning “not trusted“.
So, our Hosting Engineers always take care of the order of the files. The certificate of the domain should be listed first, followed by the CA certificate chain.
2) Messed up intermediate certificate
Recently a customer contacted us that after installing the SSL wildcard certificate, he received the following error.
nginx SSL PEM_read_bio:bad end line
When we checked, the certificate and key files are all fine. Later, we identified that the problem happened while concatenating the intermediate certificates.
Here, customer forgot to add the below line break while combining the certificate files.
-----END CERTIFICATE----------BEGIN CERTIFICATE-----
As a result, Nginx considers this as an invalid certificate file, and throws this error.
In this case, our Hosting Engineers simply add a line break and combine all the certificate files once again, which fixed the issue.
[And, do you need help to resolve this error? Click here! One of our Support Experts will quickly fix it for you.]
3) Missing Listen directive
The Listen directive tells the server to accept incoming requests only on the specified port(s) or address-and-port combinations.
The normal SSL port is 443. So, once the SSL certificate is uploaded, it is necessary to add a virtual host for port 443.
However, we’ve seen cases in which where users forgot to add the Listen directive to bind the SSL port 443. As a result, users may receive an error message “site not available” .
In such cases, our Hosting Engineers manually add the Listen directive in the nginx configuration file and restart nginx service to fix the issue.
[Trouble with Nginx wildcard certificate? Don’t panic, one of our Nginx Experts can help you here.]
Conclusion
In short, installing Nginx wildcard certificate involves 4 simple steps. But if not properly installed, it can mess up your websites. Today, we’ve discussed how our Dedicated Support Engineers install wildcard certificate in Nginx without breaking the website and the common failure points.


0 Comments