Security always gets the highest priority in any online activity.
SSL secures the data transfer between the websites and the end-user.
Again, installing IIS HTTPS Self Signed Certificate can help the website owner to secure the website at no extra cost.
At Bobcares, we often receive requests to install a Self-Signed certificate as part of our Server Management Services.
Today, let’s analyze the error and see how our Support Engineers install it for our IIS customers.
What is a Self Signed Certificate?
Before going deeper, let’s have a quick look on self-signed certificates as such.
Usually SSL certificates are provided by certificate authorities. This involves various charges based on the type of SSL certificate.
A self-signed certificate is a certificate that is signed by the same individual rather than a trusted certificate authority. However, Self-signed certificates can provide the same level of encryption as provided by a trusted authority.
Again, the self-signed certificate is free of cost. The certificate is not as secure as a certificate provided by a trusted certificate authority. This happens as the encryption method differs based on the type of certificate. Thus, the choice of SSL for the website depends largely on the usage, cost factors, etc.
For security reasons, we never recommend the use of a self signed certificate on an e-commerce site or any site that transfers valuable personal information like credit cards, social security numbers, etc. However, Self-Signed SSL will be of great help when browsers like Google Chrome look for SSL in almost all websites.
How we install Self Signed Certificate in IIS
Recently, we had a Windows customer who requested us to install a self-signed certificate. Let us discuss how our Support Engineers installed a Self-Signed Certificate in IIS for our customers.
Install Self Signed Certificate for a website
To install the Self-Signed certificate, we
Accessed Start >>Administrative Tools >> Internet Information Services (IIS) Manager.
Then, we clicked on the server name and then double-clicked the server certificate. Under the action column, we selected Create Self-Signed Certificate.
There we entered a friendly name for the certificate. Next, we selected the option “personal” from the drop-down. Finally, clicked ok.

That made the certificate available under the server certificate.
The self-signed certificate has been created. But to make the process complete, we should add our Self Signed Certificate in the binding.
Add Self-Signed Certificate in binding
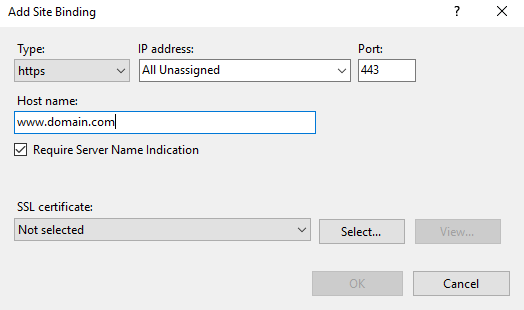
The HTTPS entry must be present in the binding for the website to load using HTTPS. Now, let us discuss how our Support Engineers added a Self-Signed Certificate in binding for HTTPS.
We began by expanding the sites in IIS. Selected the domain and clicked on bindings in the action column. Port 80 will be present in IIS by default.
We added the port 443 in IIS to make the website respond to the HTTPS call from the webserver.
Then, clicked on add. Now, Selected the type as HTTPS. We ticked “require server name Identification” check-box and entered the hostname.

From the SSL certificate drop-down, we selected the name of the certificate (Friendly name when creating a certificate). Finally, clicked ok.
Now the binding for HTTPS to use the port 443 will be present in the list. Therefore, the website will load using the SSL certificate from the browser.
How we fix the common SSL certificate errors
Though the SSL addition process looks pretty straight-forward, errors are quite common with SSL websites. Let’s see how our Support Engineers resolved the error within minutes.
1. Problem with firewall
Recently, one of our customers reported a problem with his self-signed certificate on the websites. The website was not loading with HTTPS. We helped him to fix the error and made the website load from HTTPS.
On analyzing the error, we found that there was a block for port 443 in the firewall. Our Support Engineers opened the HTTPS port in the firewall for the customer. That fixed the error and the website started loading securely.
2. Antivirus settings
Another reason could be antivirus that blocks the usage of a self-signed certificate. The antivirus blocks the request to the server from the self-signed certificate. In such cases, based on the antivirus, we allow the HTTPS connections from the Self-Signed certificate.
[Looking for assistance in adding self-signed SSL certificate? We are here to help.]
Conclusion
In short, we discussed how our Support Engineers installed Self Signed Certificate for a domain from IIS. And, we saw the fixes for the common error after installing a Self-Signed Certificate.


Using Visual Studio and IIS Express for development. When and web solution is executed and the the application starts IIS Express we get an error indicating Access is denied. I can add the certificate, but the application does not register that it exists and I get the same error. We are limited using the product, but I should be able to modify application.config to bind the certificate, but I’m not have any success. This is an environment where security is very restrictive, however i do have authority t create a certificate.
Hi,
Please contact our support team via live chat