Cacti is a network monitoring device that creates personalized graphs of server efficiency. The process to add a remote Linux host to Cacti also involves steps to install and configure SNMP service on the remote host.
As a part of our Server Management Services, we help our Customers with server monitoring tasks regularly.
Let us today discuss the possible steps to add a remote Linux host to Cacti.
How to add remote Linux host to Cacti?
- Install SNMP service on remote Linux hosts
- Configuring SNMP service
- Configure the firewall rules for SNMP
- Adding remote Linux host to Cacti
Install SNMP service on remote Linux hosts
SNMP protocol allows us to collect information on CPU utilization, memory usage, disk utilization, network bandwidth, etc.
Cacti create graphs on this information and provide an overview of the remote hosts’ performance.
Now, let us install and enable SNMP service on both Linux hosts: To install SNMP agent, run the command:
Ubuntu -$ sudo apt install snmp snmpd -y
Centos -$ sudo dnf install net-snmp net-snmp-utils -y
SNMP starts automatically upon installation. If the service is not running yet, start and enable it on boot. To confirm the status and start the service, use the commands below :
$ sudo systemctl status snmpd
$ sudo systemctl start snmpd
Configuring SNMP service
After the install of snmp service, the next step is to configure it. It will then help in collecting data and shipping it to the Cacti service. The configuration file is located at /etc/snmp/snmpd.conf.
Let us now discuss the steps involved in Ubuntu and Centos separately.
For Ubuntu 20.04
We need to configure a few parameters in the snmp configuration file.
First, locate the sysLocation and sysContact directives that define Linux client’s Physical location. Edit these parameters to set the values of our server.
Next, locate the agentaddress directive. This refers to the IP address and the port number that the agent will listen to.
Adjust the directive in the format below. Replace the IP_address field in the format with the original client system’s address.
agentaddress udp:IP_address
The directive will now allow the system’s local IP to listen to any snmp requests.
Next, add the view directive given below on top of the other view directives:
view all included .1 80
Next, change the rocommunity attribute shown below
rocommunity public default -V systemonly
to:
rocommunity public default -V all
Finally, to ensure the snmp service is working as expected, run the command below on the Linux host.
$ sudo snmpwalk -v 1 -c public -O e IP_address
Here IP_address is the IP address of the client’s system. This should output a large amount of data.
For CentOS 8
In CentOS 8, the configuration is slightly different. First, locate the line that begins with the com2sec directive in the configuration file as shown:
# sec.name source community
com2sec notConfigUser default public
We will specify a new security name known as AllUser and delete the notConfigUser as shown:
# sec.name source community
com2sec AllUser default public
Next, locate the line that starts with the group directive as shown.
# groupName securityModel securityName
group notConfigGroup v1 notConfigUser
group notConfigGroup v2c notConfigUser
We will modify the second attribute and specify AllGroup as the group name and AllUser as the security name as previously defined.
# groupName securityModel securityName
group notConfigGroup v1 notConfigUser
group AllGroup v2c AllUser
In the view section, add this line
view AllView included .1
Finally, locate the line beginning with the access directive. Replace the notConfigGroup parameter with AllGroup and systemview with AllView.
Save the changes and exit the configuration file. Restart snmpd daemon for the changes to take effect
$ sudo systemctl restart snmpd
Also, enable the service to start on boot.
$ sudo systemctl enable snmpd
Once again, verify if the snmp configuration is working as expected using the snmpwalk command:
$ sudo snmpwalk -v 2c -c public -O e 127.0.0.1
Configure the firewall rules for snmp
Next, we need to open udp port 161 to allow snmp traffic on both the Cacti server and Linux hosts.
For Ubuntu 20.04 host
Run the beneath commands to allow udp port 161 in the firewall,
$ sudo ufw allow 161/udp
$ sudo ufw reload
For CentOS 8 host
For CentOS 8 client and the Cacti server that also runs on CentOS 8, invoke the following commands:
$ sudo firewall-cmd --add-port=161/udp --zone=public --permanent
$ sudo firewall-cmd --reload
Head over to the Cacti server and run the commands shown to confirm that snmp is shipping metrics from the remote clients.
$ sudo snmpwalk -v 1 -c public -O e IP_address# Ubuntu
$ sudo snmpwalk -v 2c -c public -O e IP_address # CentOS
This confirms that the Cacti server is receiving system metrics from the remote Linux systems.
Adding remote Linux host to Cacti
To log in into the Cacti monitoring tool, access the URL:
http://your.ip.add.ress/cacti
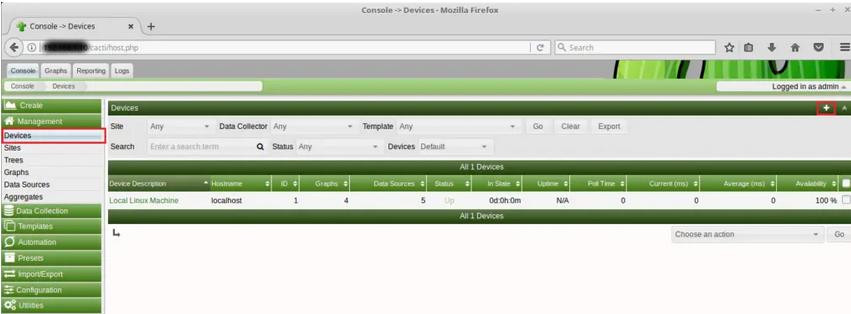
This is the section where you have to add your remote Linux hosts. So, log in to the Cacti server and click on ‘Create devices’. We can also add device from the Management >> Devices >> + Sign .

Once the device is added, click on “Create Graphs for this Host” link at the top right on the same page to create graphs. Select the templates depending on the requirements. For network interfaces, select a graph type as In/Out Bits with Total Bandwidth and then click on Create.
[Need any further assistance to add Linux host to Cacti – We’re available 24*7]
Conclusion
In short, Cacti is a network monitoring device that creates personalized graphs of server efficiency. Today, we saw how our Support Engineers add a Linux host to Cacti


0 Comments