FreePBX in the Google Cloud is a web-based open source GUI for controlling and managing Asterisk, an open source IP PBX server.
As part of our Google cloud Platform services, Bobcares responds to all inquiries, no matter how big or small.
Let’s look at how our Support team explained how to set up FreePBX Server in more detail.
FreePBX in Google Cloud
The GNU General Public License (GPL), an open source licence, governs FreePBX hosting. This is a self-hosted FreePBX Distro that includes the system OS (Ubuntu), Asterisk, the FreePBX GUI, and various dependencies.
Setup FreePBX
The following configuration changes are required to get started. All commands must be executed as root. To switch to the root user, run the following command:
sudo -iCopy CodeStep 1: Connect FreePBX to a MySQL database.
Enter the following into the terminal after copying and pasting it.
cat <<EOF > /etc/odbcinst.ini
[MySQL]
Description = ODBC for MySQL (MariaDB)
Driver = /usr/local/lib/libmaodbc.so
FileUsage = 1
EOFCopy Code
Then, enter the following into the terminal after copying and pasting it.
cat <<EOF > /etc/odbc.ini
[MySQL-asteriskcdrdb]
Description = MySQL connection to 'asteriskcdrdb' database
Driver = MySQL
Server = localhost
Database = asteriskcdrdb
Port = 3306
Socket = /var/run/mysqld/mysqld.sock
EOFCopy Code
Step 2: Launch the FreePBX Server
- Firstly, change directory to /usr/src
cd /usr/srcCopy Code - Then, download the FreePBX
wget http://mirror.freepbx.org/modules/packages/freepbx/freepbx-15.0-latest.tgzCopy Code - Compress the downloaded file.
tar vxfz freepbx-15.0-latest.tgzCopy Code - Then, remove the folder
rm -f freepbx-15.0-latest.tgzCopy Code - Create the configuration file
touch /etc/asterisk/{modules,cdr}.confCopy Code - Then, go to the freepbx directory
cd freepbxCopy Code - Run the following command
./start_asterisk startCopy Code - Finally, complete the installation.
./install -nCopy Code
If everything went well, we should see the following message.

Step 3: Create SMTP Alerts in FreePBX (Postfix)
We must then install Postfix in order to configure our email alerts. Before we can install any packages, we must first remove any apt locks. Under the root account, run the following commands.
rm /var/lib/dpkg/lock*Copy Coderm /var/cache/apt/archives/lockCopy Coderm /var/lib/apt/lists/lockCopy CodeFinally, run the following command to install Postfix.
apt-get install postfix -yCopy CodeStep 4: Go to the FreePBX Admin GUI Console.
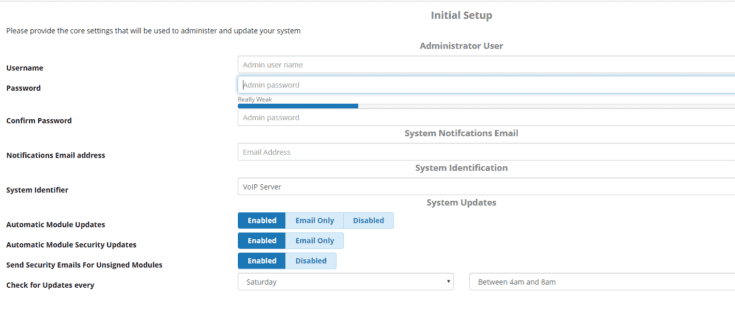
We are now ready to login after configuring the above. Paste the IP address of our VM into the browser (use http instead of https if the login page fails to load) and we should see the Admin GUI. To login, create a new admin account.

Step 5: Upgrade the FreePBX and Asterisk modules.
After we’ve logged in, we’ll need to do the following:
- When the loading is complete, click Apply Config in the top right corner.
- Then go to the Admin menu and select Module Admin.
- Click the Check online button.
- Then, select Download all
- Then click Process.
- Click Confirm at the bottom.
- Then, click the Return
- Finally, in the top right corner, click Apply Config.
[Looking for a solution to another query? We are just a click away.]
Conclusion
To sum up, our Support team walks us through the process of setting up FreePBX Server in greater depth.
PREVENT YOUR SERVER FROM CRASHING!
Never again lose customers to poor server speed! Let us help you.
Our server experts will monitor & maintain your server 24/7 so that it remains lightning fast and secure.


0 Comments