


Access files on DigitalOcean Droplet with the help of FileZilla. Our Support Team offers you an easy tutorial to upload and download files from your Droplets.
Take your time to learn all about downloading, installing, and configuring FileZilla to access your files from your Droplets. Bobcares has your back.
Accessing files on DigitalOcean Droplet
Accessing files on DigitialOcean Droplets has been made easy with this easy-to-understand tutorial by our Support Team. In fact, recently, one of our customers who had deployed Odoo 14 on their Droplet, required access to folders and files in the Odoo 14 package. Fortunately, our Support Engineers whipped up a quick solution just in time. They did this via SFTP with the help of an FTP client, FileZilla.
What are DigitalOcean Droplets?
Before we delve into accessing files, let’s take a quick look at what are DigitalOcean Droplet. Well, they are Linux-based virtual machines, also known as VMs. Furthermore, they run on virtualized hardware.
When you create a new Droplet, you wind up creating a new server that is either part of a larger, cloud-based infrastructure or a standalone.
Transferring files to Droplet
Transferring file to a Droplet from a local machine can be done through file transfer clients and a variety of protocols. Our Engineers recommend using SFTP with FileZilla since it is a free, open-source, and also cross-platform tool.
Moreover, its user-interface supports new users easily. If you do not have a problem using the command-line interface, you can also use tools like OpenSSH’s scp, and sftp, rsync and so on. For security reasons, our Support Team recommends using SSH keys with SFTP.
The process behind accessing files on DigitalOcean
- Installing FileZilla
- Configuring FileZilla
- Transferring files with FileZilla
Installing FileZilla
Let’s start out by downloading and installing FileZilla on our machine. You have to choose the version that is compatible with your operating system.
If you are running a Debian-based Linux distribution, you can also install FileZilla via the APT package manager.
sudo apt-get update
sudo apt-get install filezilla
Configuring FileZilla
Once we have installed FileZilla, the next step is to configure it. In other words, ensuring that it connects to the Droplet.
- First, open FileZilla and go to Settings in the Edit menu.
- Then, click SFTP in the Connection section.

- After that, we will add the private SSH key by locating our Droplet’s private SSH key after clicking Add Key file.
- If you are prompted to convert the file to a supported file, our Engineers recommend clicking Yes.
- Then, navigate to the File menu and select Site Manager. The Site Manager allows you to remove, add as well as manage servers and devices that you want to be connected via FileZilla.
- After that, select New Site and enter the Droplet’s name. Remember to select SFTP in the protocol field. Furthermore, the following information has to be entered:
- Host: The Droplet’s IP address
- Port: The name of the port used to connect to the Droplet.
- Logon Type: Choose Interactive
- User: The username used to connect to the Droplet(default user is root)
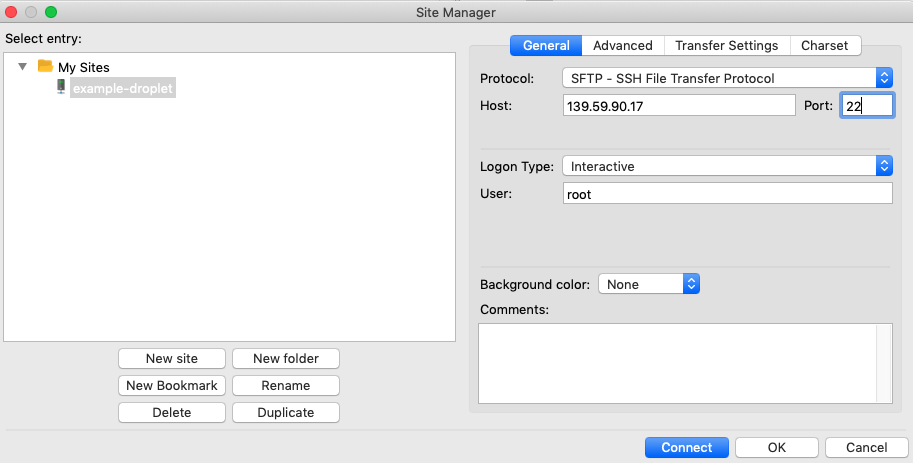
Then, click Connect and you will notice that status of the connection is displayed in the status field.
Sometimes you may face a “Disconnected: No supported authentication methods available (server sent: publickey” error. This often occurs when the Droplet is not able to locate the correct private SSH key file.
Transferring files with FileZilla
After you have connected to the Droplet, it is time to navigate through the directories in the local machine via the Local Site windows. Once you locate the file you want to transfer to Droplet, right-click it and choose Upload.
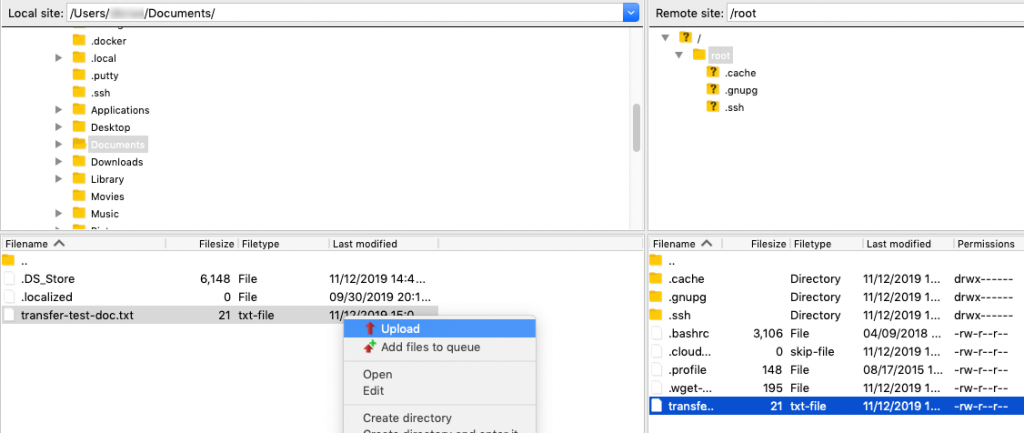
You can also transfer files to the local machine from the Droplet with the Remote Site windows. Once you locate the file, right-click it and click Download.
As you can see, accessing files on DigitalOcean is an easy job with the help of an FTP client like FileZilla.
[Need help with your Droplet? We are just a click away.]
Conclusion
This tutorial dealt with installing and configuring FileZilla in order to access files on DigitalOcean. The Support Team at Bobcares made the entire process easy with a step-by-step tutorial.
PREVENT YOUR SERVER FROM CRASHING!
Never again lose customers to poor server speed! Let us help you.
Our server experts will monitor & maintain your server 24/7 so that it remains lightning fast and secure.


0 Comments