To enable advanced Wordfence protection on an OpenLiteSpeed server, we need to install the Wordfence plugin on the WordPress site and configure the server to use the Web Application Firewall (WAF) effectively. Bobcares, as a part of our WordPress Support Service offers solutions to every query that comes our way.
Overview
- What is meant by Advanced Wordfence Protection?
- Key Features of the Protection
- How to Enable Advanced Wordfence Protection on OpenLiteSpeed?
What is meant by Advanced Wordfence Protection?
Protecting the security of the WordPress site is critical, especially with the growing complexity of cyber threats. Advanced Wordfence protection, specifically created for WordPress, provides a complete set of security features aimed at protecting the site from a variety of attacks. We can join it with OpenLiteSpeed web server to enable strong protection without affecting performance.
Key Features of the Protection
- The WAF allows us to put strict limits on site resource usage by web crawlers, bots, and scripts.
- Premium users get automatic blocking of IP addresses that are engaged in complex attacks, not just brute force login tries.
- WordFence’s Threat Defense Feed is regularly updated with the most recent firewall rules, malware signatures, and malicious IP addresses, protecting against new exploits as they emerge.
- The Premium version enables us to block access to the WordPress login page or the full site from particular countries. This is useful if we only get genuine traffic from specific regions.
How to Enable Advanced Wordfence Protection on OpenLiteSpeed?
1. Log in to the WordPress admin dashboard and log in with the credentials.
2. Go to Plugins > Add New.
3. In the search bar, type “Wordfence” and select the plugin.
4. Click “Install Now,” then “Activate.”
5. Enter the email for alerts and agree to the terms.
6. Enter the premium key if we have one; otherwise, use the free version.
Now, to set up Wordfence for Advanced Protection on OpenLiteSpeed, edit Vhost Configuration for Wordfence.
7. Open the WebAdmin Console at https://:7080.
8. Go to Vhost Configuration > General.
9. Add the line php_value auto_prepend_file /home/example.com/public_html/wordfence-waf.php in the php.ini overwrite section, replacing the path with the actual path to the wordfence-waf.php file.
10. Restart OpenLiteSpeed using systemctl restart lsws or through the WebAdmin interface.
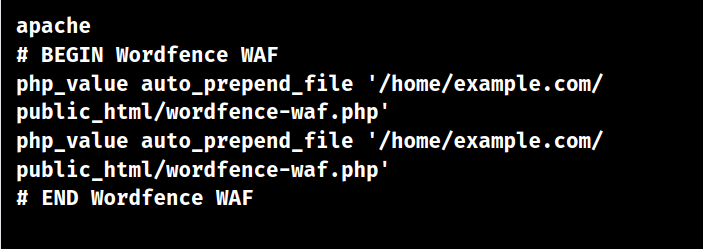
11. Open the .htaccess file in the WordPress site’s root directory.
12. Add the following lines:

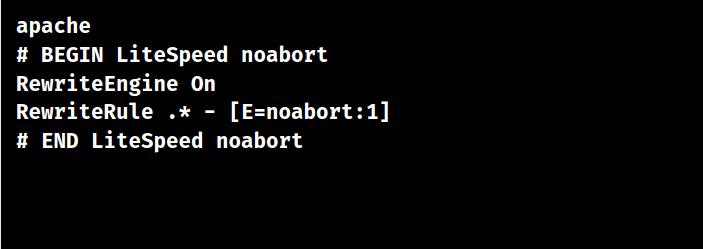
13. To prevent LiteSpeed from Aborting Wordfence Scans, include the following code to the .htaccess file:

14. Log Back into the WordPress admin dashboard.
15. Go to the Wordfence settings page.
16. Ensure the Firewall Protection Level is set to Extended Protection.
[Want to learn more? Reach out to us if you have any further questions.]
Conclusion
The Advanced Wordfence Protection provides a powerful Web Application Firewall, real-time IP blocking and threat intelligence, country blocking, and premium support. To conclude, the article went over the details from our Support team on enabling Advanced Wordfence Protection in OpenLiteSpeed.


0 Comments