Let us take a closer look at the ERPNext Digitalocean with the support of our Digital ocean-managed services at Bobcares.
What is ERPNext and why set it up on Digitalocean?
ERPNext is a set of Enterprise Resource Planning (ERP) applications that take use of the power and flexibility of open-source technology.
It excels at handling fundamental business activities such as finance, sales, human resources, manufacturing, purchasing, services, and helpdesk requirements, among others.
Among the advantages of installing a system such as ERPNext or Digitalocean are:
- Increased productivity through automating routine business procedures.
- Better IT productivity by sharing a database among all company departments.
- Better decision-making as a result of an integrated view of how business divisions interact with one another.
ERPNext is built on Frappe, a Python-based full-stack online application framework that takes full use of the Node/JavaScript runtime environment and employs MariaDB as its database backend.
The bench command-line utility is one of the numerous benefits of Frappe-based systems such as ERPNext.
By automating activities like installing, upgrading, setting, and administering many Frappe/ERPNext sites, the bench CLI saves administrators time.
Configuring Locales for ERPNext Digitalocean setup
It is strongly advised that we configure the keyboard mapping for the console, as well as the language and character encoding on your host.
This is necessary to avoid any problems during the ERPNext 12 setup process.
Please keep in mind that this setting has nothing to do with the UI language on the real ERPNext platform, but rather with the system locale setup.
- Firstly we have to update the server, type in the following command line:
sudo apt update - After that, we have to set up the configure keymap, language, and character encoding. To do this type in the following:

- Ubuntu 20.04 and other Linux editions employ the localectl software to control and alter system-wide locale and keyboard layout settings before the user signs in, which is exactly what ERPNext 12 wants.
The following lines must also be added to the /etc/environment file. To open the file, use Nano or any text editor:
sudo nano /etc/environment - After this process we have to add the following lines:

- Finally, save and close the file. We have to reboot the server to apply all of the changes:
sudo rebootWe have to give the server some time to reboot. After that we have to use the SSH to reenter the instance. Now aftet this step we are ready to install the database.
Install the MariaDB
This is the next step to set up the ERPNext on Digitalocean.
Follow the steps given below to set this up:
- Use the following command line to install the MariaDB:
sudo apt install mariadb-server - Install the following packages after installing mariadb-server:

- ERPNext 12 is a Python program, hence database administration is handled via the python3-mysqldb package.
Certain MariaDB developer features need the use of libmysqlclient-dev.
- Then, execute the mysql_secure_installation script to provide an extra layer of protection to the MariaDB server:
sudo mysql_secure_installationMariaDB will begin running in its default settings when the mysql_secure_installation procedure is completed.
For all database activities, the typical ERPNext installation use MariaDB’s root user.
While this strategy is easy for single server configurations, it is not regarded a sound security practice.
Creating a MariaDB Super Admin User
Now we have to head to the next major step to set up the ERPNext on Digitalocean.
ERPNext expects to manage database connections using MariaDB’s root user, although this is not always desirable.
To get around this constraint and allow a non-root user to handle MariaDB, we’ll construct a database named after the user.
The new user will then be given unique permissions to control ERPNext database activities.
- Firstly, launch the MariaDB prompt:
sudo mysql - Now, establish a new database with the same name as the user we wish to use for MariaDB connections.
CREATE DATABASE abc;
- Create the MariaDB user abc with root-like rights, and then give the user a strong password. Keep the password somewhere safe; we’ll need it later:

- After that to apply all changes, flush privileges:
FLUSH PRIVILEGES; - After finishing it we have to exit the seciton by typing in :
exit
We simply need to fine-tune MariaDB now that we’ve set up a database user to assure correct ERPNext 12 functionality.
Fortunately, the ERPNext team has created an outstanding configuration template that we will utilize to begin the deployment.
Configuring MariaDB for ERPNext
Now we have to move on to set up the ERPNext for setting up with MariaDB as the next step to setup theerpnext with digitalocean.
It’s time to fine-tune MariaDB for ERPNext connections now that it’s been installed and protected.
Follow the steps given below to set this up:
- Firstly we have to stop the mariadb.service:
sudo systemctl stop mariadb - Then, using any text editor, we must create a MariaDB configuration file named mariadb.cnf:
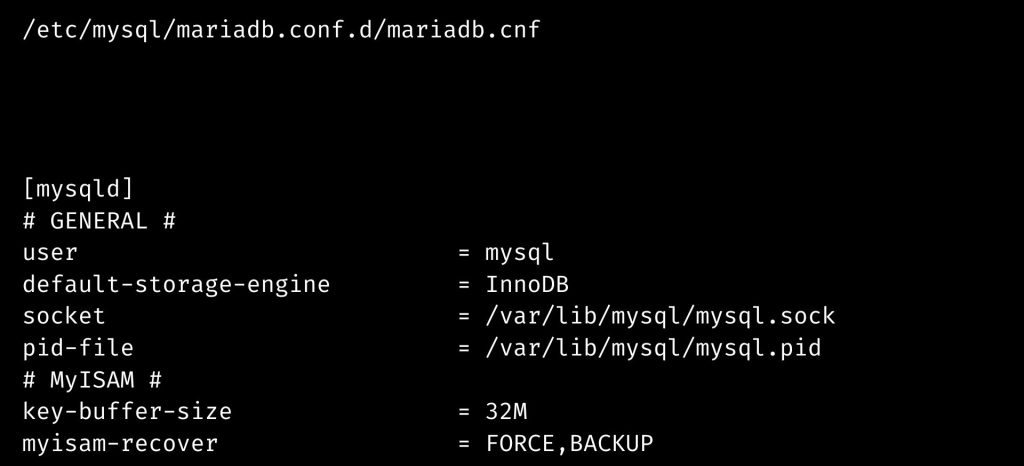
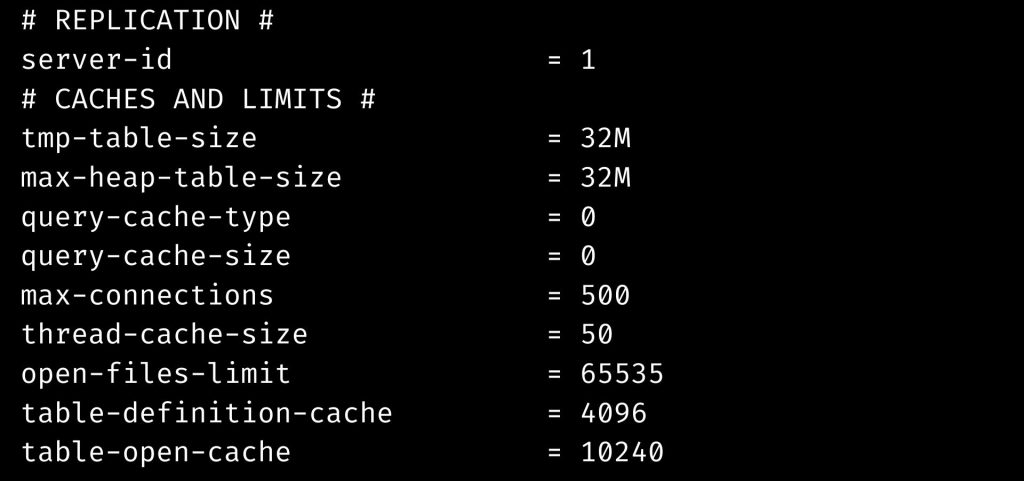
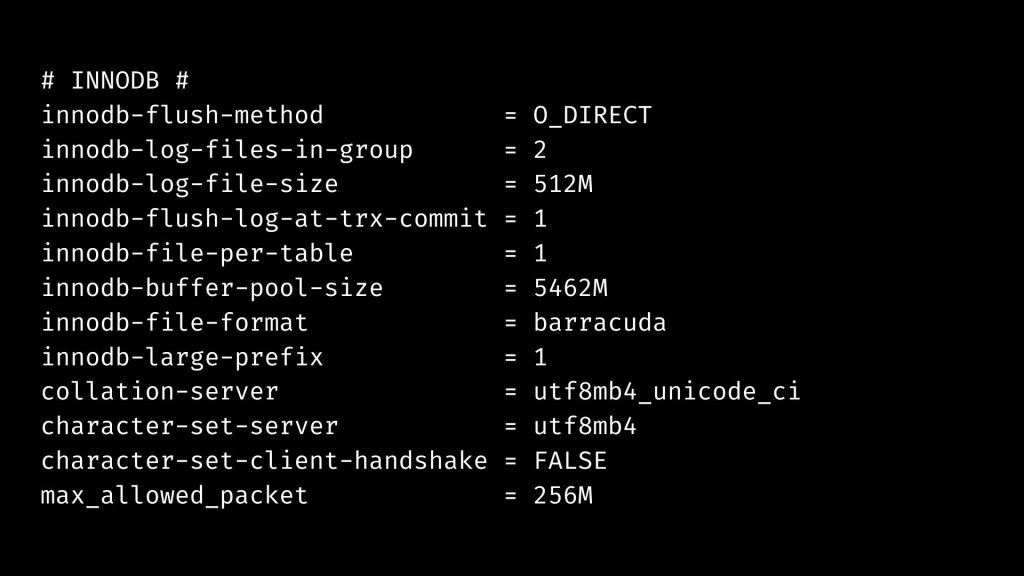
sudo nano /etc/mysql/mariadb.conf.d/mariadb.cnf - Now, add the official ERPNext setup template:


Finally, save and close the file to finish the process.
The configuration file, /etc/mysql/mariadb.conf.d/mariadb.cnf, supplements and overrides a few settings in the default MariaDB configuration, which is available at /etc/mysql/my.cnf.
This file contains a curated template that significantly improves ERPNext database speed.
Testing the MariaDB Connection
As practically all of ERPNext’s internal processes rely on the database connection, it is a good idea to test the connection before proceeding.
- Firstly we have to start the mariadb.service by typing in the following command line:

- The following command can be used to test the connection. Replace sammy and mariadb_password with the following credentials:

Now that the database backend is complete, you can proceed with configuring the ERPNext web application.
Install and setup components necessary for ERPNext 12
In this part, we’ll go through how to install and configure all of the components necessary by ERPNext 12, as well as how to install the program itself.
Begin by installing all of the system packages necessary by ERPNext 12.
Use the following command to install system-wide dependencies:

To eliminate Postfix prompts, the DEBIAN_FRONTEND=noninteractive setting was supplied to the installation command.
After that, update pip3, Python’s main package manager, and install the most recent versions of three more Python modules:

Installing the ERPNext 12 Web Application
We will now create a Frappe-based site and install the ERPNext 12 application on it. Navigate to the directory where Frappe was created.
cd /home/sammy/frappe-benchBefore we can proceed, we must install special versions of the Python libraries numpy and pandas into the Frappe virtual environment.
Use the following command to install these packages:

At this moment, the installation may pause for 10 to 20 minutes while showing the following message:

This is due to an issue with pandas and Ubuntu 20.04, which is still relatively new at the time of writing.
Regardless, the packages will build, and when they are finished, we will see something like this:

We may now proceed with the installation. Using the bench CLI, get ERPNext 12 from its repository:
bench get-app erpnext https://github.com/frappe/erpnext --branch version-12Create a new site, substituting your_domain with the domain we’ve assigned to this server’s IP:

Install the ERPNext program on the site after that:
bench --site your_domain install-app erpnextWe will have a functional ERPNext 12 program after the installation is complete. Let’s put it to the test using a bench command:
bench startThe preceding command will launch a real-time monitoring console that will display different messages about the webserver and other services.
Open a web browser and go to localhost:8000 (for local installations) or your_domain:8000 (for distant installations).
We will see the ERPNext login screen (we will continue with login and configuration in a later phase, after our site is ready for production).
Return to the console and hit CTRL+C after accessing the test deployment. This will terminate ERPNext and close the monitoring console.
[Need assistance with similar queries? We are here to help]
Conclusion
To sum up we have now seen how to set up the ERPNext on digitalocean with the support of our tech support team.
PREVENT YOUR SERVER FROM CRASHING!
Never again lose customers to poor server speed! Let us help you.
Our server experts will monitor & maintain your server 24/7 so that it remains lightning fast and secure.


0 Comments