Learn how to handle errors with Laravel’s MessageBag. Our Laravel Support team is here to help you with your questions and concerns.
Understanding Laravel’s MessageBag: A Guide for Handling Errors
Did you know that managing error messages effectively is crucial for both developers and users when building web applications with Laravel?
Laravel’s MessageBag is a tool designed to store and manage error messages. Hence, it makes it easier to handle various error scenarios gracefully. Let’s dive into what a MessageBag is and how we can use it in your Laravel applications.
An Overview:
- What is a MessageBag?
- Common Scenarios for Using MessageBag
- How to Add Errors to the MessageBag
- 1. Via the withErrors Method
- 2. Manually Creating and Adding Errors
- 3. Via Session for Flash Messages
- How to Access Errors in Views
- Handling Custom Error Scenarios
- Best Practices for Using MessageBag
- Advanced Techniques
- Tips for Effective Error Management
What is a MessageBag?
In Laravel, the MessageBag is a container specifically designed to store error messages. While it’s most commonly used for handling validation errors, we can also use it to manage custom and external error messages.
Common Scenarios for Using MessageBag
- Laravel’s built-in validator automatically populates the `$errors` object with validation errors when a request doesn’t meet specified criteria.
- Sometimes, we may need to add custom error messages based on specific conditions or business logic.
- Also, when integrating with external services, we may receive error messages that need to be added to the MessageBag for consistency and easy access.
How to Add Errors to the MessageBag
1. Via the withErrors Method
When validating requests in controllers or form requests, we often use the `withErrors` method to redirect back with validation errors. So, this method automatically populates the MessageBag with errors. Here’s how we can use it:
use Illuminate\Support\Facades\Validator;

public function store(Request $request)

{

$validator = Validator::make($request->all(), [

'name' => 'required|max:255',

'email' => 'required|email',

]);

if ($validator->fails()) {

return redirect('form')

->withErrors($validator)

->withInput();

}

// Process the valid data...

}
2. Manually Creating and Adding Errors
If we need to manually create and add errors to a MessageBag, we have to create an instance of MessageBag and use its methods:
use Illuminate\Support\MessageBag;

// Create a new MessageBag instance

$errors = new MessageBag();

// Add a single error

$errors->add('field_name', 'The field_name is required.');

// Add multiple errors

$errors->add('field_name', 'The field_name must be at least 5 characters.');

$errors->add('email', 'The email must be a valid email address.');

// Merge multiple errors at once

$errors->merge([

'field_name' => ['The field_name is required.'],

'email' => ['The email must be a valid email address.']

]);

// Pass the errors to the view or use them as needed

return view('form', ['errors' => $errors]);
3. Via Session for Flash Messages
To persist errors across redirects, we can use Laravel’s session flash data. So, this is useful for maintaining error messages between requests:
use Illuminate\Support\Facades\Session;

$errors = new MessageBag();

$errors->add('field_name', 'The field_name is required.');

// Flash errors to the session

Session::flash('errors', $errors);

// Redirect with flash data

return redirect()->back();
How to Access Errors in Views
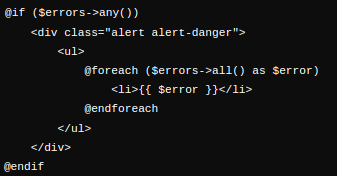
Once errors are passed to a view, we can display them using Blade templates. Here’s a simple example of how to display errors:

Handling Custom Error Scenarios
While Laravel offers excellent tools for validation errors, there are times when we need to handle custom error scenarios:
- When building APIs, you can use MessageBag to structure error responses consistently.
- Also, capture errors from business rules that don’t fit into traditional validation.
Best Practices for Using MessageBag
- Maintain a consistent format for all error messages to make them easy to parse and understand.
- Furthermore, use Laravel’s localization features to manage error messages in multiple languages.
- Also, use a centralized place to handle common errors across the application to avoid duplication.
- Ensure that critical errors are logged using Laravel’s logging capabilities for easier debugging.
Advanced Techniques
- Learn how to capture and display errors from third-party services by integrating their error messages into the MessageBag.
- Also, implement Laravel broadcasting to send real-time error notifications to the user interface.
Tips for Effective Error Management
- Implement custom validation rules for complex business logic.
- Additionally, use validation hooks like after to add custom logic after validation.
- Use middleware to handle errors globally, ensuring consistent error responses across the application.
- Also, create custom middleware for handling specific error scenarios, improving modularity and reusability.
- Then, write unit tests to verify that the error handling logic works as expected.
- Additionally, ensure that error messages are displayed correctly in the user interface through integration testing.
[Need assistance with a different issue? Our team is available 24/7.]
Conclusion
Understanding and effectively using Laravel’s MessageBag can enhance the way we handle error messages in our applications. So, whether we are dealing with validation errors, custom logic, or external services, the MessageBag offers a flexible and consistent approach to managing errors, ensuring a smoother experience for both developers and users.
In brief, our Support Experts demonstrated how to handle errors with Laravel’s MessageBa.


0 Comments