RDP file transfer can be done by opening and configuring the program and then accessing the files.
Here at Bobcares, we have seen several such Windows-related queries as part of our Server Management Services for web hosts and online service providers.
Today we’ll take a look at how to transfer files to Windows Server.
RDP File transfer process in Windows Server
It might be a hectic process for you to transfer files to your new Windows Server when you are first setting up everything. Now let’s take a look at how our Support Engineers transfer the files through Remote Desktop Connection.
1. Open the Program
First, we click on the ‘Start’ button and search for “Remote Desktop Connection” and a computer with green arrows should come up. This is the program that we will be using.

2. Configuring the Program
Below are the steps that we follow to configure the program to redirect the local workstation’s C drive.
- First, we input the server’s IP address in the “Computer” field
- Next, we select the “Local Resources” tab
- After that, we select the “More” button
- Then we expand the “Drives” section
- Here, we select the “Local Disk C:” (and any other drives)
- Finally, we click “Connect”
3. Accessing the Files
Once we are connected to the server, we follow the steps below to access the files.
- First, we log into the server using the new settings
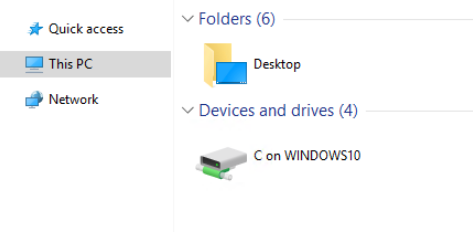
- Next, we open “File Explorer”
- After that, we select “This PC” or “Computer”
- Then we double-click “C on [Your Local Workstation]”

Now, all the files will be on the local workstation. However, there is a file size limitation of 2 GB when transferring files through this method. Additionally, transfer speeds may be a little slower.
Moreover, we can make use of Plesk to set up FTP which can then be used to transfer large files.
[Need any further assistance RDP queries? – We are here to help you]
Conclusion
Today, we saw how our Support Engineers transfer files in Windows.


0 Comments