Here is a handy guide to help you out with setting up cPanel on Virtualizor. Our Virtualizor Support team is here to lend a hand with your queries and issues.
A Guide to Setting up cPanel on Virtualizor
cPanel and WHM are two key parts of the cPanel server management interface. cPanel offers several features, making it an ideal solution for VPS hosting.
Did you know that the Virtualizor permits end users to install Control Panel on the VPS directly?
However, before we begin, ensure that the Control panel option is enabled under Configuration in the Admin panel.
Today, our experts are going to take us through setting up cPanel on Virtualizor with these steps:
- First, we have to log in to the Virtualizor.
- Next, head to List VPS in the side menu.
- Then, select the VPS that we want to install cPanel on.
- After that, verify the server details by taking a look at the VPS information.
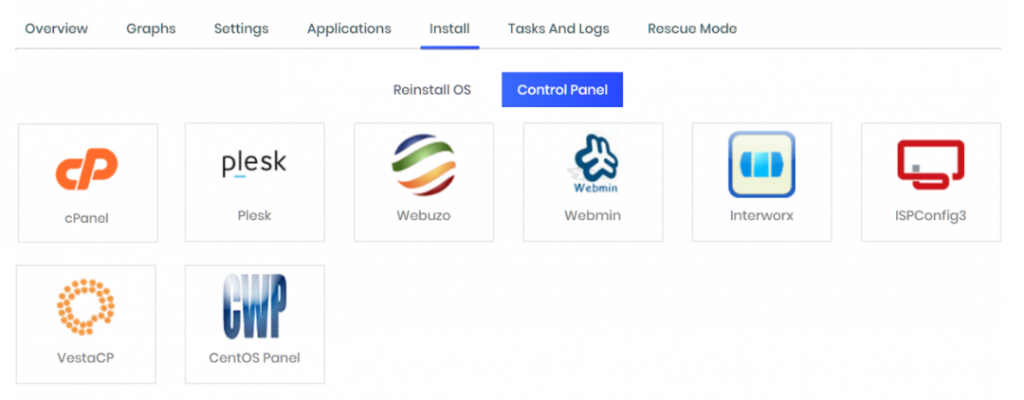
- Next, head to the Install tab and choose cPanel from the Control Panels menu as seen below.

- Then, click Ok to start installing cPanel on Virtualizor.
- Before the installation begins, we have to shut down the VPS by clicking the STOP icon.
After the VPS is shut down, restart it by clicking the PLAY icon. After the VPS boots, the installation will begin.
- After installation, we will receive an email that includes the control panel installation details.
At this point, we will be able to head to the WHM login screen and configure the settings.
[Need assistance with a different issue? Our team is available 24/7.]
Conclusion
To sum up, our Support Engineers demonstrated how to set up cPanel on Virtualizor.
PREVENT YOUR SERVER FROM CRASHING!
Never again lose customers to poor server speed! Let us help you.
Our server experts will monitor & maintain your server 24/7 so that it remains lightning fast and secure.


0 Comments