AWS EC2 instances are computing services that can be used to host web services and applications. These instances belong to an Amazon virtual cloud and they can be accessed with the help of IPs in your specified range.
In our role as Outsourced Tech Support for web hosting companies, we manage Amazon EC2 instances for our customers with two types of external IPs – Public IP and Elastic IP.
Today, we’ll see what is an EC2 Elastic IP, its benefits and how we manage them to ensure high uptime for our AWS customers.
[ Use your time to build your business. We’ll take care of your customers. Hire Our Hosting Support Specialists at $9.99/hr. ]
How Elastic IPs differ from public IPs
Every AWS user would have an AWS account and can launch EC2 instances under this account for various computing purposes. These instances can be accessed using public IP or elastic IP.
When a new EC2 instance is started, it will be automatically assigned a public IP to access that instance. This public IP address can be used to access the EC2 instance from outside.
Elastic IPs (EIPs) are static IPs allocated to a specific AWS account. They are public IPv4 addresses, that can be manually assigned to EC2 instances to access them from outside.
The public IP is a dynamic one and changes with every reboot. As a result, services in that instance that use DNS, can face downtime during this change in IP.
Whereas, the elastic IPs are static in nature and does not change with an instance restart. Their static nature makes EIPs a more preferable option for services in EC2 instances.
Benefits of using EC2 Elastic IPs
Many internet services require DNS. While using public IPs, it is very difficult to switch the DNS each time an IP change occurs, and it involves a downtime owing to the DNS propagation.
Here are some benefits of using elastic IPs, which prompts us to prefer them over public IPs for our customers’ EC2 instances.
- Static and public – Being static in nature, we use the Elastic IPs for public services that require static IPs – such as web server, dns or email server.
- Flexibility – As Elastic IPs are allotted to each AWS account and are not specific to an EC2 instance, we allocate an Elastic IP to any EC2 instance as and when a requirement arise.
- Load balancing – When one EC2 instance fails or gets overloaded with traffic, we allocate its associated EIP to another EC2 instance, by configuring a failover setup in the system. This helps us to ensure uninterrupted service for the users.
- Fail-over setup – Having multiple Elastic IPs for an AWS account enables us to quickly map a service from one IP to another, in case of issues such as IP blacklisting or IP changes.
- Uptime – With our load balancing and fail-over setup with the help of elastic IPs, we are able to prevent downtime in services that can happen due to maintenance or DNS propagation.
We’ve been able to prevent server incidents by up to 15% by using our proactive server checks (click here to see how we improve web hosting support).
Now we’ll see how we assign and manage Elastic IPs in our customers’ Amazon EC2 instances.
Coming up: How to allocate elastic IPs
1. Allocate a new Elastic IP
The Elastic IPs are specific to each user’s AWS account. Before you can start using an EIP, you need to add a new EIP to your Amazon account.
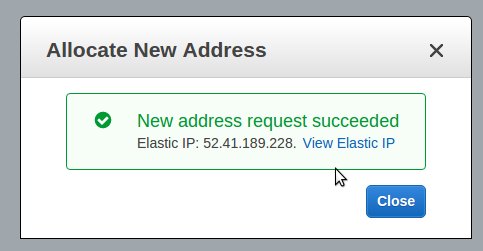
From the Amazon console, we select ‘Elastic IPs’ option and ‘Allocate New Address’. Now the Elastic IP is assigned to user’s AWS account and would be available for use in his EC2 instances.

Allocate a new Elastic IP in your Amazon account
2. Assign the IP address
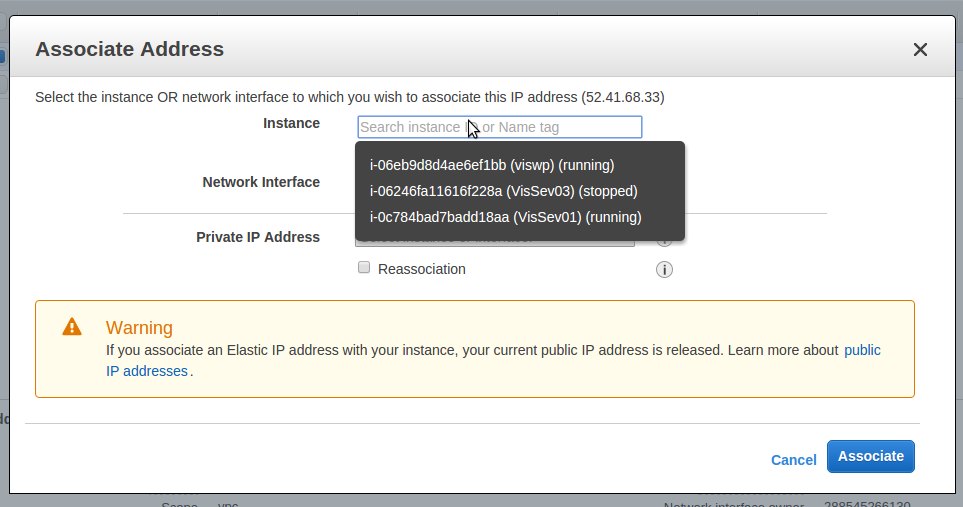
Once the Elastic IP is allocated, we assign this EIP to the EC2 instance that requires it. We can do this using the ‘Actions’ -> ‘Associate Address’ option for that IP.
We select the instance from the drop down and assign the Elastic IP address to that instance. Once the IP is assigned, we configure the corresponding web service to use it.

Elastic IP assignment to EC2 instance
For instances that have multiple services running in it, we assign multiple Elastic IPs to the same instance, with the help of private IPs. We have discussed this in another post.
[ Running a hosting business doesn’t have to be hard, or costly. Get world class Hosting Support Specialists at $9.99/hour (bulk discounts available) ]
3. Assign the DNS to the new Elastic IP
Once an Elastic IP is assigned to an EC2 instance, the public IP that was already there for that instance would be released and cannot be used for that instance.
After assigning the elastic IP, we access that EC2 instance using this IP. However, for the EC2 hostname to resolve to this EIP, we edit the DNS entries and do the appropriate changes.
Once the DNS settings are done, the services in the EC2 instances would be accessible to users publicly from the internet via the hostname or the IP address.
4. Reassign the Elastic IP to another instance
Since Amazon charges for unused Elastic IPs to prevent people from reserving IPs for future use, it is important to ensure proper utilization of these IPs.
Bobcares engineers avoid IP wastage with our efficient IP management process in AWS instances. For instance, we perform migrations of EC2 instances during upgrade or maintenance activities.
In such scenarios, we allocate the EIP that is no longer needed in the old instance, to the new instance. This helps us to ensure that the EIPs are not wasted or billed for non-usage.
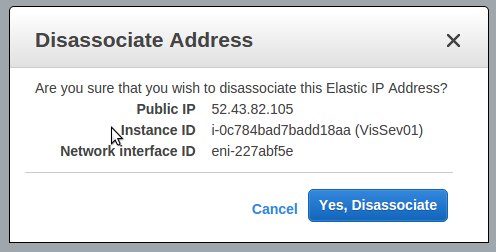
To reassign an Elastic IP to another instance, we first choose ‘Dissociate Address’ to remove it from the currently assigned instance. Then we associate it to the new instance, as discussed in section 2.

Dissociate the EIP from an EC2 instance
Coming up: How to release elastic IPs
5. Release the unused Elastic IP
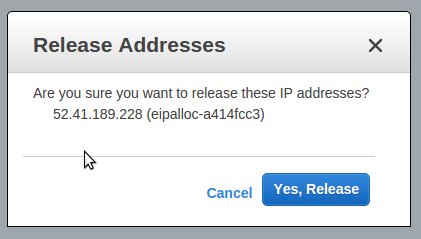
An unused Elastic IP will still remain in the EC2 instance or stay allocated to the customer’s Amazon account, until we ‘Release’ it from the account.
The Elastic IP that is no longer needed, should be first dissociated from the instance and then released. Amazon charges for unused EIPs, and hence this process helps us to save costs.

Release Elastic IP from EC2 instance
Automating EC2 elastic IP management
Here we saw how to allot, associate, dissociate and release Elastic IPs in AWS EC2 instances manually from the AWS console. But doing all these tasks manually via frontend is not viable in huge systems with multiple instances.
To make it easier for customers to manage large systems or failover setup in EC2 instances, we make use of command line tools such as ‘ec2-allocate-address’ to allocate IP, ‘ec2-associate-address’ to associate IP, and so on.
At Bobcares, we setup custom scripts using these commands to manage Elastic IPs among the different EC2 instances for our customers, to ensure high uptime and availability for their services.
[ You don’t have to lose your sleep to keep your customers happy. Our Hosting Support Specialists cover your servers and support your customers 24/7 at just $9.99/hour. ]
Setting up RDNS for EC2 elastic IP
Our expert technicians configure web, mail and other services in AWS EC2 instances. While configuring mail services, we take additional effort to prevent spamming from the servers.
Amazon sets a limit on the number of emails that can be sent from EC2 accounts. To prevent the outgoing mails from being tagged as spam, we configure anti-spam records such as RDNS.
By configuring reverse DNS lookup for the mail server IP, we prevent the IP from getting into spam blacklists. With our proactive monitoring and prompt administration, we also fix any IP blacklisting issue that may affect the EC2 instances.
A point to note..
Here we’ve discussed the use of Elastic IPs and how to assign, associate and release them in Amazon EC2 instances. There are two types of EC2 instances – EC2-Classic and EC2-VPC.
The behavior of EIPs in these two types varies, so it is important to look up the details before doing any IP updates. It is also possible to migrate the Elastic IPs between the two EC2 plans.
Our Dedicated Support Specialists routinely help AWS owners ensure seamless web services for their customers. If you’d like to know how you can better support your users, we’d be happy to talk to you.


0 Comments