Keycloak in digital ocean is an open source identity and access management tool, which allows us to add authentication to applications and secure services with minimum fuss.
Bobcares, as part of our DigitalOcean Managed Service, responds to all inquiries, big or small.
Let’s take a closer look at Digital Oceans Keycloak.
Keycloak in Digital Ocean
Keycloak is an open source identity and access management tool for modern applications and services that enables us to quickly add authentication to apps and secure services. There’s no need to store or authenticate users. It’s all there right out of the box. Advanced features such as User Federation, Identity Brokering, and Social Login will be available.
Benefits of Keycloak
- In the long run, we will save money. For 1.000 users, Auth0 costs 23 USD per month.
- Building our own solution is difficult and ineffective.
- In minutes, we can log in and register for a new service.
- Email verification is already included.
- 2FA is pre-installed.
- Only a few clicks separate us from social logins for sites like Facebook, Twitter, LinkedIn, Instagram, GitHub, and GitLab.
- Bring our own theme
- For multiple services, use as an SSO (Single Sign On) solution.
- Connect to LDAP or Active Directory services that already exist.
Deploy to DigitalOcean App Platform
DigitalOcean recently released DigitalOcean App Platform, a PaaS solution. Because we want to make authentication easier, it seems like a good idea to set up our own authentication server.
The container
Fortunately, Keycloak provides an optimised and ready-to-use container. It’s ‘keycloak-x’ and it’s fairly new.
Repository
Our apps are deployed directly from their respective git repositories by DigitalOcean App Platform. We can either provide a Dockerfile or use DO’s readily available environments. We can create an empty repository for this project on GitHub or GitLab since we already have a container. Here, we require only a simple Dockerfile in this repository:
FROM quay.io/keycloak/keycloak-x
Set up a database
We can set up a development database, create a new database in an existing database server, or start from scratch. Create a new database server using the DO account. We’ll use MySQL. Set up our cluster however we want. We’ll use the smallest configuration possible. Add a new database called keycloak and a new user named keycloak once our database server is up and running. For the next step, copy all credentials.
Set up the DigitalOcean App
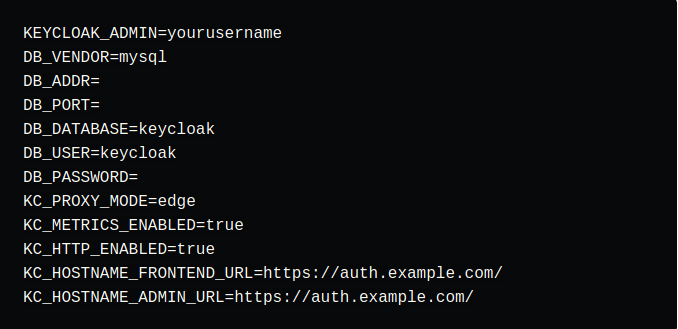
Start a new ‘app’ by pressing the big green ‘Create’ button. If we haven’t already, we should connect our GitHub or GitLab accounts. Click ‘next’ after selecting the repository from the list below. Proceed to the next step after selecting a name and a region. . The Digital ocean will detect Dockerfile. We want to use the following environment variables to deploy it as a Web Service:

Of course, we must provide the correct database connection information and create our own keycloak username and password. Because DO terminates the SSL connection, we’ve disabled https. Also, make sure the hostname urls have a trailing . The port is 8080, and TCP should work fine for health checks.
Configure our very own keycloak server
Our keycloak instance should be up and running at this point. I would suggest adding another domain to our DigitalOcean app’s settings. Simply ensure that our DNS servers are configured correctly and that KC HOSTNAME FRONTEND URL and KC HOSTNAME ADMIN URL match our generated or custom domain.
We can use the assigned or custom domain to access our installation. Simply use our admin credentials to log in.
[Looking for a solution to another query? We are just a click away.]
Conclusion
To sum up, Digital Oceans Keycloak was demonstrated by our Skilled engineers.
PREVENT YOUR SERVER FROM CRASHING!
Never again lose customers to poor server speed! Let us help you.
Our server experts will monitor & maintain your server 24/7 so that it remains lightning fast and secure.


0 Comments