We can use Boto3 in AWS Elasticsearch to interconnect the Python application, library, or script with AWS services. Bobcares, as a part of our AWS Support Services, offers solutions to every AWS query that comes our way.
How to use Boto3 in AWS Elasticsearch?
Boto3 is an AWS SDK for Python. In this article, we will use Boto3 to Connect an Ubuntu EC2 Instance to the AWS Elasticsearch Service. Let’s look into the steps to use Boto3 to connect an Ubuntu instance with Elasticsearch.
- Knowing AWS Account ID
- Elasticsearch Deployment
- IAM Role, Policy, and Trust Relationship Creation
- Connection establishment
Knowing AWS Account ID
We need the Account ID to set up the security on Elasticsearch. By clicking the Support in the AWS console, we can get the ID. Remember to note it down.
Elasticsearch Deployment
1. Firstly, type Elasticsearch into the AWS console search bar. Then click it.
2. Now click “Create a new domain.”
3. Choose the needed deployment type and version.
4. Provide a name to the domain and select the type of instance.
5. Click Next until we reach the step to “Configure access and security.”
6. Select Custom access policy under Domain access policy by scrolling down.
7. There will be three text boxes below the Domain access policy. Choose IAM ARN in the first box, then paste the Account ID in the second box, and then choose Allow in the third. Make certain we choose encryption.
8. Now click next until we reach the prompt to deploy the service. Then deploy the service.
9. The Elasticsearch endpoint will appear ready for use after around 10 minutes.
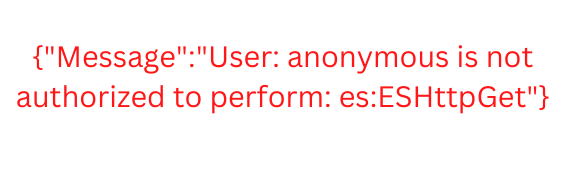
However, if we click the endpoint, we may see the below error:

To fix this error, let’s move to the next step.
IAM Role, Policy, and Trust Relationship Creation
1. IAM Policy creation:
- Type “IAM” into the AWS console search bar and then click it.
- Then choose “Policies” and Select JSON
- Paste in the following JSON:
{ "Version": "2012-10-17", "Statement": [ { "Action": [ "es:ESHttpDelete", "es:ESHttpGet", "es:ESHttpHead", "es:ESHttpPost", "es:ESHttpPut" ], "Effect": "Allow", "Resource": "*" } ] - Click Review policy, name the policy Can_CRUD_Elasticsearch.
- Click Create policy
2. IAM Role with attached Policy creation:
- Click “Roles” on the Dashboard.
- Choose EC2 under the common use case and AWS service for the trusted entity under Create Role.
- Attach the policy we prepared above on the second page of the Create Role form. We can do this by entering Can_CRUD_Elasticsearch into the search bar and then selecting the checkbox next to its name.
- This role grants EC2 instances (e.g. Ubuntu servers) access to Amazon services. So we can name it accordingly.
- Click Create role.
3. Trust Relationships: Now we’re at the IAM Role dashboard. Click the Trust Relationship tab and click Edit Trust Relationships. The following JSON should be copied and pasted into the “Policy Document” column.
{
"Version": "2012-10-17",
"Statement": [
{
"Effect": "Allow",
"Principal": {
"Service": "ec2.amazonaws.com",
"Service": "es.amazonaws.com"
},
"Action": "sts:AssumeRole"
}
]
}
Then click update trust relationship.
Connection establishment
1. Starting the EC2 instance: Click Launch a VM from the AWS Management Console, or enter EC2 in the search box and then click Launch Instance. Then choose an AMI instance and Instance Type. Also, set up the instance details. Then click “Review and Launch” and then launch it.
2. Setting up the instance: We should update the OS of the server due to security issues. Also, make sure to install Python.
3. VE creation: We can have multiple Python package versions on the same server without any issues due to VE.
ubuntu@ip-172-31-52-51:~$ sudo apt-get install python3-venv
Set up the VE, then activate it using a source.
ubuntu@ip-172-31-52-51:~$ python3 -m venv connect_to_es
ubuntu@ip-172-31-52-51:~$ source ./connect_to_es/bin/activate
(connect_to_es) ubuntu@ip-172-31-52-51:~$ cd connect_to_es/
(connect_to_es) ubuntu@ip-172-31-52-51:~/connect_to_es$
The name of the virtual environment appears in front of the prompt. This proves we turned on the VE. We need to install the following packages in the environment:
(connect_to_es) ubuntu@ip-172-31-52-51:~/connect_to_es$ pip install boto3 requests requests-aws4auth 'elasticsearch>=7.0.0,<8.0.0'
The installed packages are displayed on the screen after a pip freeze:
(connect_to_es) ubuntu@ip-172-31-52-51:~/connect_to_es$ pip freeze
boto3==1.13.21
botocore==1.16.21
certifi==2020.4.5.1
chardet==3.0.4
docutils==0.15.2
elasticsearch==7.7.1
idna==2.9
jmespath==0.10.0
pkg-resources==0.0.0
python-dateutil==2.8.1
requests==2.23.0
requests-aws4auth==0.9
s3transfer==0.3.3
six==1.15.0
urllib3==1.25.9
Now, without compromising the system security, we linked an Ubuntu server running in the cloud to the Elasticsearch service using Boto3.
[Searching for a solution to a different question? We are just a click away.]
Conclusion
To conclude, we provide a 4-step method to connect an Ubuntu EC2 instance with AWS Elasticsearch Service using the Boto3 software.
PREVENT YOUR SERVER FROM CRASHING!
Never again lose customers to poor server speed! Let us help you.
Our server experts will monitor & maintain your server 24/7 so that it remains lightning fast and secure.


0 Comments